Case Study
1. What is Reverb?
Reverb is an open-source, event-driven, asynchronous workflow engine that orchestrates the logic and infrastructure developers need to build complex background tasks. Users define tasks as multi-step functions in their repository, and Reverb handles triggering, executing, and retrying them step-by-step. The service is self-hosted on Amazon Web Services (AWS) and is deployable with one command using our CLI tool.
In this case study, we will discuss how we built Reverb and the technical challenges we encountered. But first, we need to explore why developers would benefit from using a workflow engine.
2. Asynchronous Workflows
2.1 The Request-Response Cycle
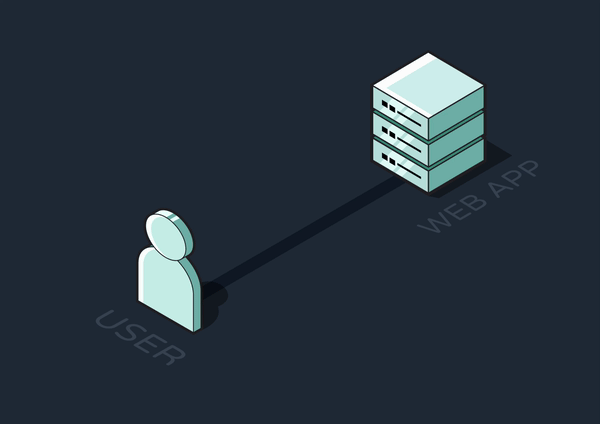
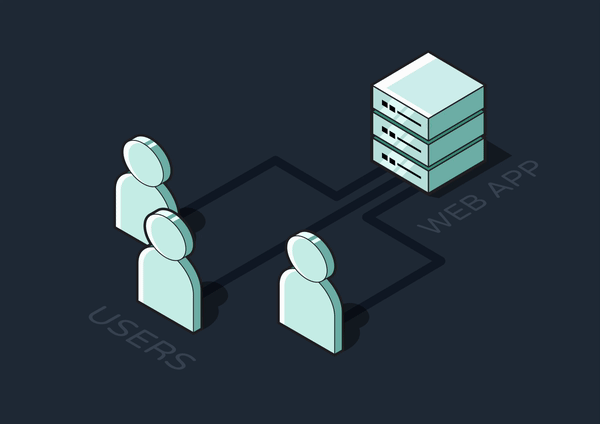
The request-response cycle is the basis for all web interactions. The client sends a request to retrieve data or perform an action, and the server processes this request and returns a response.

Any tasks the server completes between receiving a request and sending a response are said to be handled synchronously. For quick tasks that don’t require many resources, like simple database queries or calculations, synchronous execution makes sense since the user would barely notice any delay in the response.
2.2 Offloading Asynchronous Jobs
On the other hand, many tasks would be problematic to handle synchronously. For instance, consider a user signing up for a subscription service. Their initial sign-up should be synchronous because it must be confirmed before they can continue using the site. However, generating and sending a welcome email could take a few extra minutes. Executing this operation synchronously would be terrible for the user experience. There’s no reason to make them sit and wait on a long task that doesn’t need to run immediately.
Furthermore, having the API handle long or intensive operations would consume significant resources, leaving fewer available for responding to other requests. This could lead to longer response times and temporarily deadlock the server under high-traffic conditions.
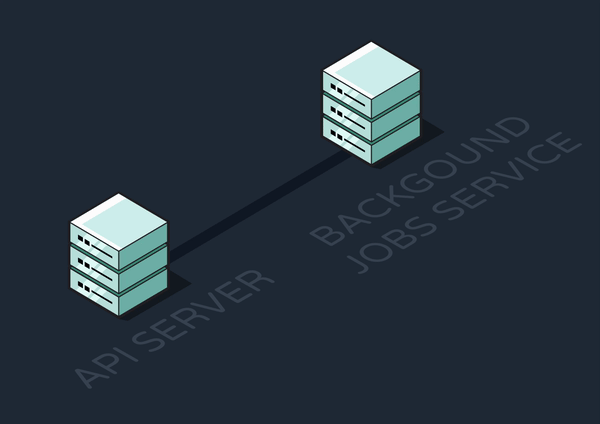
To solve these problems, time or resource-intensive jobs can be completed asynchronously, or outside of the primary request-response cycle. The client-facing API server can offload jobs to another service, freeing up the API to immediately send back responses and become available to new requests.
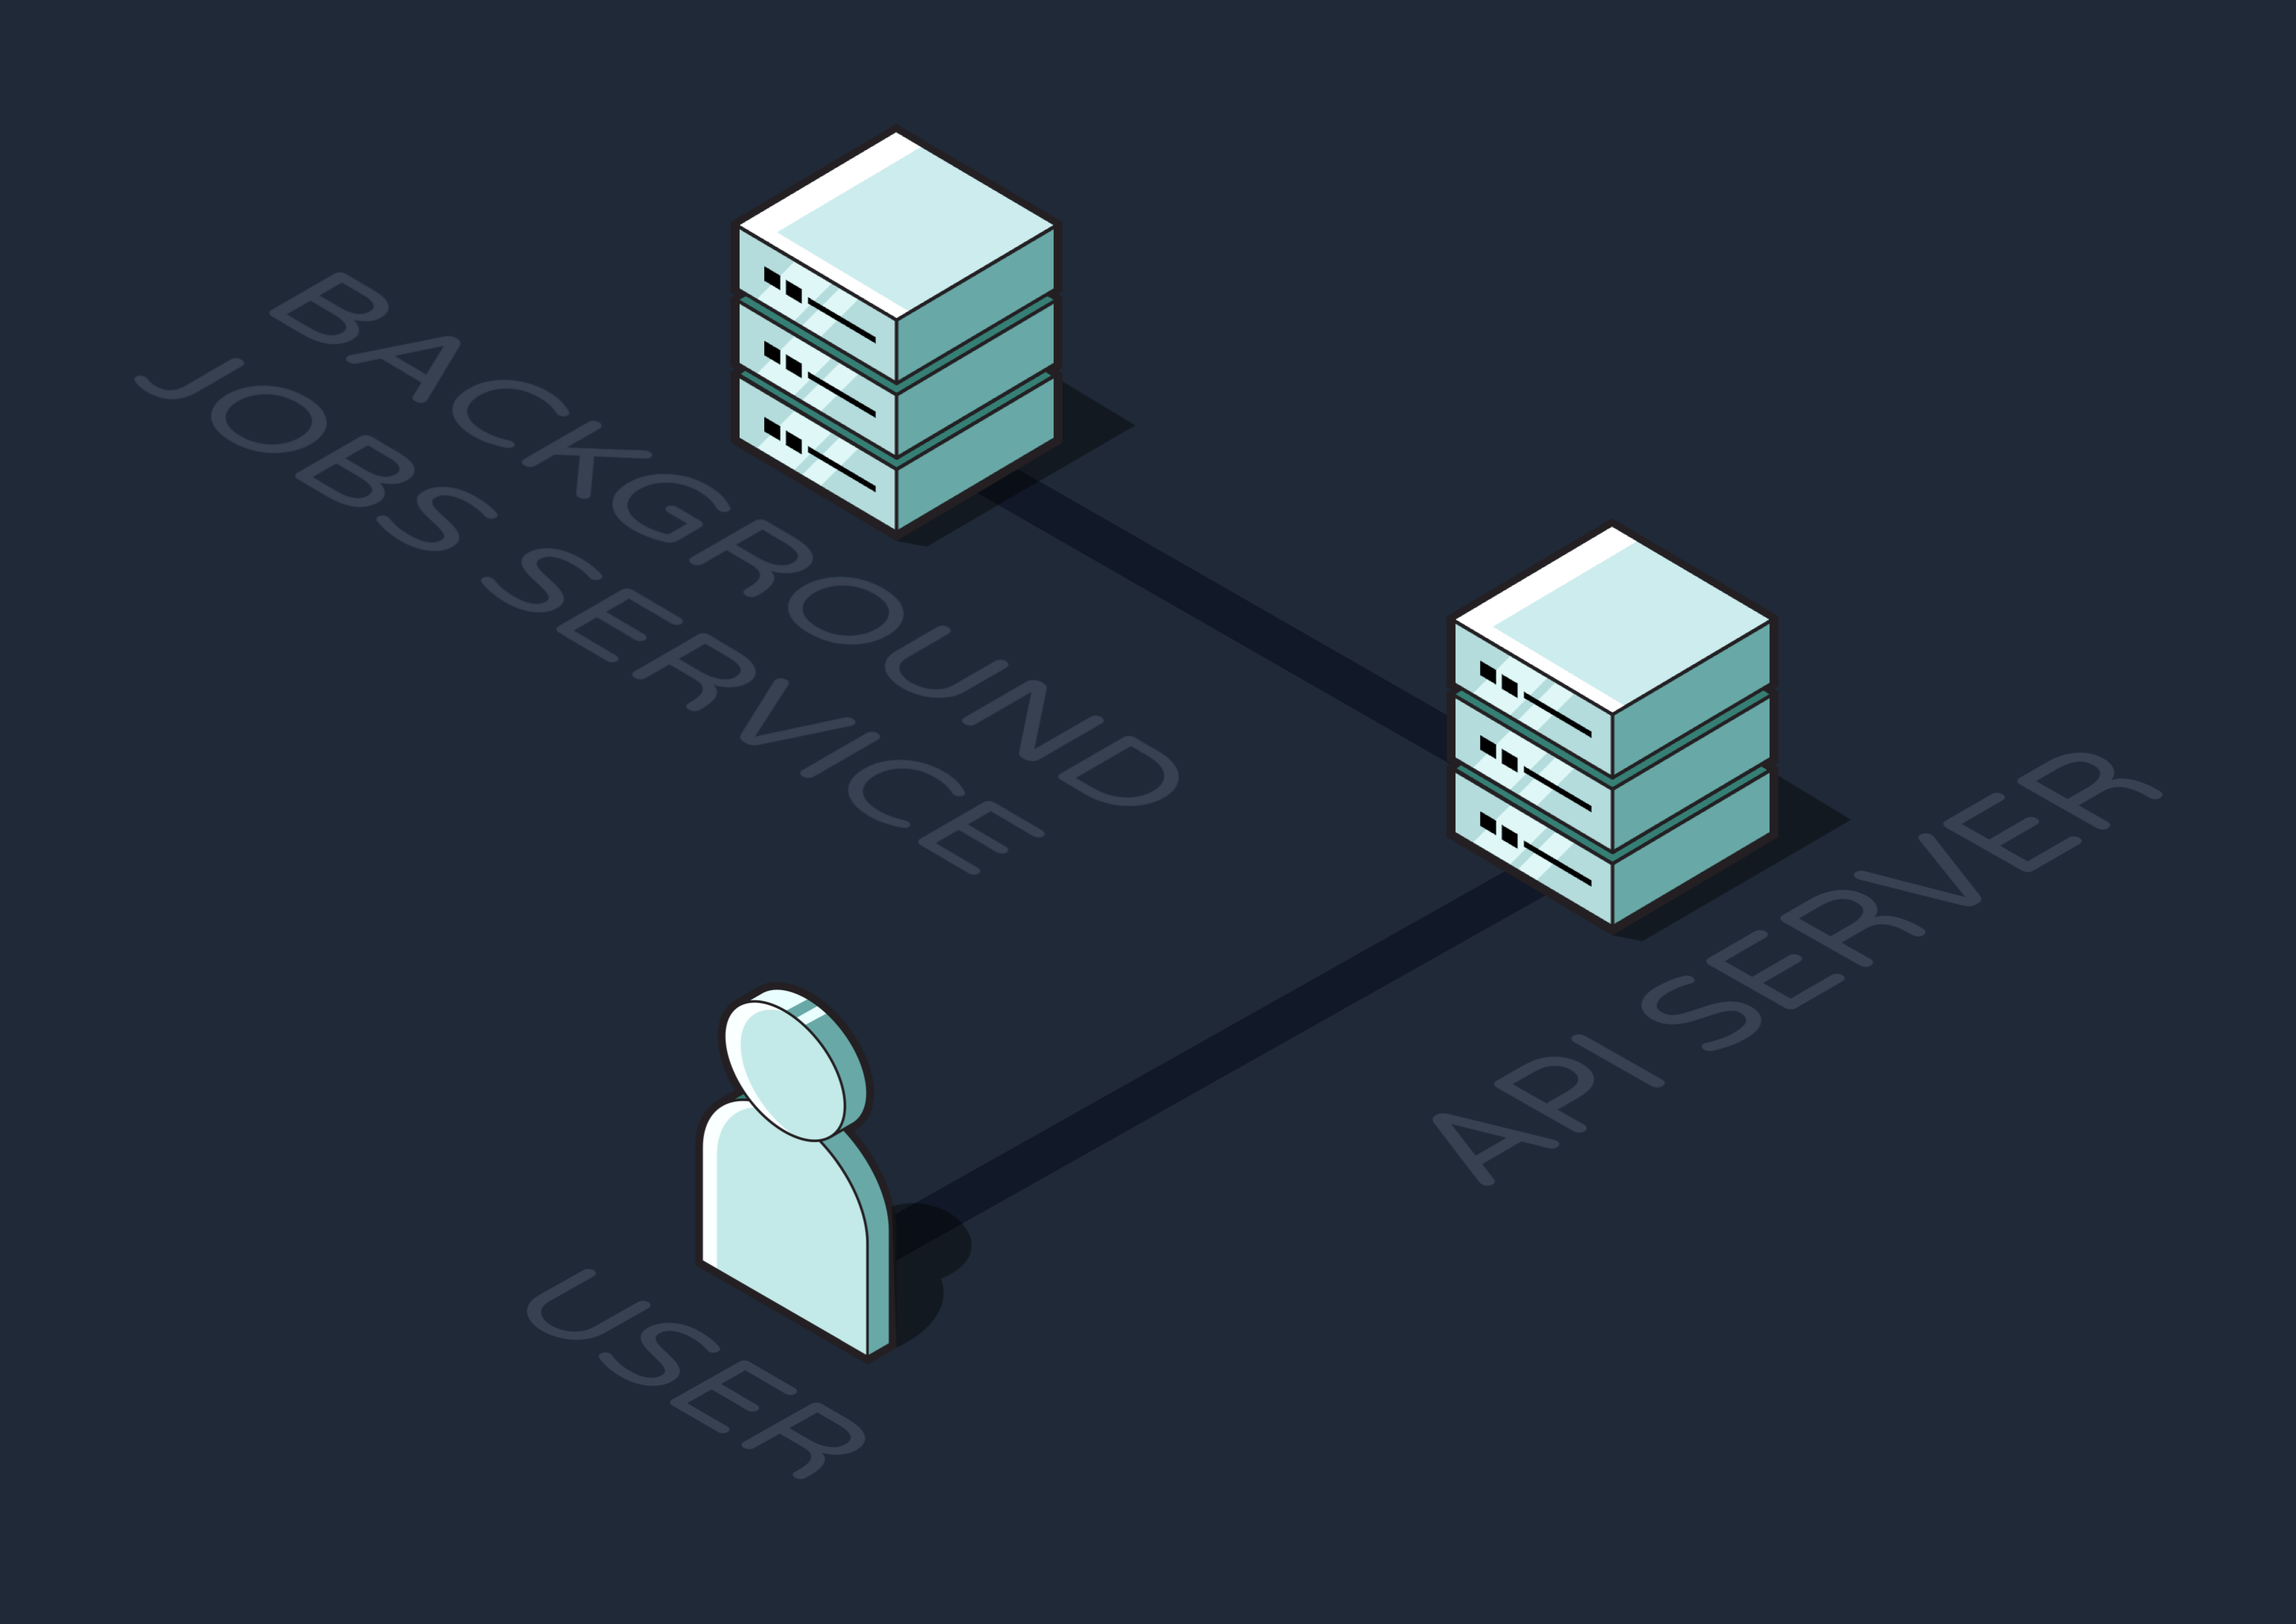
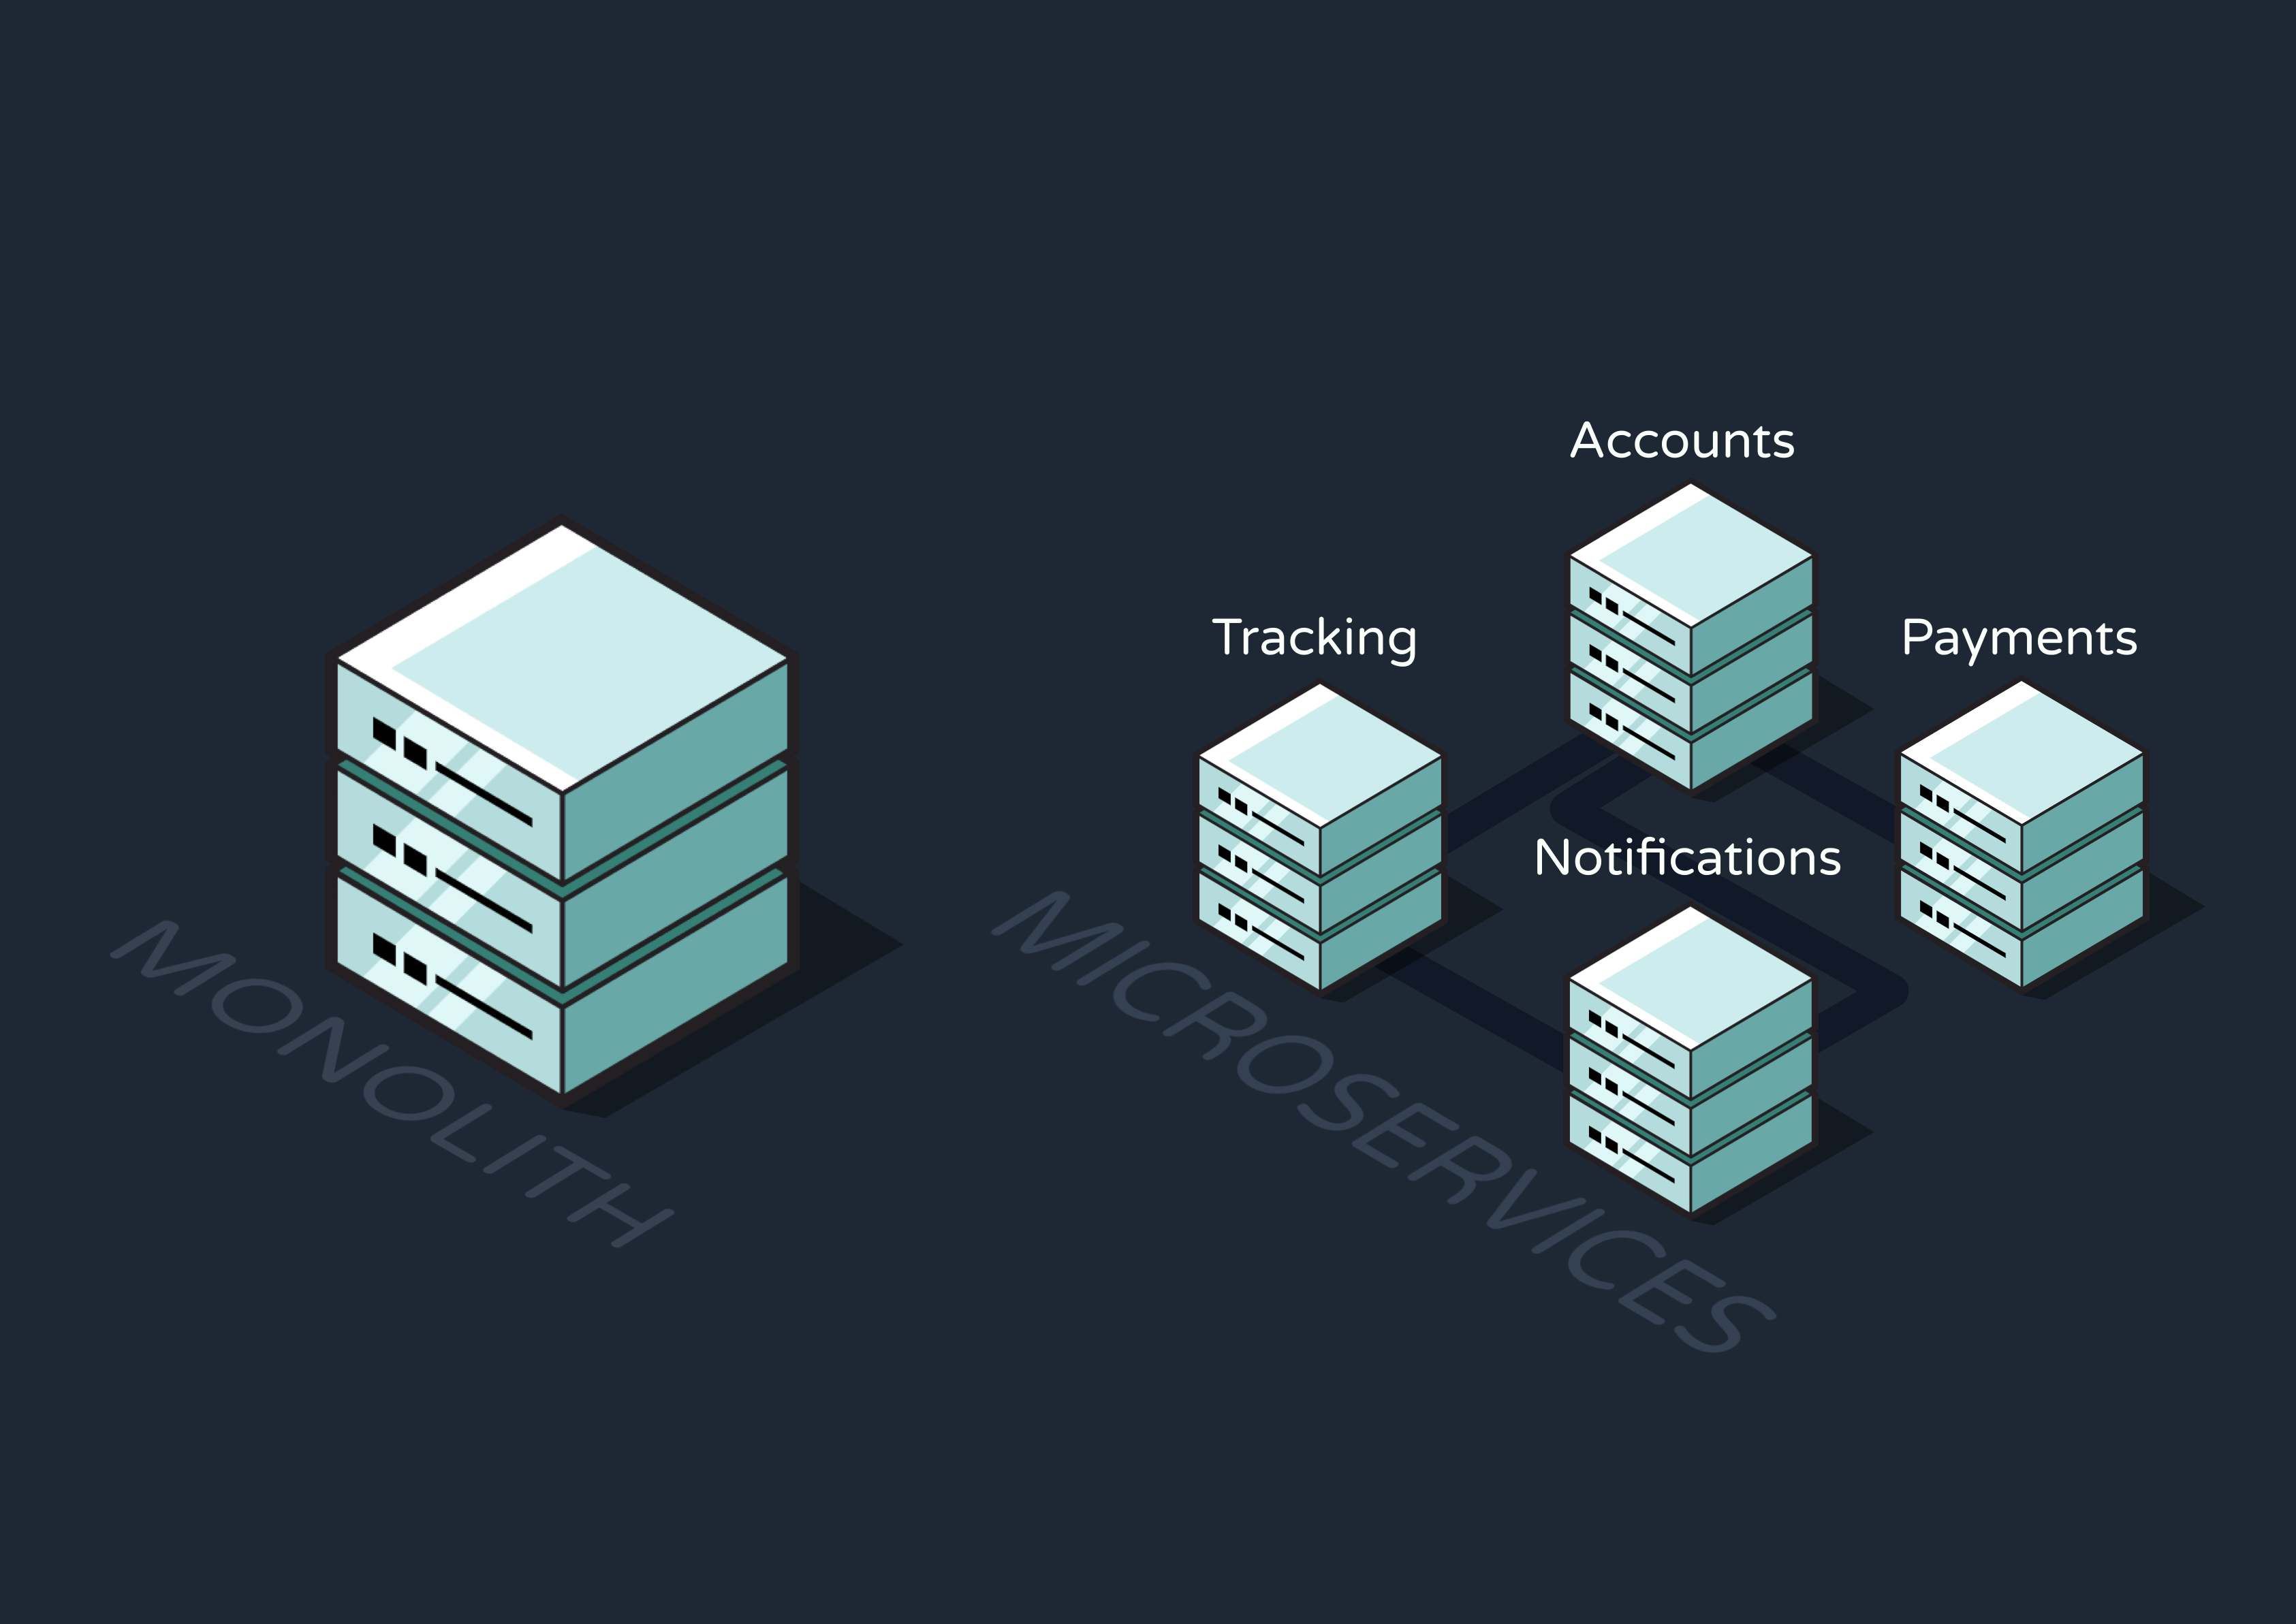
By breaking up the application like this, we adopt a microservices architecture. Rather than tightly coupling all of an app’s operations and running them as a single, monolithic process, this architecture breaks the app down into smaller services that each perform specific business tasks. For instance, a delivery tracking app might have an Accounts Service, Payments Service, Tracking Service, Notifications Service, and more. This system lessens the load and scope of responsibility for each service, helping developers build more reliable systems.
For our purposes thus far, we might separate out an API Service and a Background Jobs Service. While this is great for offloading asynchronous jobs and keeping the API responsive, it introduces fragility into the system:
-
Different parts of the application now communicate over the network
rather than through memory. Even a momentary network failure can
result in jobs being lost while in transit.
Network failures lead to dropped jobs. - If the background service crashes, it won't receive any jobs sent during that period.
- If the service can’t handle the volume of throughput it’s receiving, jobs will be dropped.
- If the service throws an error while executing a job, that job will be discarded.
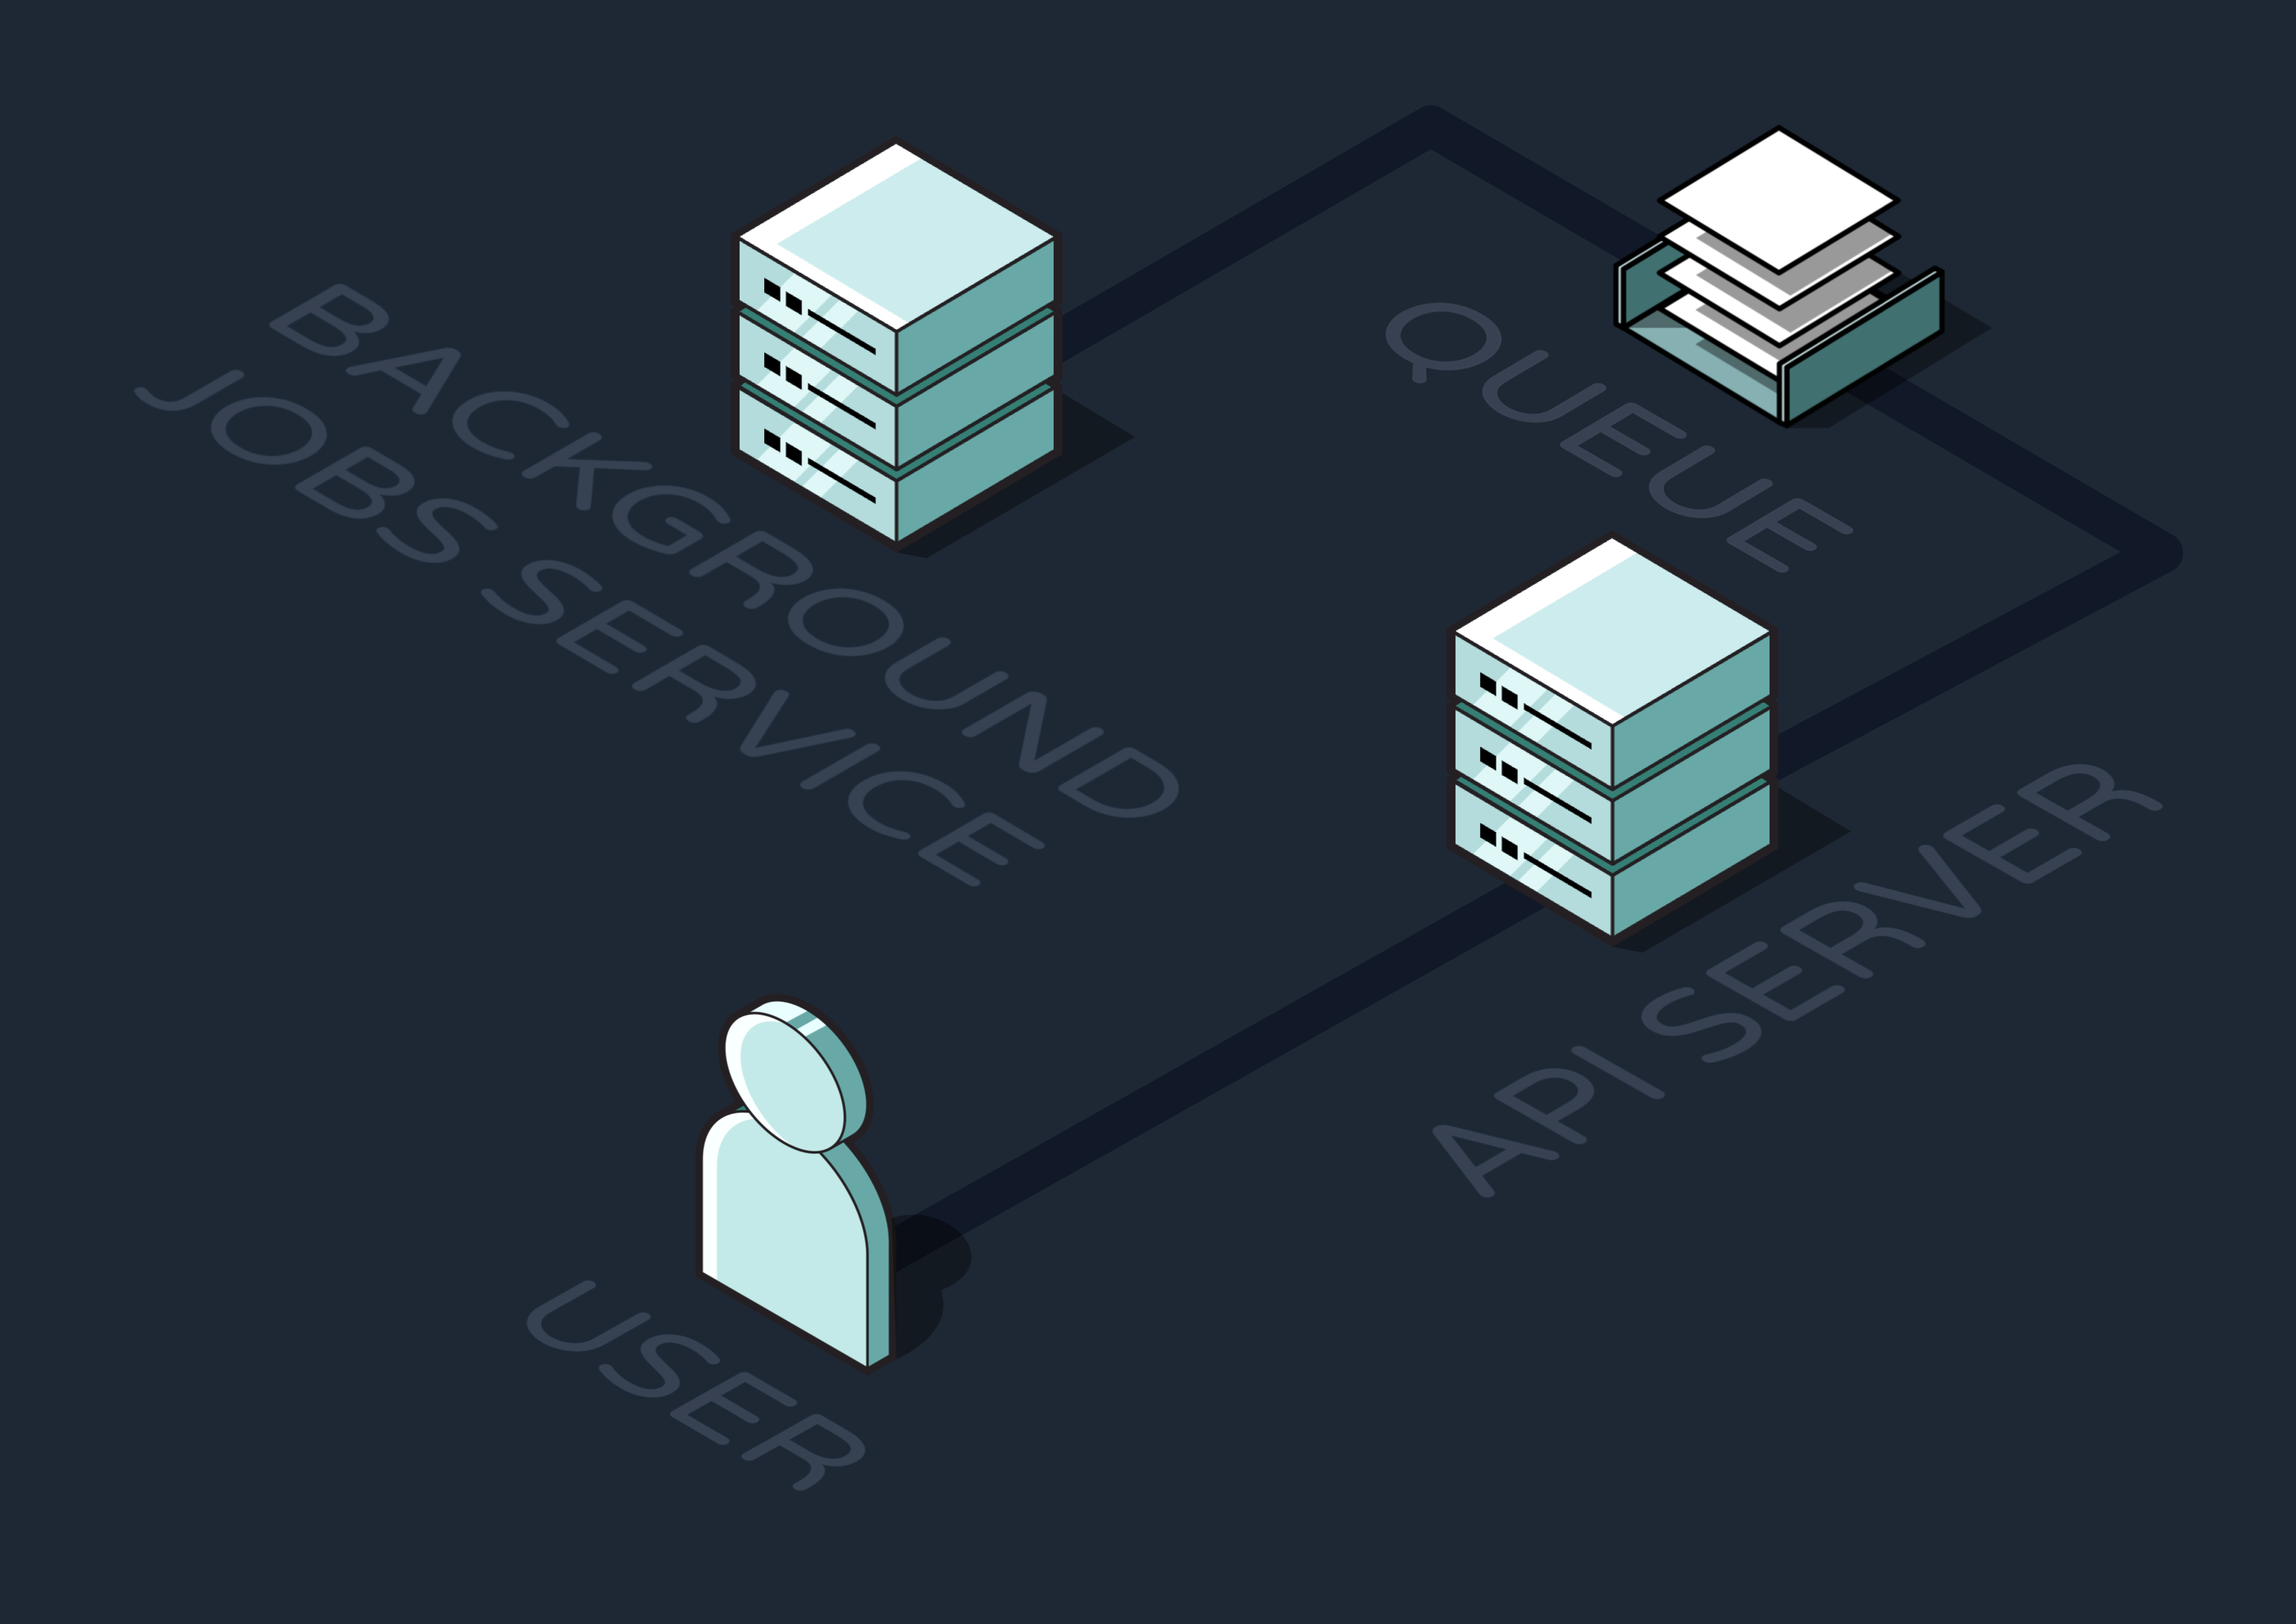
2.3 Adding a Message Queue
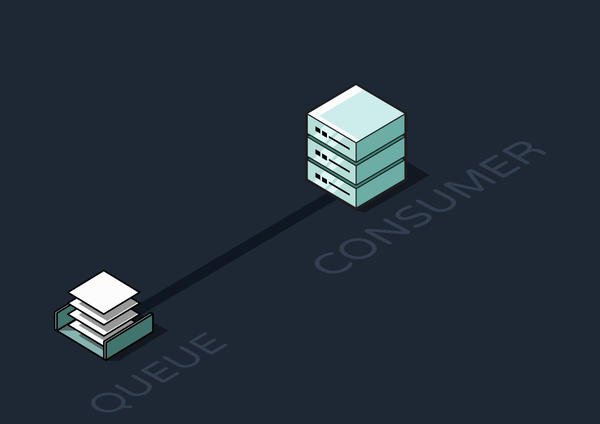
Problems that arise when communicating in a distributed system are commonly solved by positioning a message queue between services. Messages are the data–in our case, background job invocations–transported between a producer service and a consumer service. The producer adds jobs to the queue, and the consumer dequeues and executes them.
If the network fails or the consumer crashes, the queue will persist the job until the consumer is reachable and ready to process it. Additionally, the queue can act as a rate limiter by letting the consumer wait to process additional jobs until it has the resources to do so. But using queues as a solution also introduces new problems:
- Adding Infrastructure: Different queues are built on different underlying technologies. Devs must choose which queue fits their system best without adding too much new infrastructure to maintain. We’ll discuss the tradeoffs of different queueing technologies more deeply when we cover how Reverb implemented its queue.
-
Retrying Jobs: Jobs that are dequeued but then
fail can still be lost. Some queues offer built-in retry systems,
where the consumer tells the queue that the job failed and it’s
re-enqueued to try again. However, developers are still responsible
for configuring timeouts between retries and maximum retry limits to
keep their queue from clogging up.
- Dead Letters: Sometimes a job never succeeds, even after many retries. This often happens if the job is malformatted and can’t be interpreted by the consumer. Such jobs are typically offloaded into a “dead-letter queue,” and devs must decide how to process these dead letters.
- Durability and Scaling: If the queue becomes overloaded by too many incoming messages and crashes, the jobs in the queue could be permanently lost. This is particularly true for queues implemented in memory. To solve this, a developer might consider scaling the queue horizontally or vertically.
- Vertical scaling involves increasing the capacity of the existing queue by adding more resources—such as CPU, memory, or storage. This keeps infrastructure simple, but hardware can only vertically scale so much. Additionally, having just one instance means there’s still a single point of failure and everything could be lost if the queue goes down.
- Horizontal scaling, on the other hand, means adding more instances of the queue to handle more messages concurrently and make overloading an individual instance less likely. This also improves fault tolerance by removing the single point of failure. However, distributing messages across multiple queues makes it difficult to keep messages in order. And, of course, it adds more moving pieces to the system.
2.4 Event-driven Architecture (EDA)
So far, we’ve assumed that the API server adds one job invocation to the queue for each job that needs to be executed. However, this doesn’t let the API server off the hook as fully as we want. The server must still be aware of every background job and contain all the logic for determining if and when to execute a specific one.
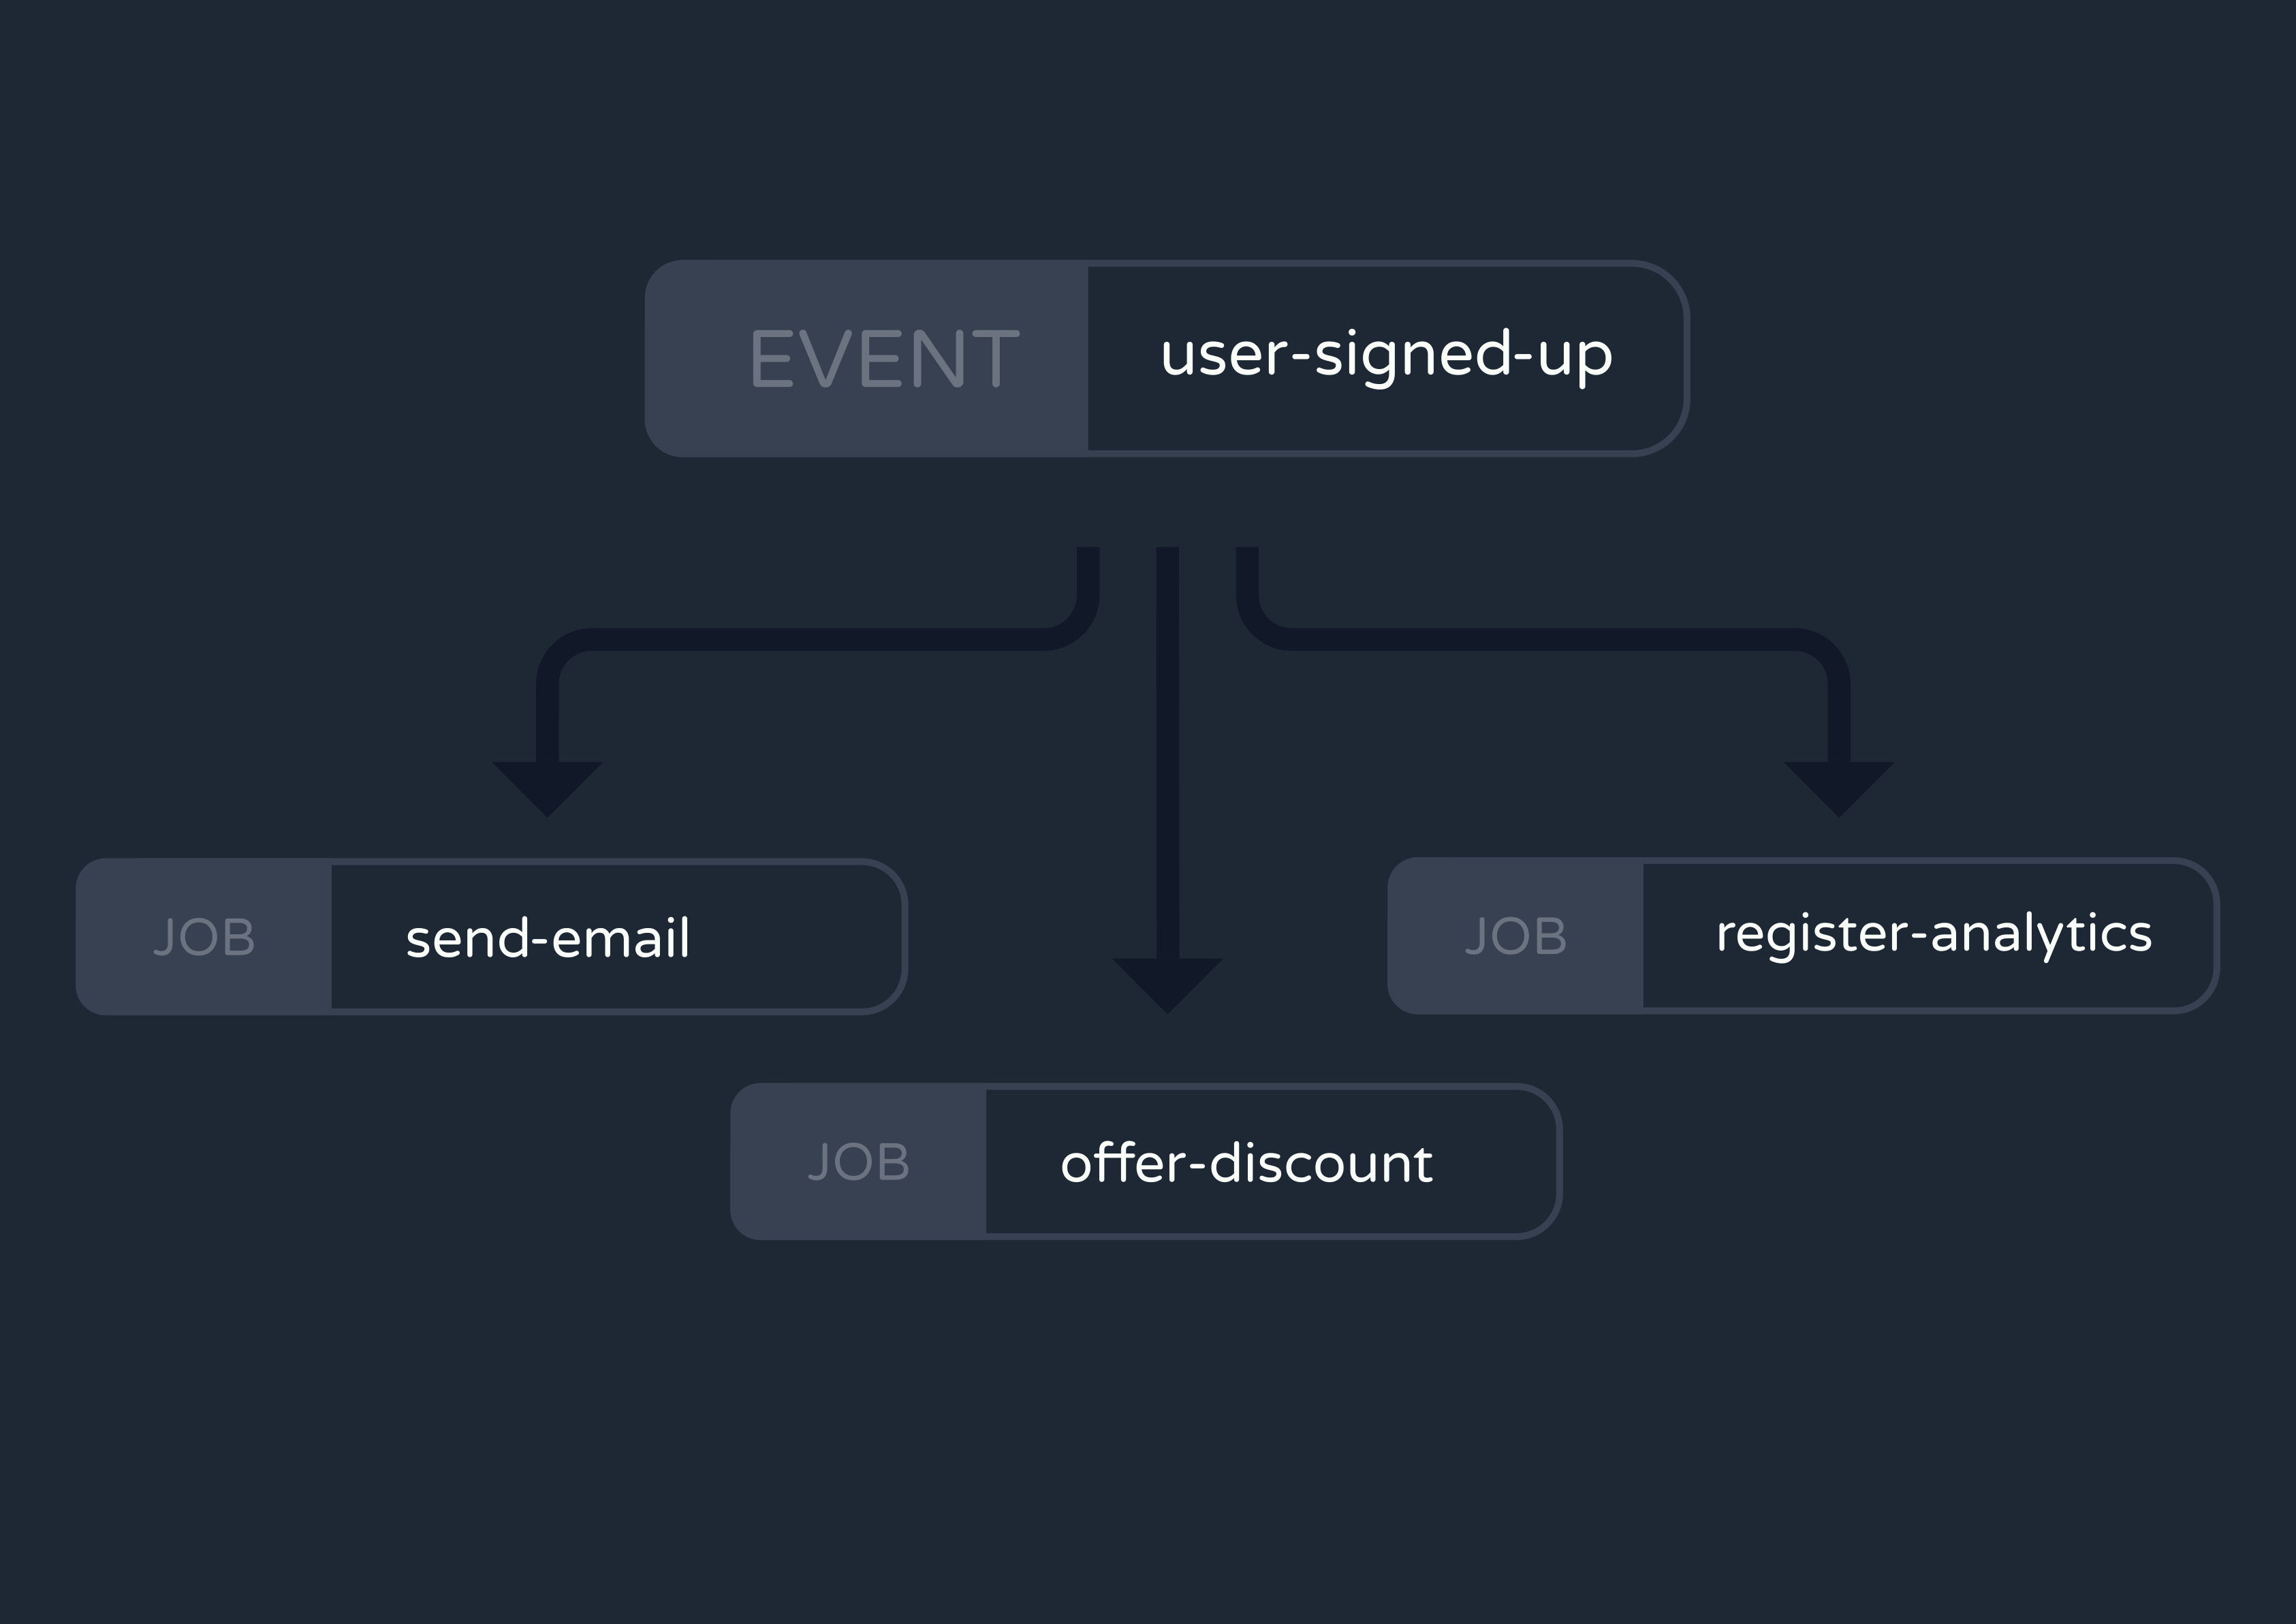
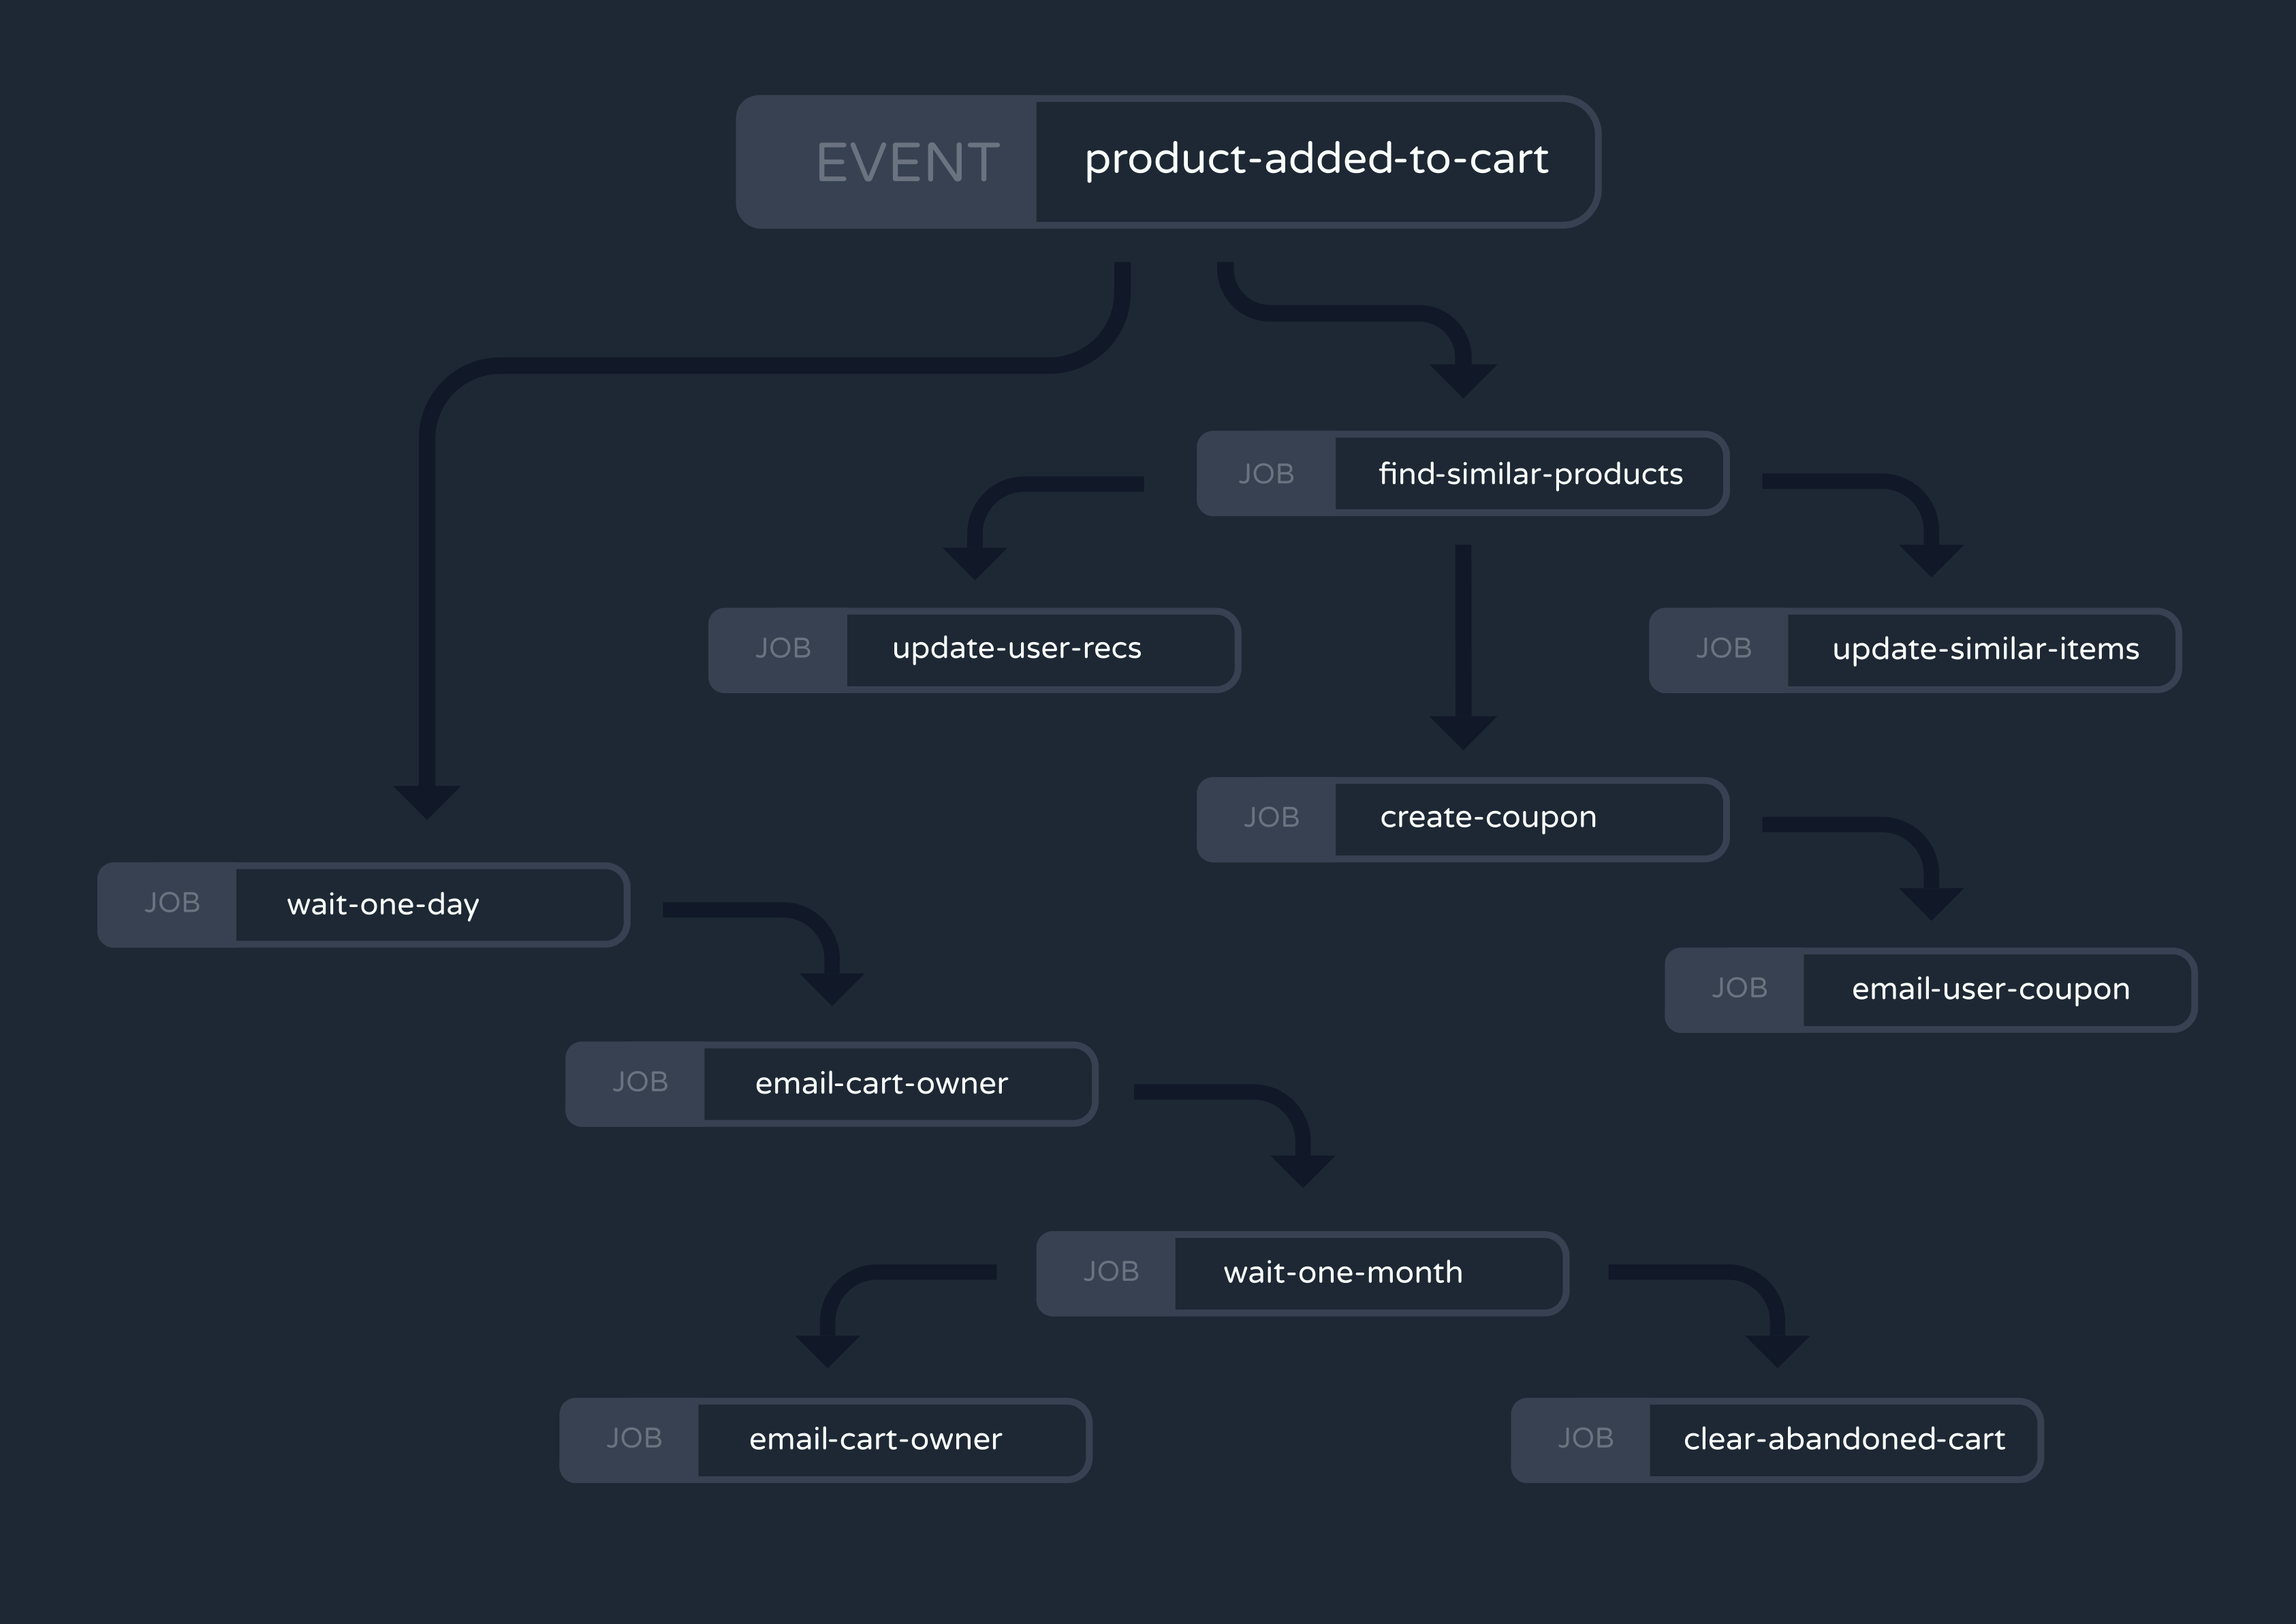
An alternative to this setup is an event-driven architecture. Rather than telling services which jobs to execute, the API server would simply indicate that an event has occurred. To illustrate this, consider again a user signing up on a website. Instead of enqueuing jobs for welcome emails, new-user discounts, and data analytics, the API server could just queue a “user-signed-up” event. It doesn’t have to know which jobs run when that event occurs–only that it occurred.
So where does all the logic for mapping events to job invocations go? The queue. The queue must now have some mechanism for implementing a pattern known as fan-out, which occurs when a single process triggers multiple operations to run simultaneously. To continue with our sign-up example, the queue would make it so a single “user-signed-up” event fans out to trigger the email, discount, and analytics jobs.
Of course, a queue can’t automatically know which events map to which jobs. So developers have to configure this mapping within the queue manually. Additionally, devs will need to implement some form of event tracing, which means introducing tools that track the flow of an event from its emission through all of the jobs it triggers. This is crucial for debugging and monitoring the health of an event-driven system.
2.5 From Background Jobs to Workflows
We’ve seen that an event can trigger multiple jobs concurrently. But what if you instead want to trigger jobs as an in-order sequence of steps, where each job relies on the successful completion of the job before it?
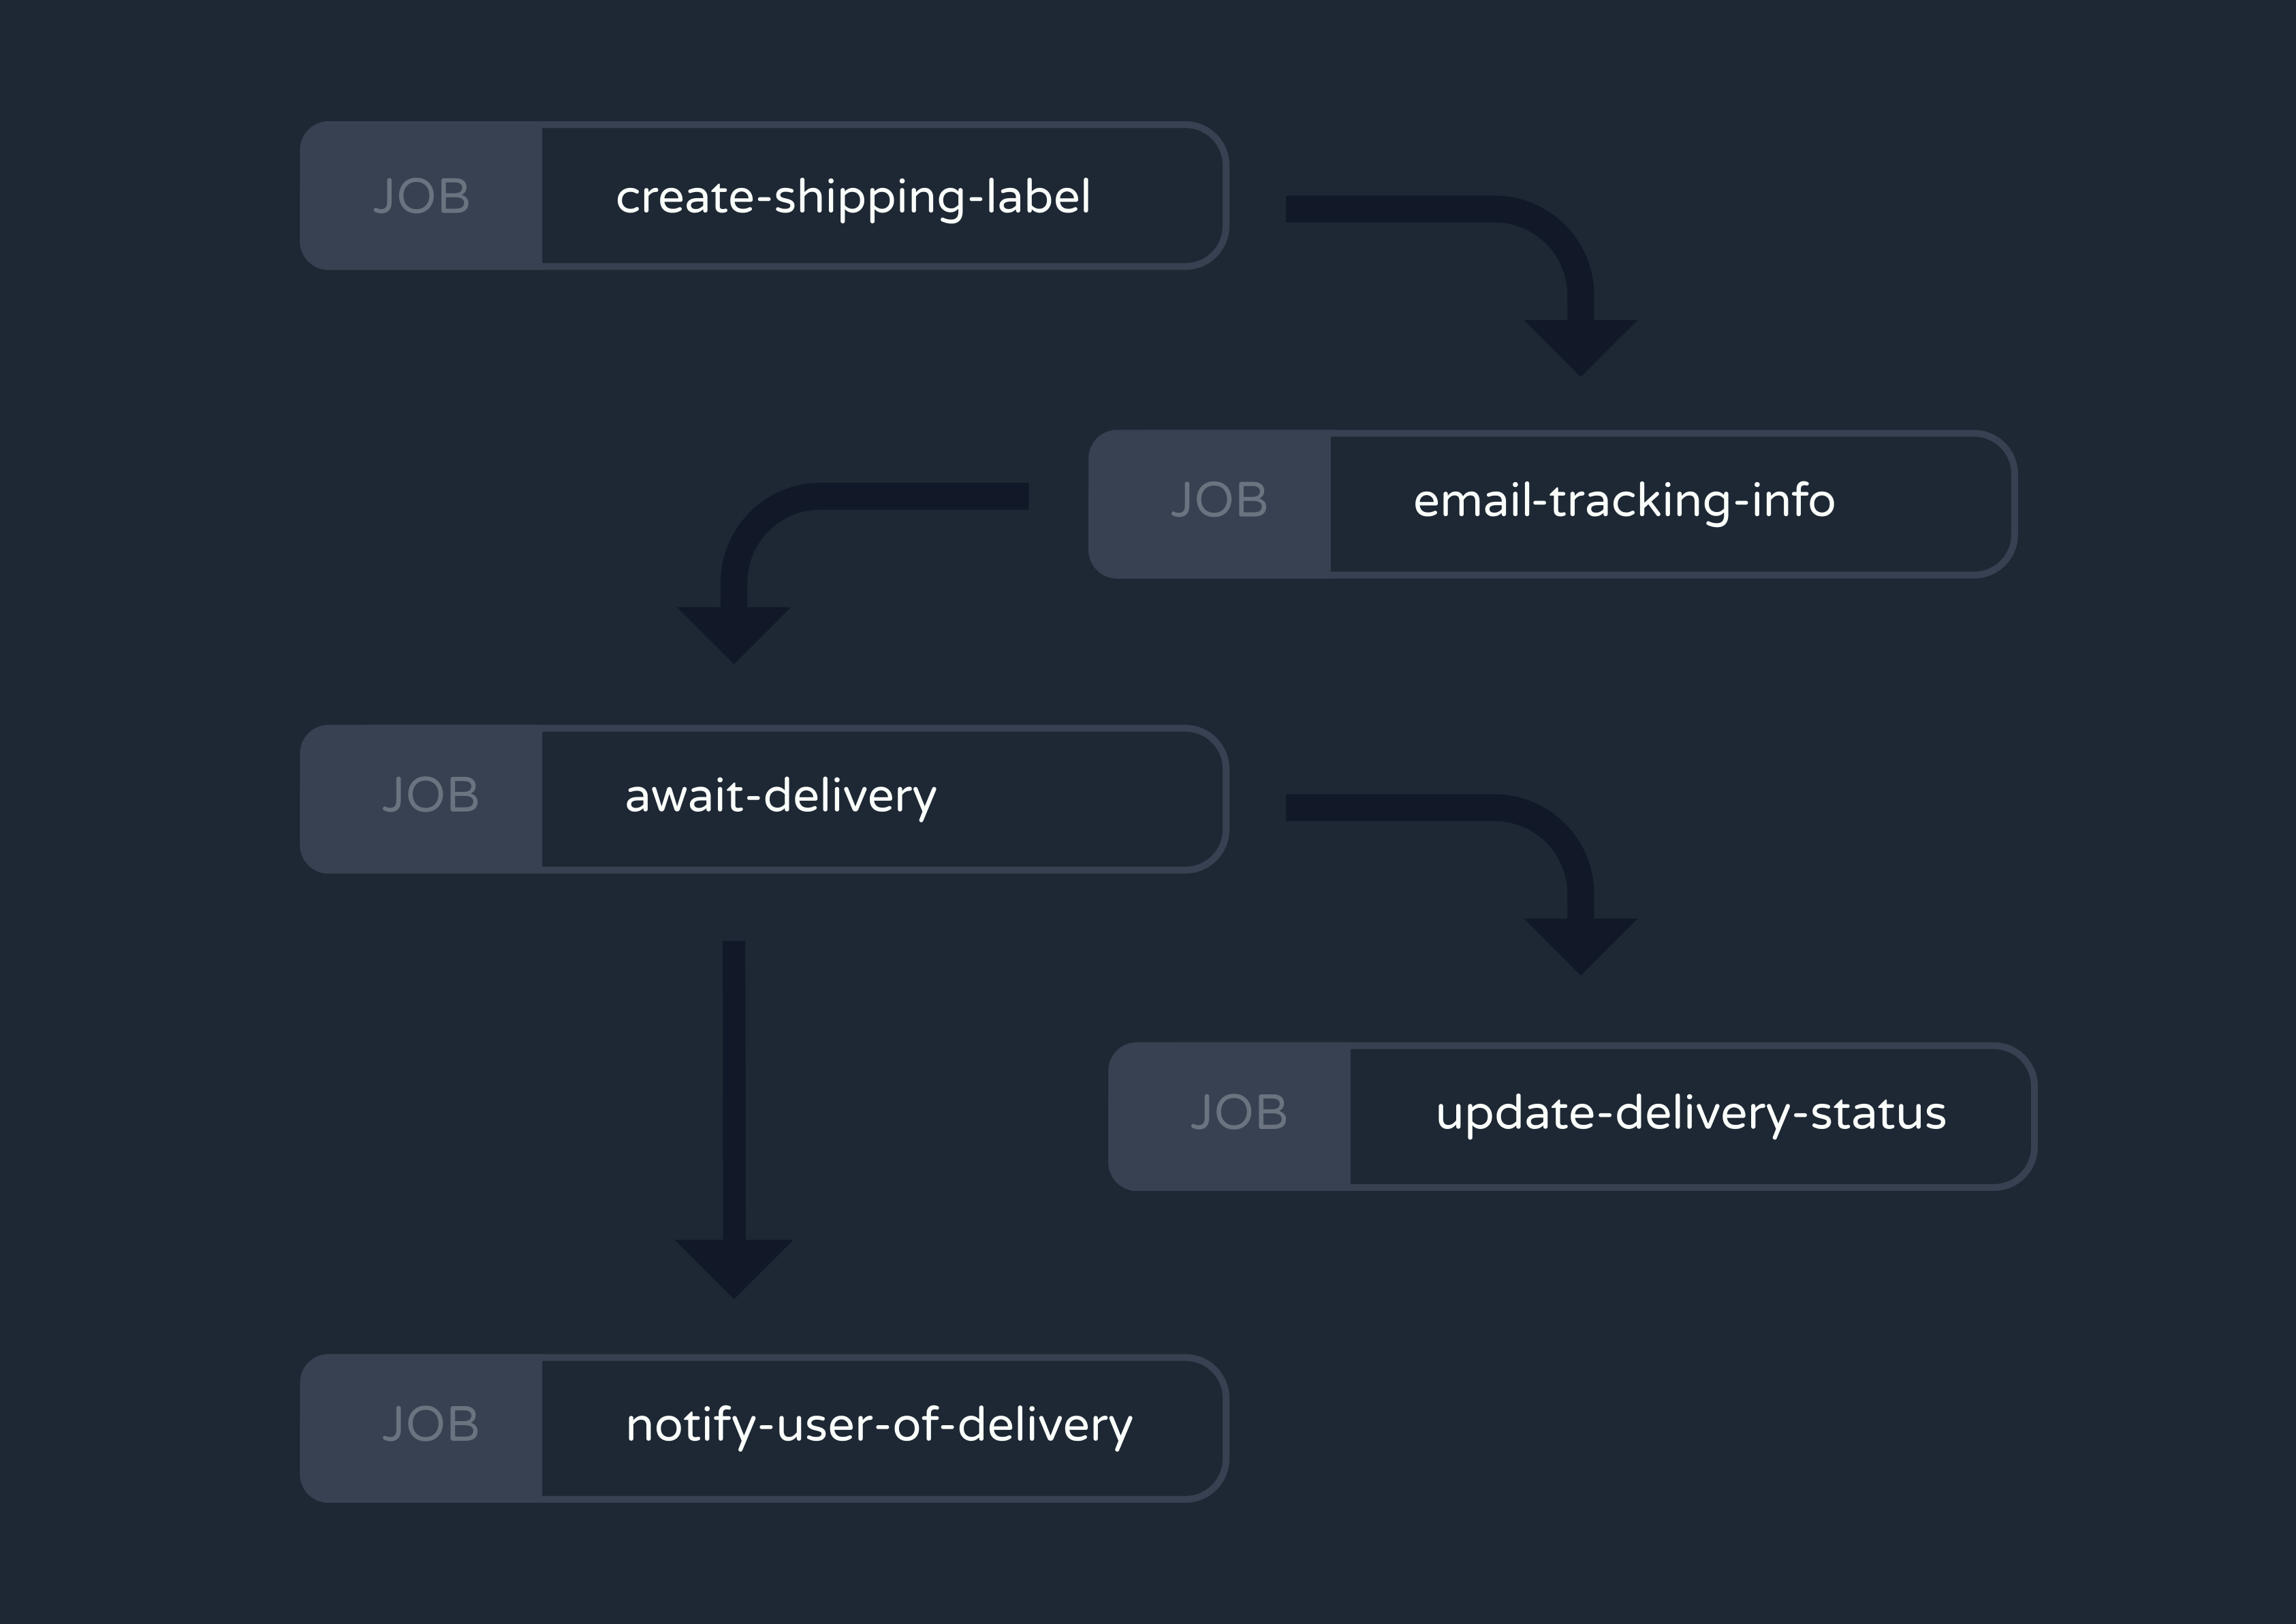
This is common for many use cases, including the delivery tracking app we discussed earlier. Consider the asynchronous jobs that a “user-placed-order” event would trigger. First, the app might generate a shipping label and tracking number for the delivery. Only after the tracking number is successfully generated can you email the user their shipping information. And only after the order is ultimately delivered can you send an “Order delivered!” notification and change the delivery’s status in your database.
Multi-step background jobs like these are called asynchronous workflows, and implementing them can benefit your application in many ways.
- As in the example above, you can string together interdependent tasks to build complex background processes.
- You can divide time and resource-intensive tasks—like video transcoding or processing large datasets—into smaller, more manageable steps to reduce the burden on your system. Executing these steps concurrently enhances your application's performance, allowing it to handle demanding jobs more efficiently.
- Serverless functions are popular for their auto-scaling abilities, but functions can only run for a few minutes at a time. This makes serverless a non-starter for longer background jobs. However, if you can break such jobs into a sequence of shorter workflow steps, executing with serverless becomes a viable option.
- Workflows greatly increase retry efficiency because failing in the middle of a workflow no longer means you have to retry the entire job—just the latest step.
- Event tracing becomes more specific and helpful for debugging because you can identify failures at specific substeps.
- A single event can trigger multiple sequences of jobs instead of individual ones. A service expends negligible resources to enqueue an event, yet this simple action can set off a complex network of processes.
Of course, before you can reap the benefits above, you must write a lot of new logic for your application. This can be a significant challenge for developers who are new to the concept of workflows.
For every workflow, you first need to define the logic determining the order in which steps are executed. Because each step could be handled by a different service, this logic might be scattered throughout your application and difficult to maintain or update.
You then have to keep track of which steps have run and which steps still need to, which is often called managing state. What’s more, this state must survive server crashes and system failures if you want to ensure workflows execute reliably. Storing state to disk via a database is an option, but you must first figure out how to represent something as abstract as “workflow state” in your schema. Not to mention, this strategy requires adding yet another piece of infrastructure to maintain.
Additionally, you’ll need to store the return values from each step and share them with the next step in the sequence. Using our delivery app example, the “email-tracking-number” step would need access to the tracking number returned by the “generate-label” step before it. Each step needs to return a meaningful value that the next step knows how to process, or else the workflow could fail partway through.
Finally, workflows make event tracing more complicated, too. In addition to tracking an event from its emission through the completion of the jobs it triggers, you need to follow it across every individual step of every workflow. You’ll also need to make this tracing accessible and digestible to developers, perhaps through a Command-Line Interface (CLI) or User Interface (UI).
Clearly, manually implementing workflows demands substantial development time and deep expertise in the subject matter.
2.6 Different Kinds of Workflows
Executing workflows is challenging enough when they simply respond to events and proceed step-by-step. However, modern workflows come in many shapes and sizes. As a result, developers must design their applications with the flexibility to handle a variety of triggers and steps.
2.6.1 Different Triggers
Other than events, there are several common ways to trigger a workflow. Each one comes with its own set of challenges:
- Cron: Many applications have background jobs that automatically execute on a recurring schedule set by the developers. These are known as cron jobs, and they commonly perform routine maintenance like backing up data or generating performance reports. But if a cron job has several interdependent steps, it makes sense to break it out into a cron workflow. Many queues cannot accommodate cron triggers out of the box, so devs may need to write more logic or incorporate yet another component into their system for this specific purpose.
- Third-Party Webhooks: A third-party service can be thought of as a microservice managed by an external company rather than by the application's developers. Third parties can take some responsibility off a developer’s plate and handle complex tasks reliably.
- However, third parties themselves introduce new complexity into a workflow system. They often communicate through webhooks, which are HTTP requests triggered by events on the service. For instance, a payment service like Stripe might send a webhook to your app when a client’s payment is processed. But webhook formats are not standardized. A Stripe webhook has headers and body content that are different from a GitHub webhook, and so on. This means developers might need to write custom logic for each third-party integration.
- Remote Procedure Calls (RPCs): In general, RPCs allow a program on one server to execute functions, or “procedures,” on another. Unlike events, each RPC is a direct invocation that can only trigger one workflow at a time. This can be useful when you want to invoke a workflow in your app explicitly, but RPCs typically utilize standardized protocols that developers must learn to use.
2.6.2 Different Steps
To this point, we’ve assumed that every “step” is just a piece of code that performs an action, like sending an e-mail or prompting a large language model (LLM). But there are other types of steps that come up so frequently that developers often write additional logic specifically for them:
- Invocation Step: Sends an RPC to invoke a workflow from within a different workflow.
- Event Step: Emits an event from within a workflow, triggering any number of additional workflows.
- Branching Step: Rather than performing a specific action, this step determines which step(s) should run next based on some condition.
- Delay Step: Defer the enqueuing and execution of the subsequent step for a specified amount of time.
Larger applications often need hundreds of workflows, each containing dozens of steps. Writing the logic for each of these kinds of steps and triggers every time they appeared would make such a codebase incredibly messy, repetitive, and unmanageable.
2.7 Solution: Using a Workflow Engine
Given all the complexities we’ve outlined in implementing asynchronous workflows, it's evident why developers might seek out a more managed solution. Crafting and maintaining intricate sequences with various triggers, steps, and dependencies is not only time-consuming but also fraught with potential for bugs and inefficiencies. Additionally, the underlying infrastructure for queuing and executing steps across a distributed system can be cumbersome to design and maintain. All of this underscores the need for a specialized service that fully manages workflow orchestration for developers, also known as a workflow engine.
Workflow engines have emerged and grown rapidly in popularity over the past five years. But what exactly are the capabilities an engine must have in order to be considered a competitive solution?
- Defining workflows: Typically, the engine provides a library or Software Development Kit (SDK) that devs use to define workflows and the events or cron that trigger them.
- Executing workflows: Users should not have to implement any logic or infrastructure for queueing, executing, or managing the state of their workflows. This is the core benefit of using an engine.
- Exposing workflows: There must be a way to expose user-defined workflows to RPCs so that the engine can invoke them wherever they’re hosted
- Durability: Some level of error handling, retries, and state persistence should be ensured for executing workflow steps.
- Observability: Devs should be able to monitor their workflows through event tracing. Engines commonly offer a UI to display tracing data in a digestible way.
- Serverless Compatibility: Most workflow engines are either hosted on a cloud provider or able to be self-hosted on one.
- Third-Party Integration: An engine must provide some way to integrate third-party services and their webhooks into workflows.
3. Existing Solutions
3.1 DIY Approach
As we saw in the Asynchronous Workflows section, going the Do-It-Yourself (DIY) route for event-driven workflow orchestration can be quite complex and inefficient. This approach requires a lot of dev time, energy, and expertise to build the necessary logic and infrastructure––not to mention deploying and maintaining that infrastructure over time. This is not always realistic for small to medium-sized companies.
3.2 Paid Solutions

3.2.1 Inngest
Inngest is a prototypical event-driven workflow engine. It offers a full suite of features, including multi-language SDKs, logging & observability tools, support for long-running and recurring jobs, and automatic retries. Workflows are written as step functions with intuitive syntax that makes development easy for engineers.
However, Inngest has a very limited free tier, and scaling up incurs hefty fees. Additionally, Inngest requires that you outsource your workflow management to their cloud service, which leads to a lack of ownership over your data.
3.2.2 Temporal
Temporal’s open-source workflow engine emphasizes durability over developer experience. It guarantees reliable execution even with server failures or network outages. Additionally, Temporal lets you manually define your queue’s workers, configure retry policies, pause or stop bug-inducing workflows, and set timeouts for workflow executions.
While these features make for a durable solution, devs typically turn to a workflow engine to reduce overhead and save valuable development time. Between all the additional configuration and its less intuitive SDKs, Temporal struggles with ease of use.
Finally, while Temporal does offer a self-hosted solution to improve data ownership, it does not have a free tier.
3.2.3 AWS Step Functions
AWS is a veteran in the workflow engine game. Its Step Functions service was one of the first solutions to design workflow execution as a state machine (more on that later), and AWS created an entire language called Amazon State Language. It also offers a unique no-code interface to build your workflows visually.
However, recent solutions like Inngest and Temporal have become popular precisely because devs like to code workflows in their preferred language. Plus, using AWS comes with all the frustrating infrastructure and permissions configurations you want to avoid when employing a workflow engine.
The biggest issue is that Step Functions only provides native support for events and steps that occur within AWS services. This disqualifies it from being a true competitor.
4. Introducing Reverb
Reverb is a production-ready, developer-friendly, fully open-source, and self-hosted solution.
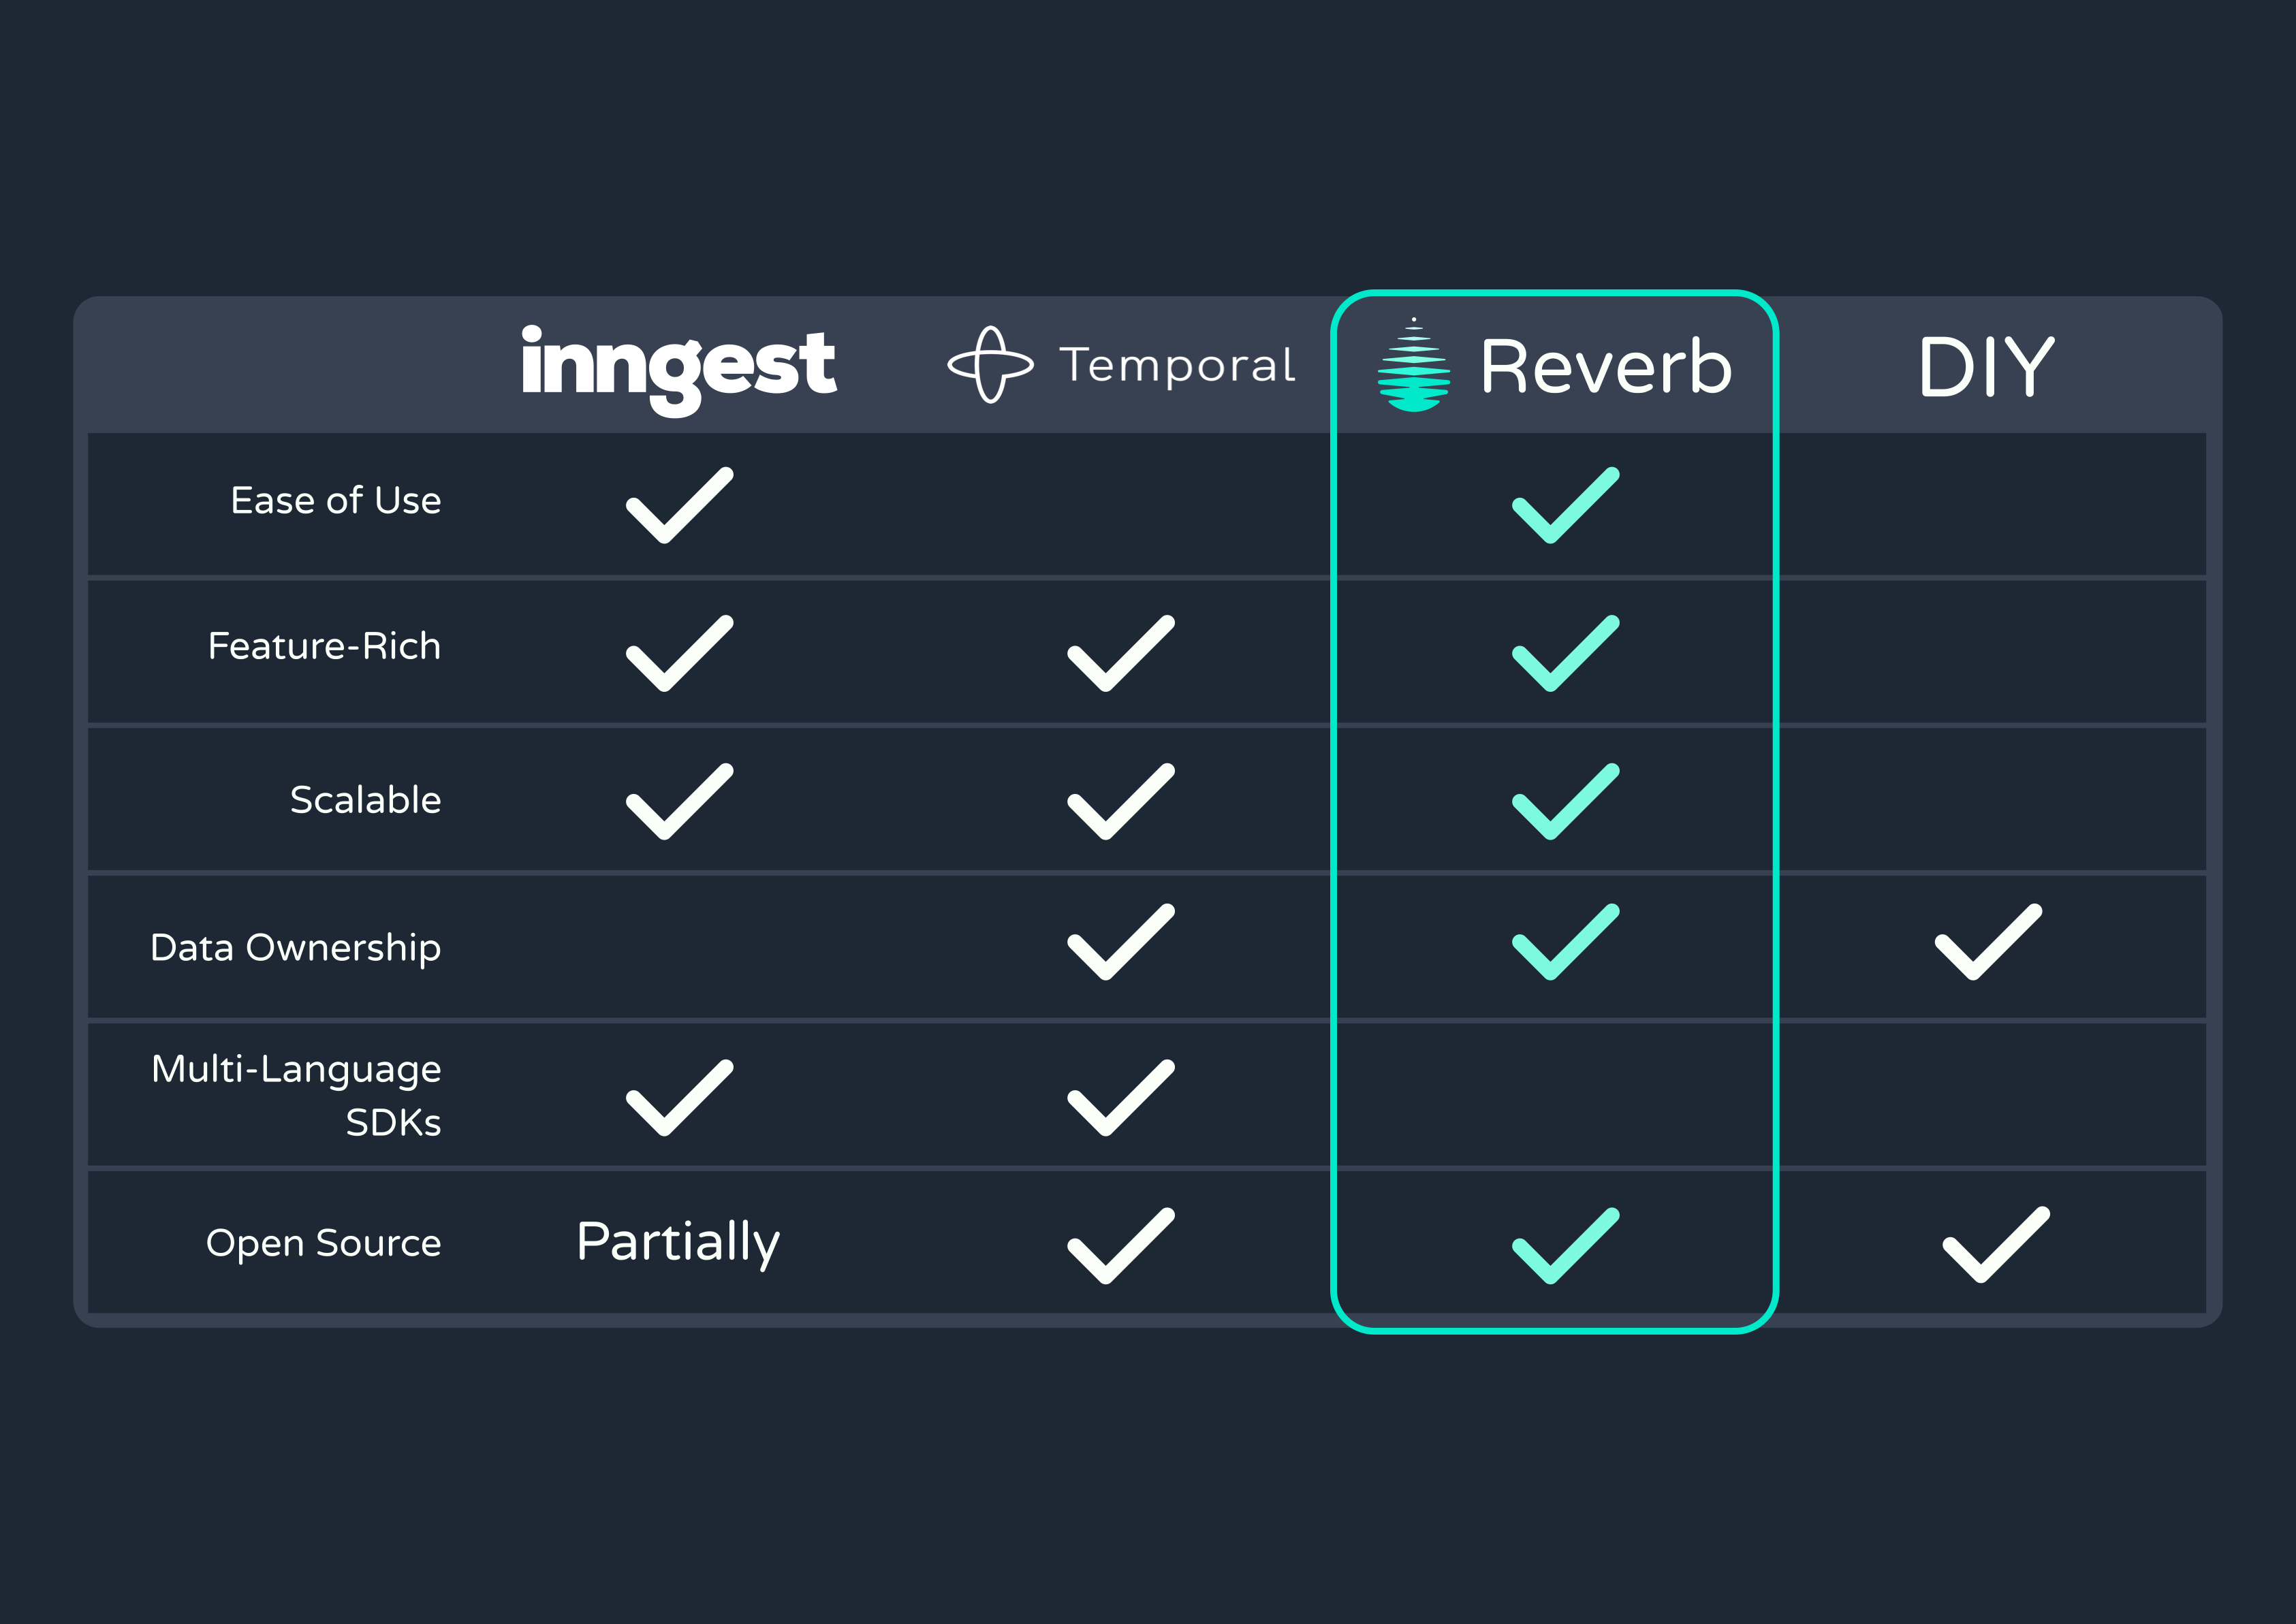
Our engine supports triggering workflows with events, cron, and webhooks and can handle complex sequences with long-running steps. It also offers production-level durability and scalability, and comes with a user interface and CLI for tracing events and tracking workflow progress.
The service is self-hosted on Amazon Web Services (AWS) and can be deployed with one command using the CLI tool.
While Reverb does not support multiple languages, it is built with Typescript and comes with a Typescript SDK for defining and exposing workflows. We chose TypeScript due to its level of adoption within the industry and to improve Reverb’s durability further via type safety.
5. Building Reverb’s Core
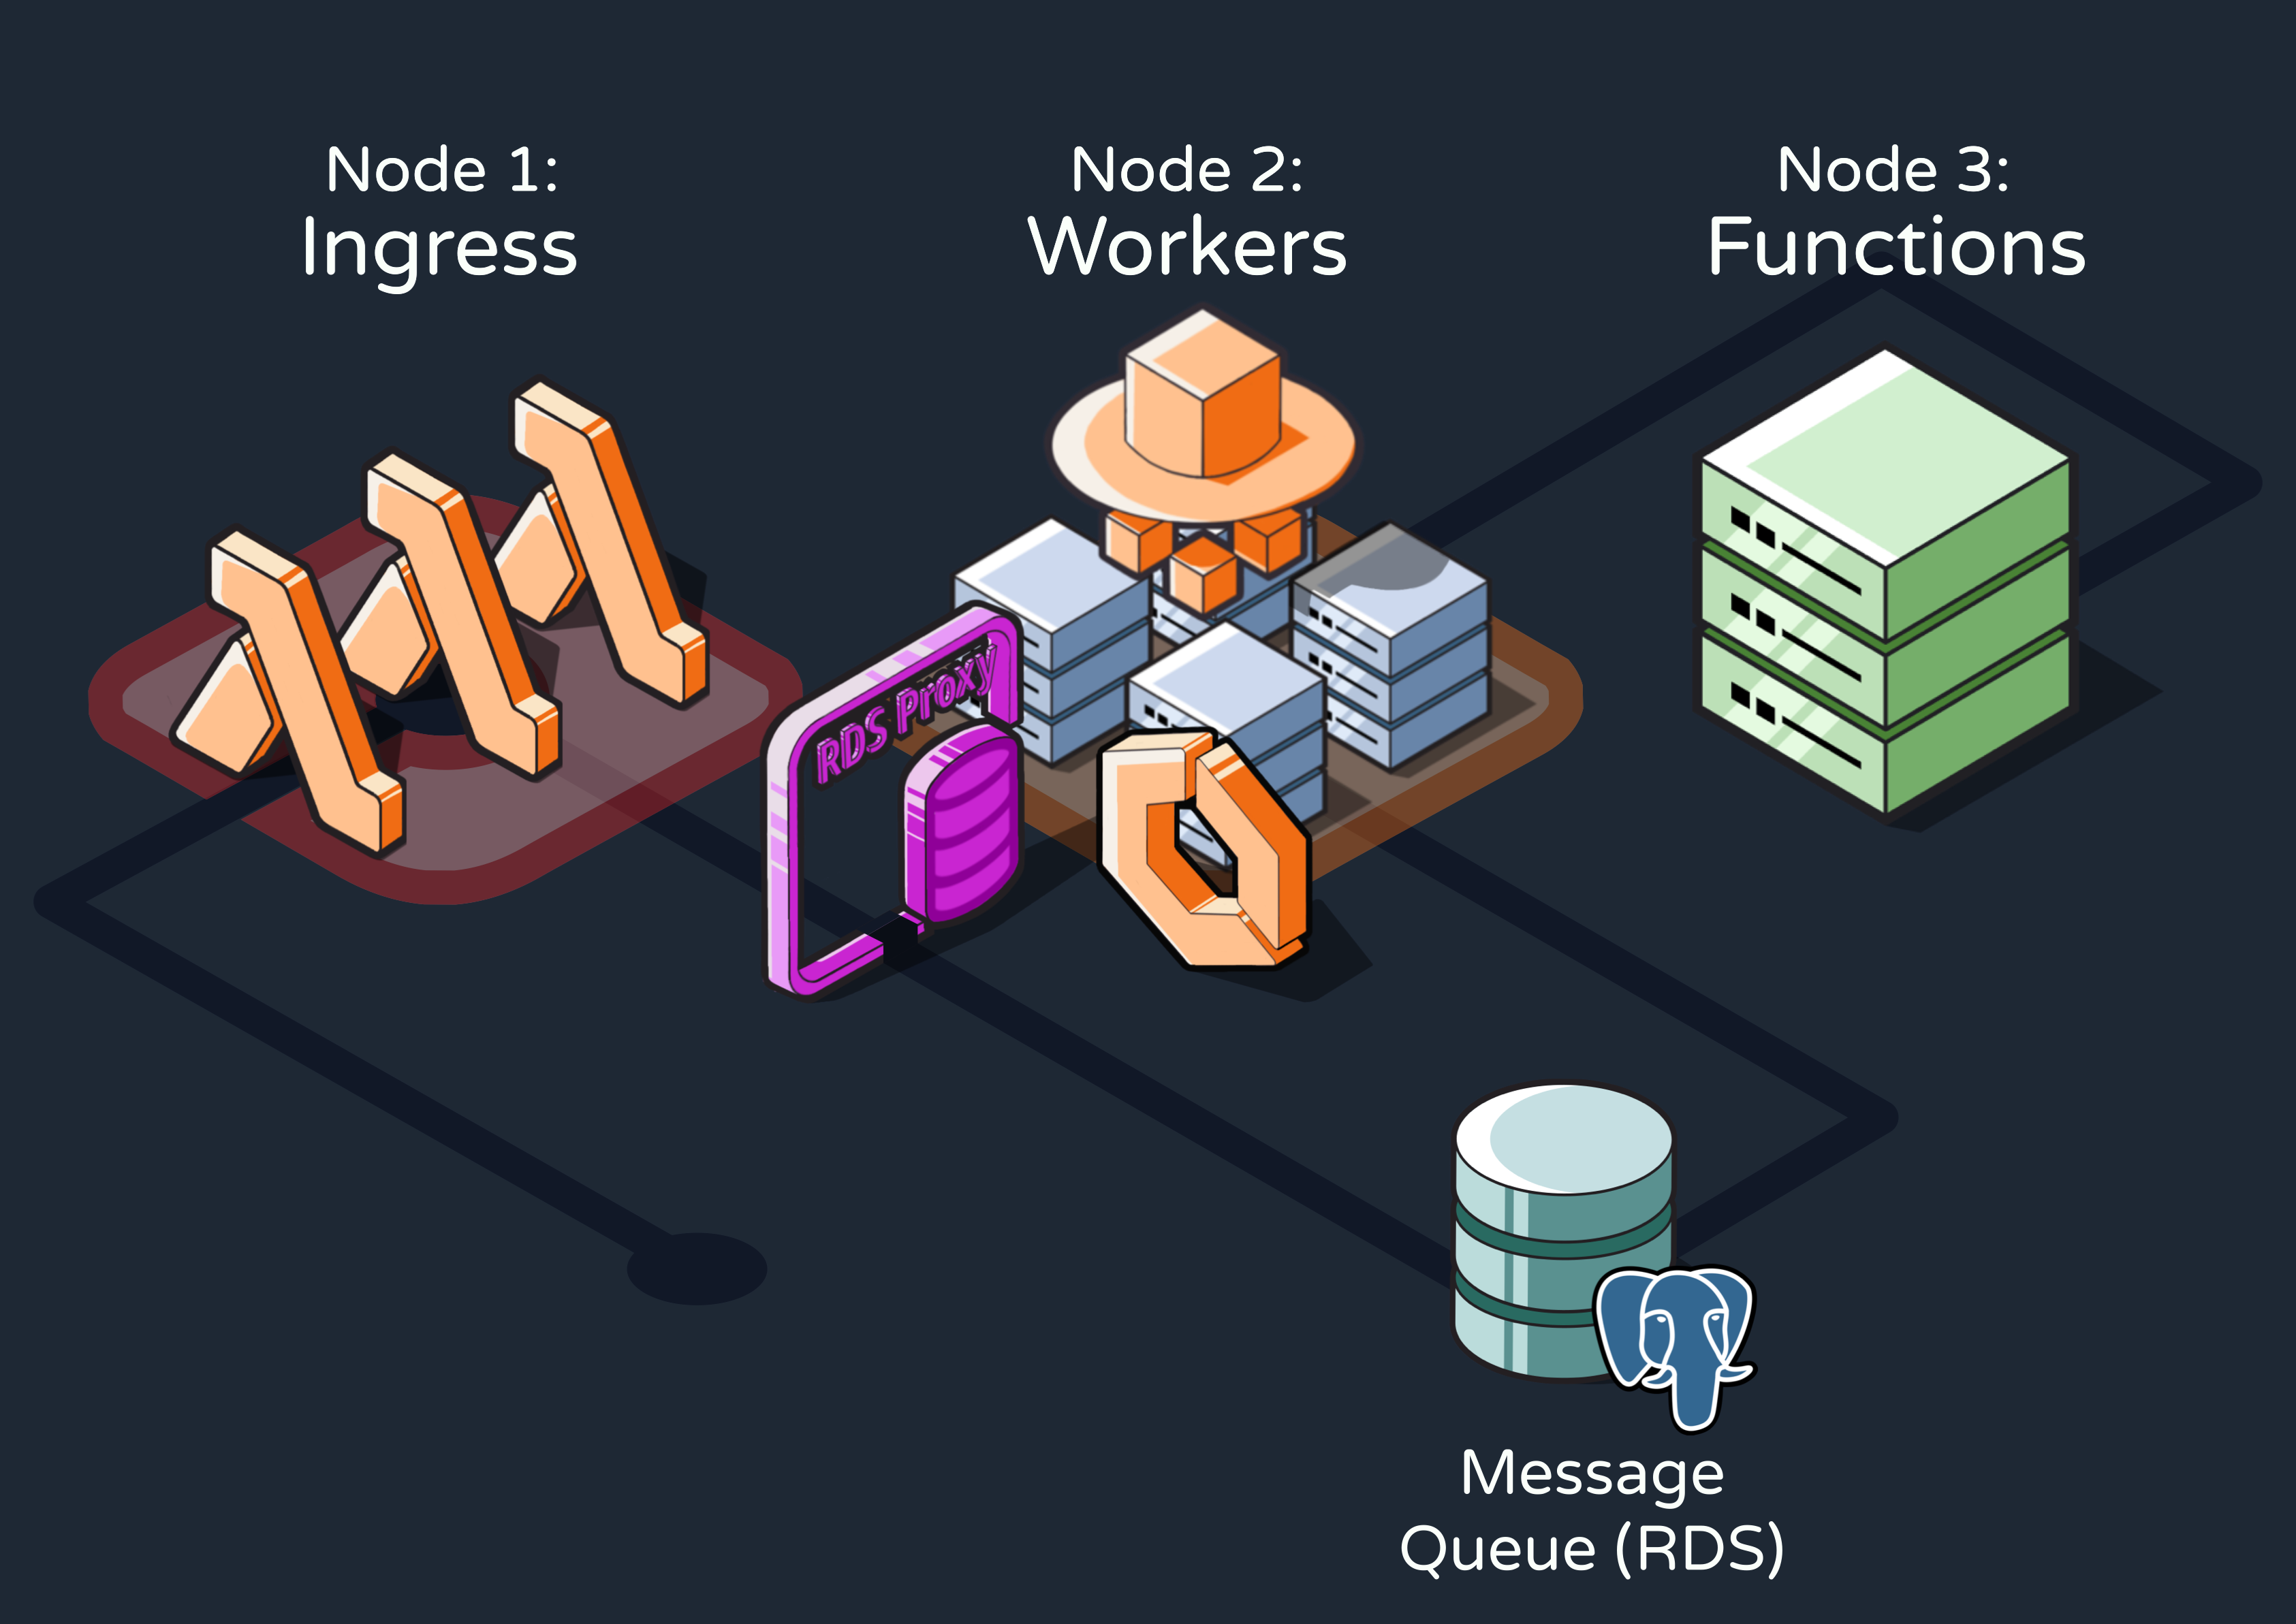
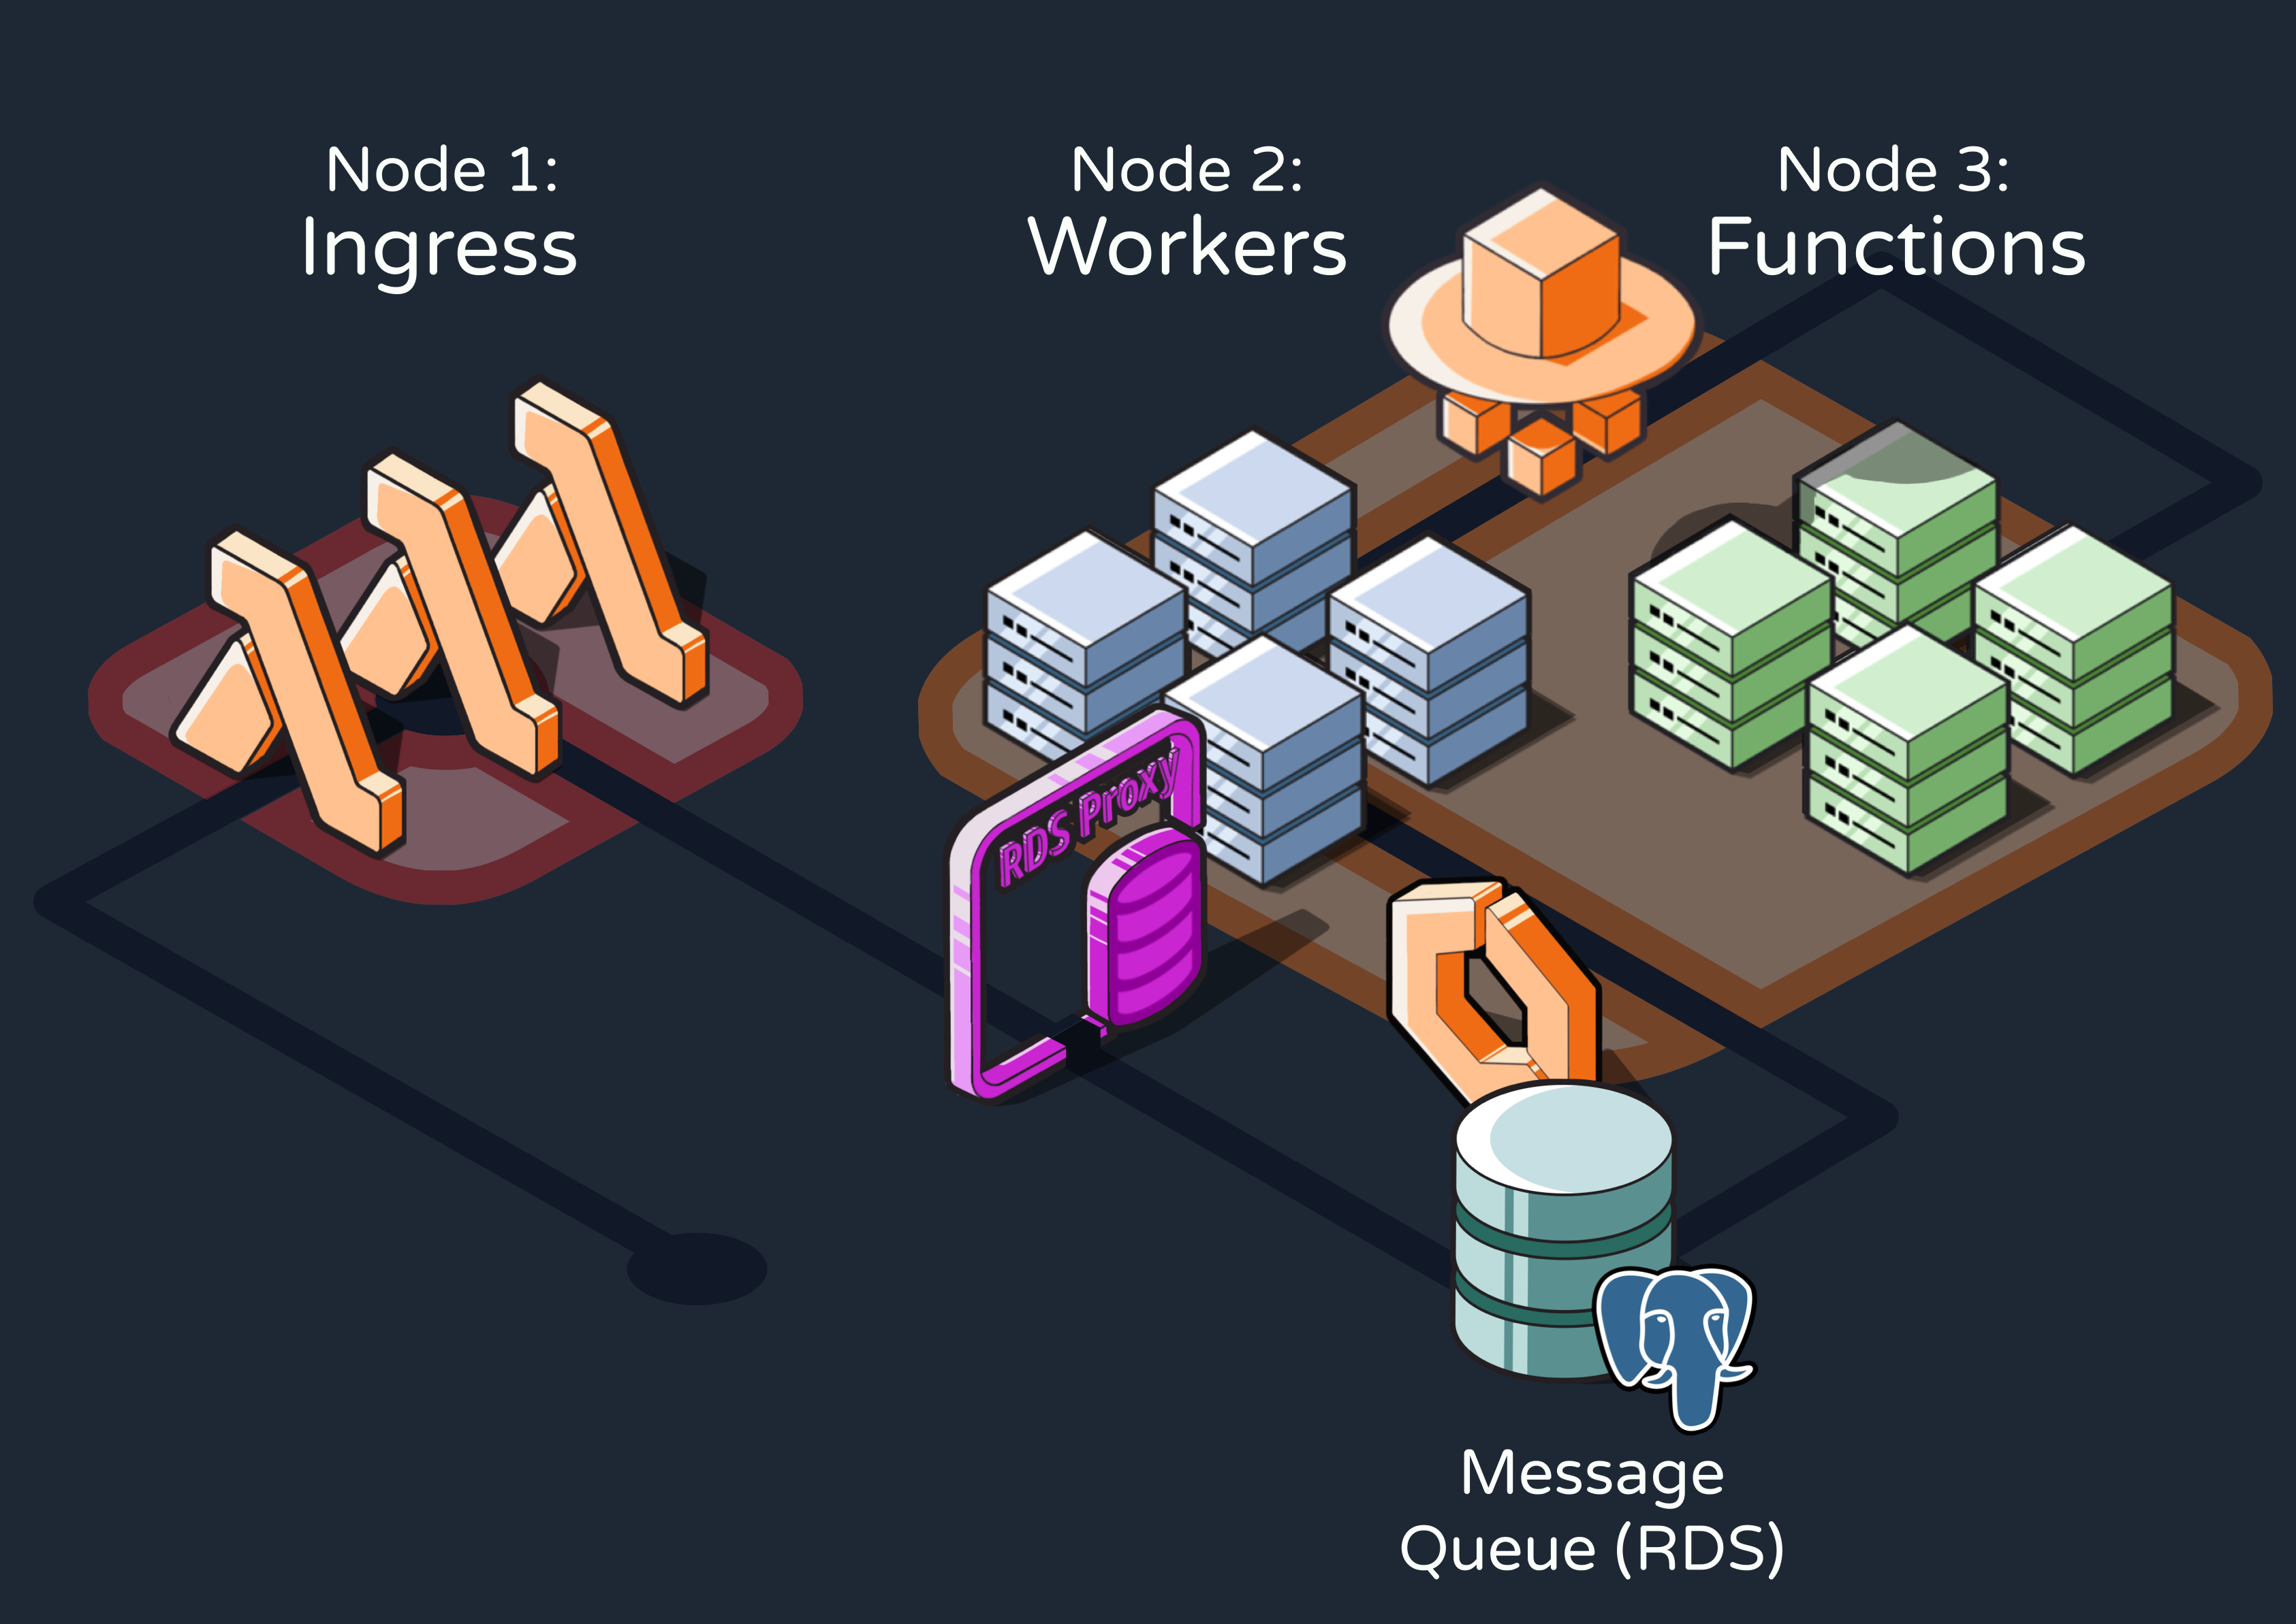
5.1 Overview of the Three-Node Pattern
Before discussing how we designed and built Reverb on AWS, let’s consider a high-level view of how an existing application would integrate with the engine during production.
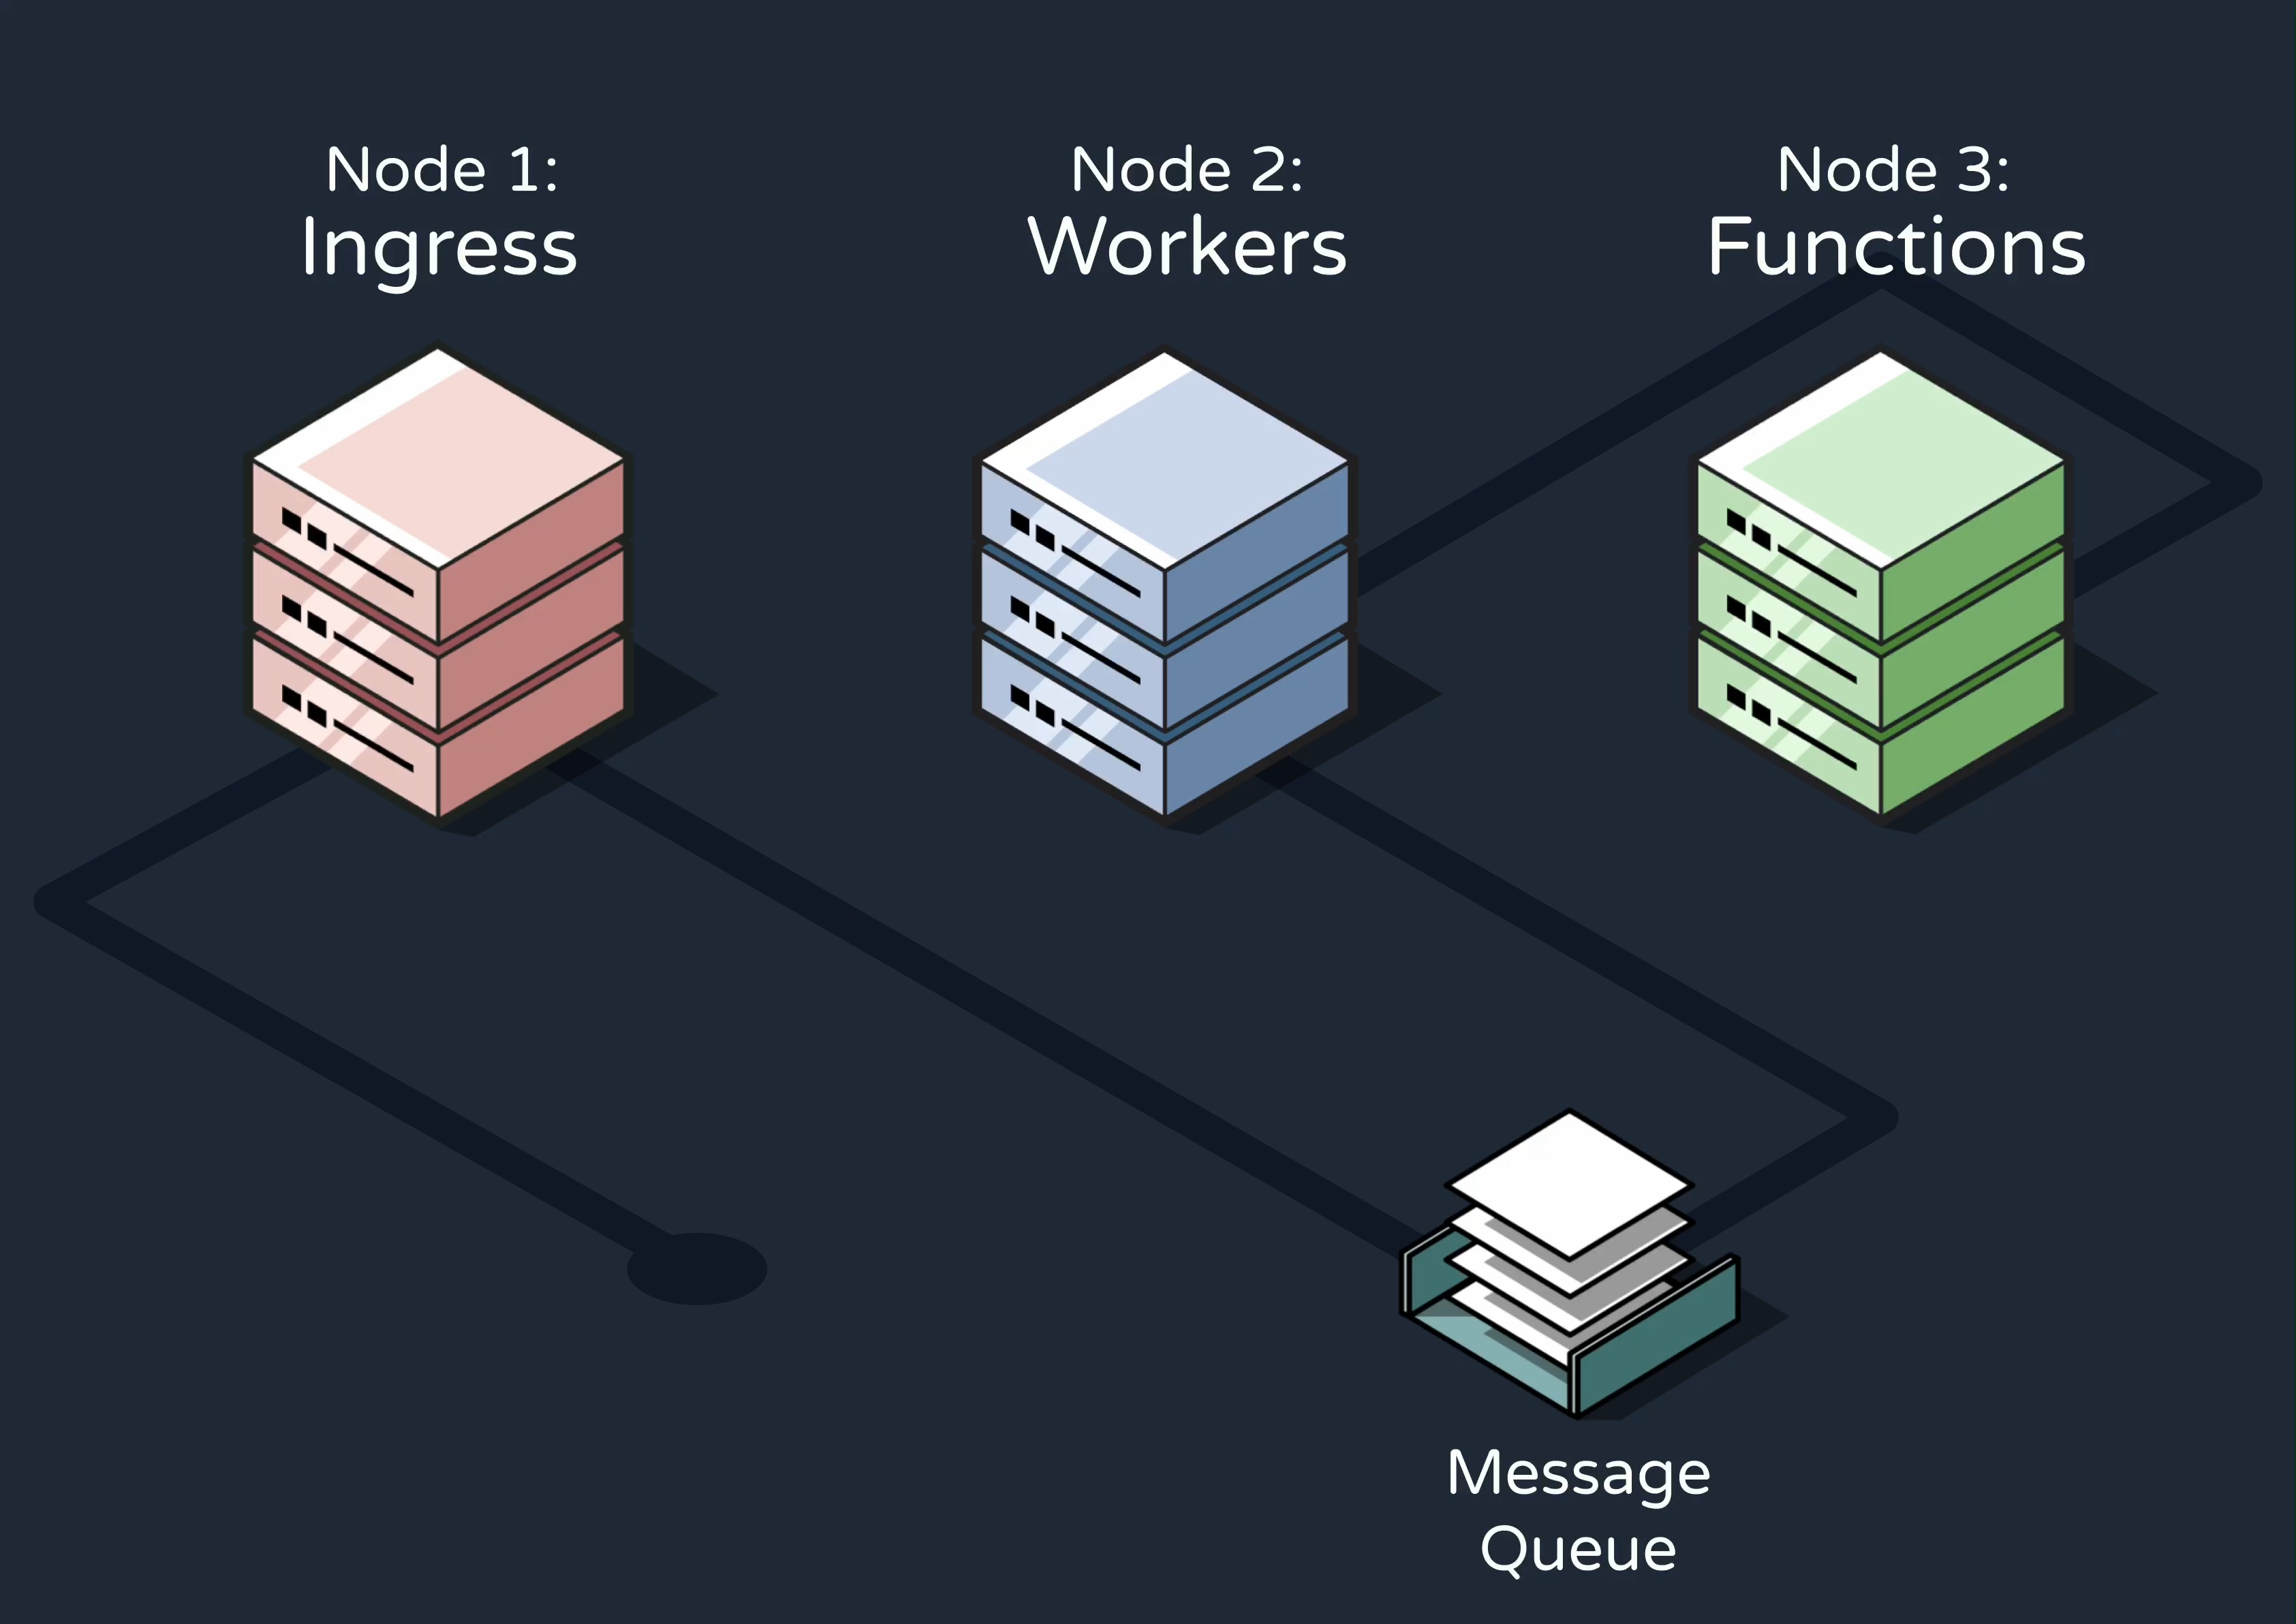
- Whenever an event that should trigger one or more Reverb workflows occurred within the application, it would send an HTTP request to the first of Reverb’s three conceptual nodes––the ingress node. This node would ingest and validate the event data.
- The event would then be added to a message queue in the queue and workers node. At a high level, this node would be responsible for determining which workflows need to be triggered by each event and sending RPC requests to execute the workflows.
- Finally, these RPCs would be received by the functions node, which defines the workflows as step functions and exposes them to RPCs at a specified endpoint. The workflows are executed here.
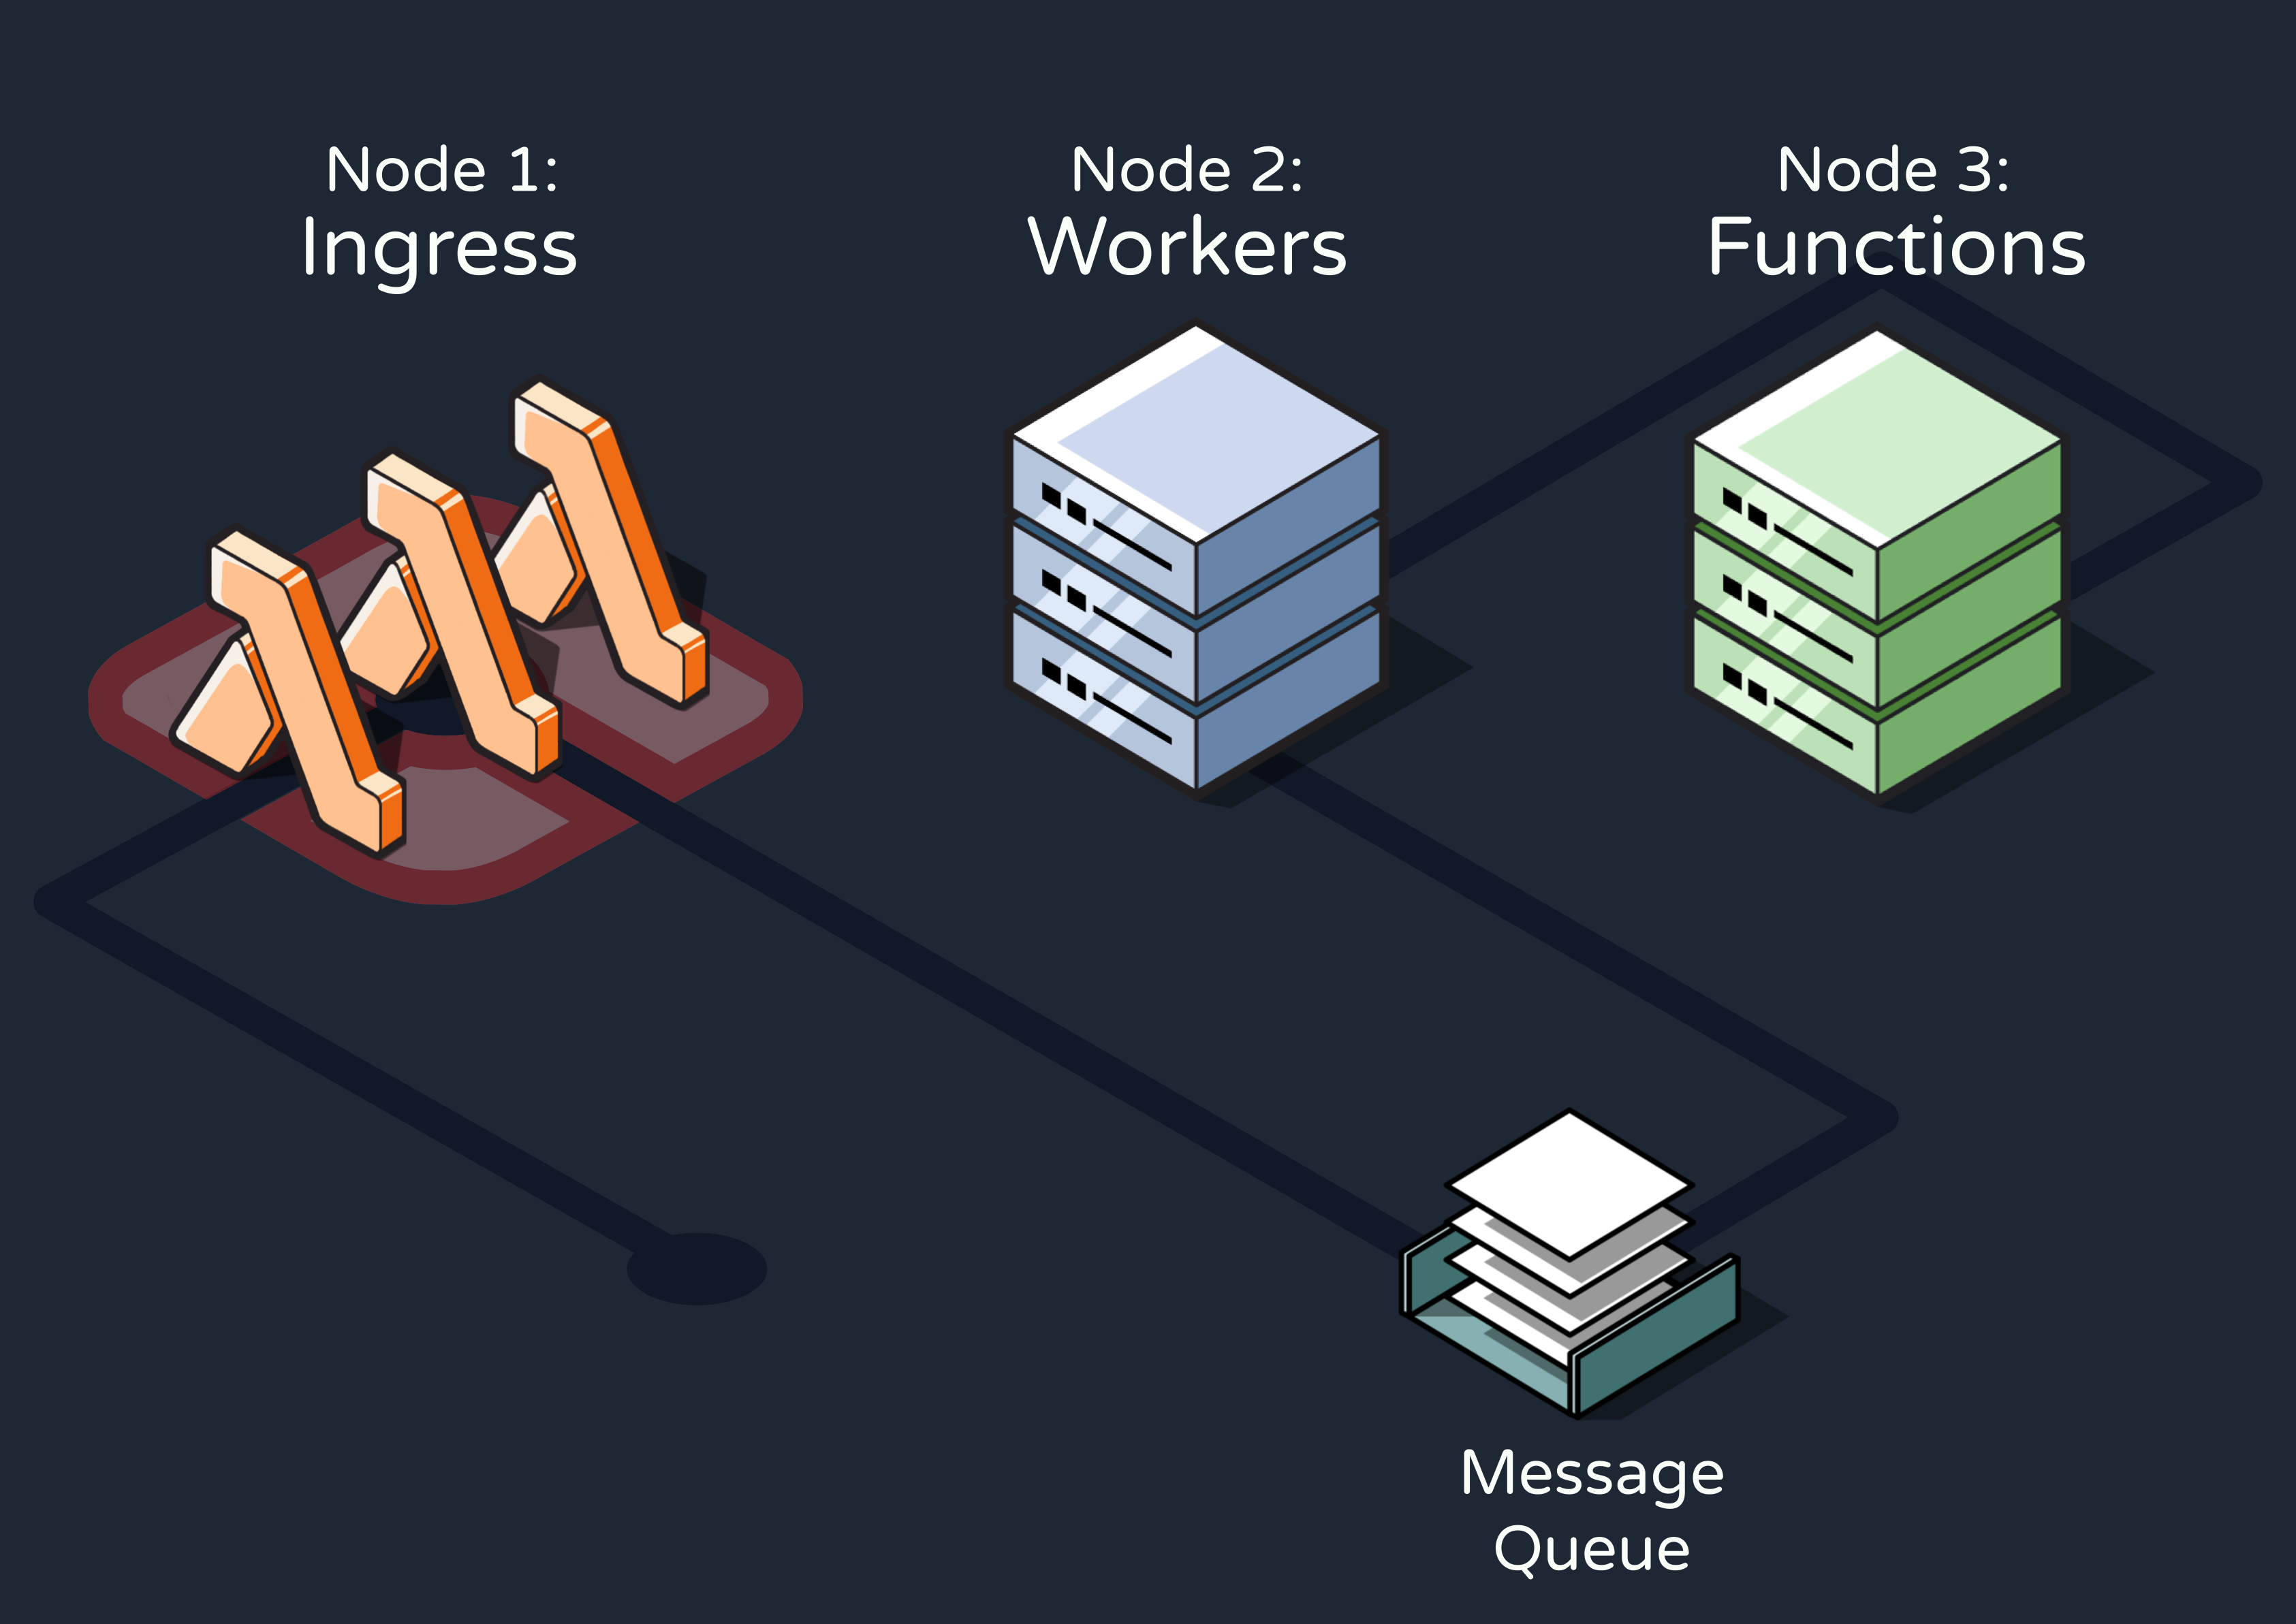
5.2 Ingesting Events
Our natural first step was to build the ingress node for ingesting, validating, and enqueuing events. We started out by implementing it as a long-running server that constantly listened for event HTTP requests from the user’s application. However, we quickly realized that this solution was highly inefficient.
We therefore pivoted to Lambda, AWS’s serverless function service, for two primary reasons. First, event throughput was likely to be bursty for many use cases, meaning our ingest server would need to respond to frequent spikes of concentrated traffic. And second, the ingestion task was simple enough to fit within Lambda’s timeout limits.
5.3 Implementing our Queues
Creating our own queue system from scratch would have added unnecessary complexity and development time, as there are already many proven technologies in the space. For Reverb, we needed a solution that could handle significant throughput, survive system crashes, and be easy for users to maintain when self-hosting.
5.3.1 Postgres and Graphile Worker

We ultimately chose Graphile Worker to implement Reverb’s queues. Graphile Worker is an open-source job queue that stores jobs on PostgreSQL and processes them on Node.js workers. While using a database like Postgres as a queue might sound unusual, doing so prevents queued jobs from being lost to server crashes by writing them to disk. Sure, this means it takes slightly more time to queue and dequeue jobs than it would with an in-memory solution like RabbitMQ, but asynchronous workflows are, well, asynchronous. It’s generally more important that they’re executed successfully than extremely quickly.
Additionally, we needed to ensure our service was reliable even when operating under high levels of worker concurrency. Fortunately, Graphile Worker prevents jobs from being dequeued by more than one worker through the Postgres SKIP LOCKED command.
Some additional reasons we chose Graphile Worker include:
- Automatic retries with exponential backoff allow for even more durability
- It is highly performant for Reverb’s use case
- Cron jobs are supported, and Postgres is more capable of handling long delays than in-memory solutions
- Its use of Postgres and Typescript fit seamlessly with the rest of our tech stack
We also briefly considered a few other solutions, including RabbitMQ and Amazon’s Simple Queue Service (SQS). While RabbitMQ is highly scalable because it lives in memory, this makes it far more susceptible to losing data when its server(s) go down. Additionally, storing large numbers of delayed jobs could really slow it down, which is not the case with Postgres’s persistent storage. Finally, RabbitMQ does not support any cron functionality, so we would have had to build out a separate solution for cron.
As for SQS, it does have smart durability defaults and would have integrated easily with the rest of our AWS infrastructure. But it doesn’t offer any solutions for cron jobs or even for delaying messages longer than 15 minutes, which disqualified it for use in our engine.
5.3.2 Processing Events and Invocations with Graphile Worker
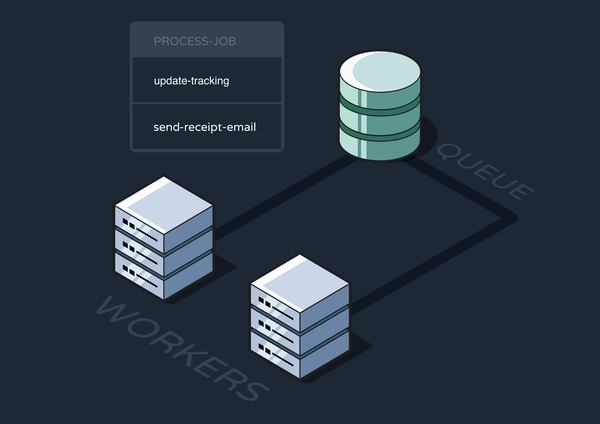
To implement our main queuing functionality with Graphile Worker, we created two separate task queues.
The first task is called “process-event.” Its workers take in events and map them to the workflows they should trigger.
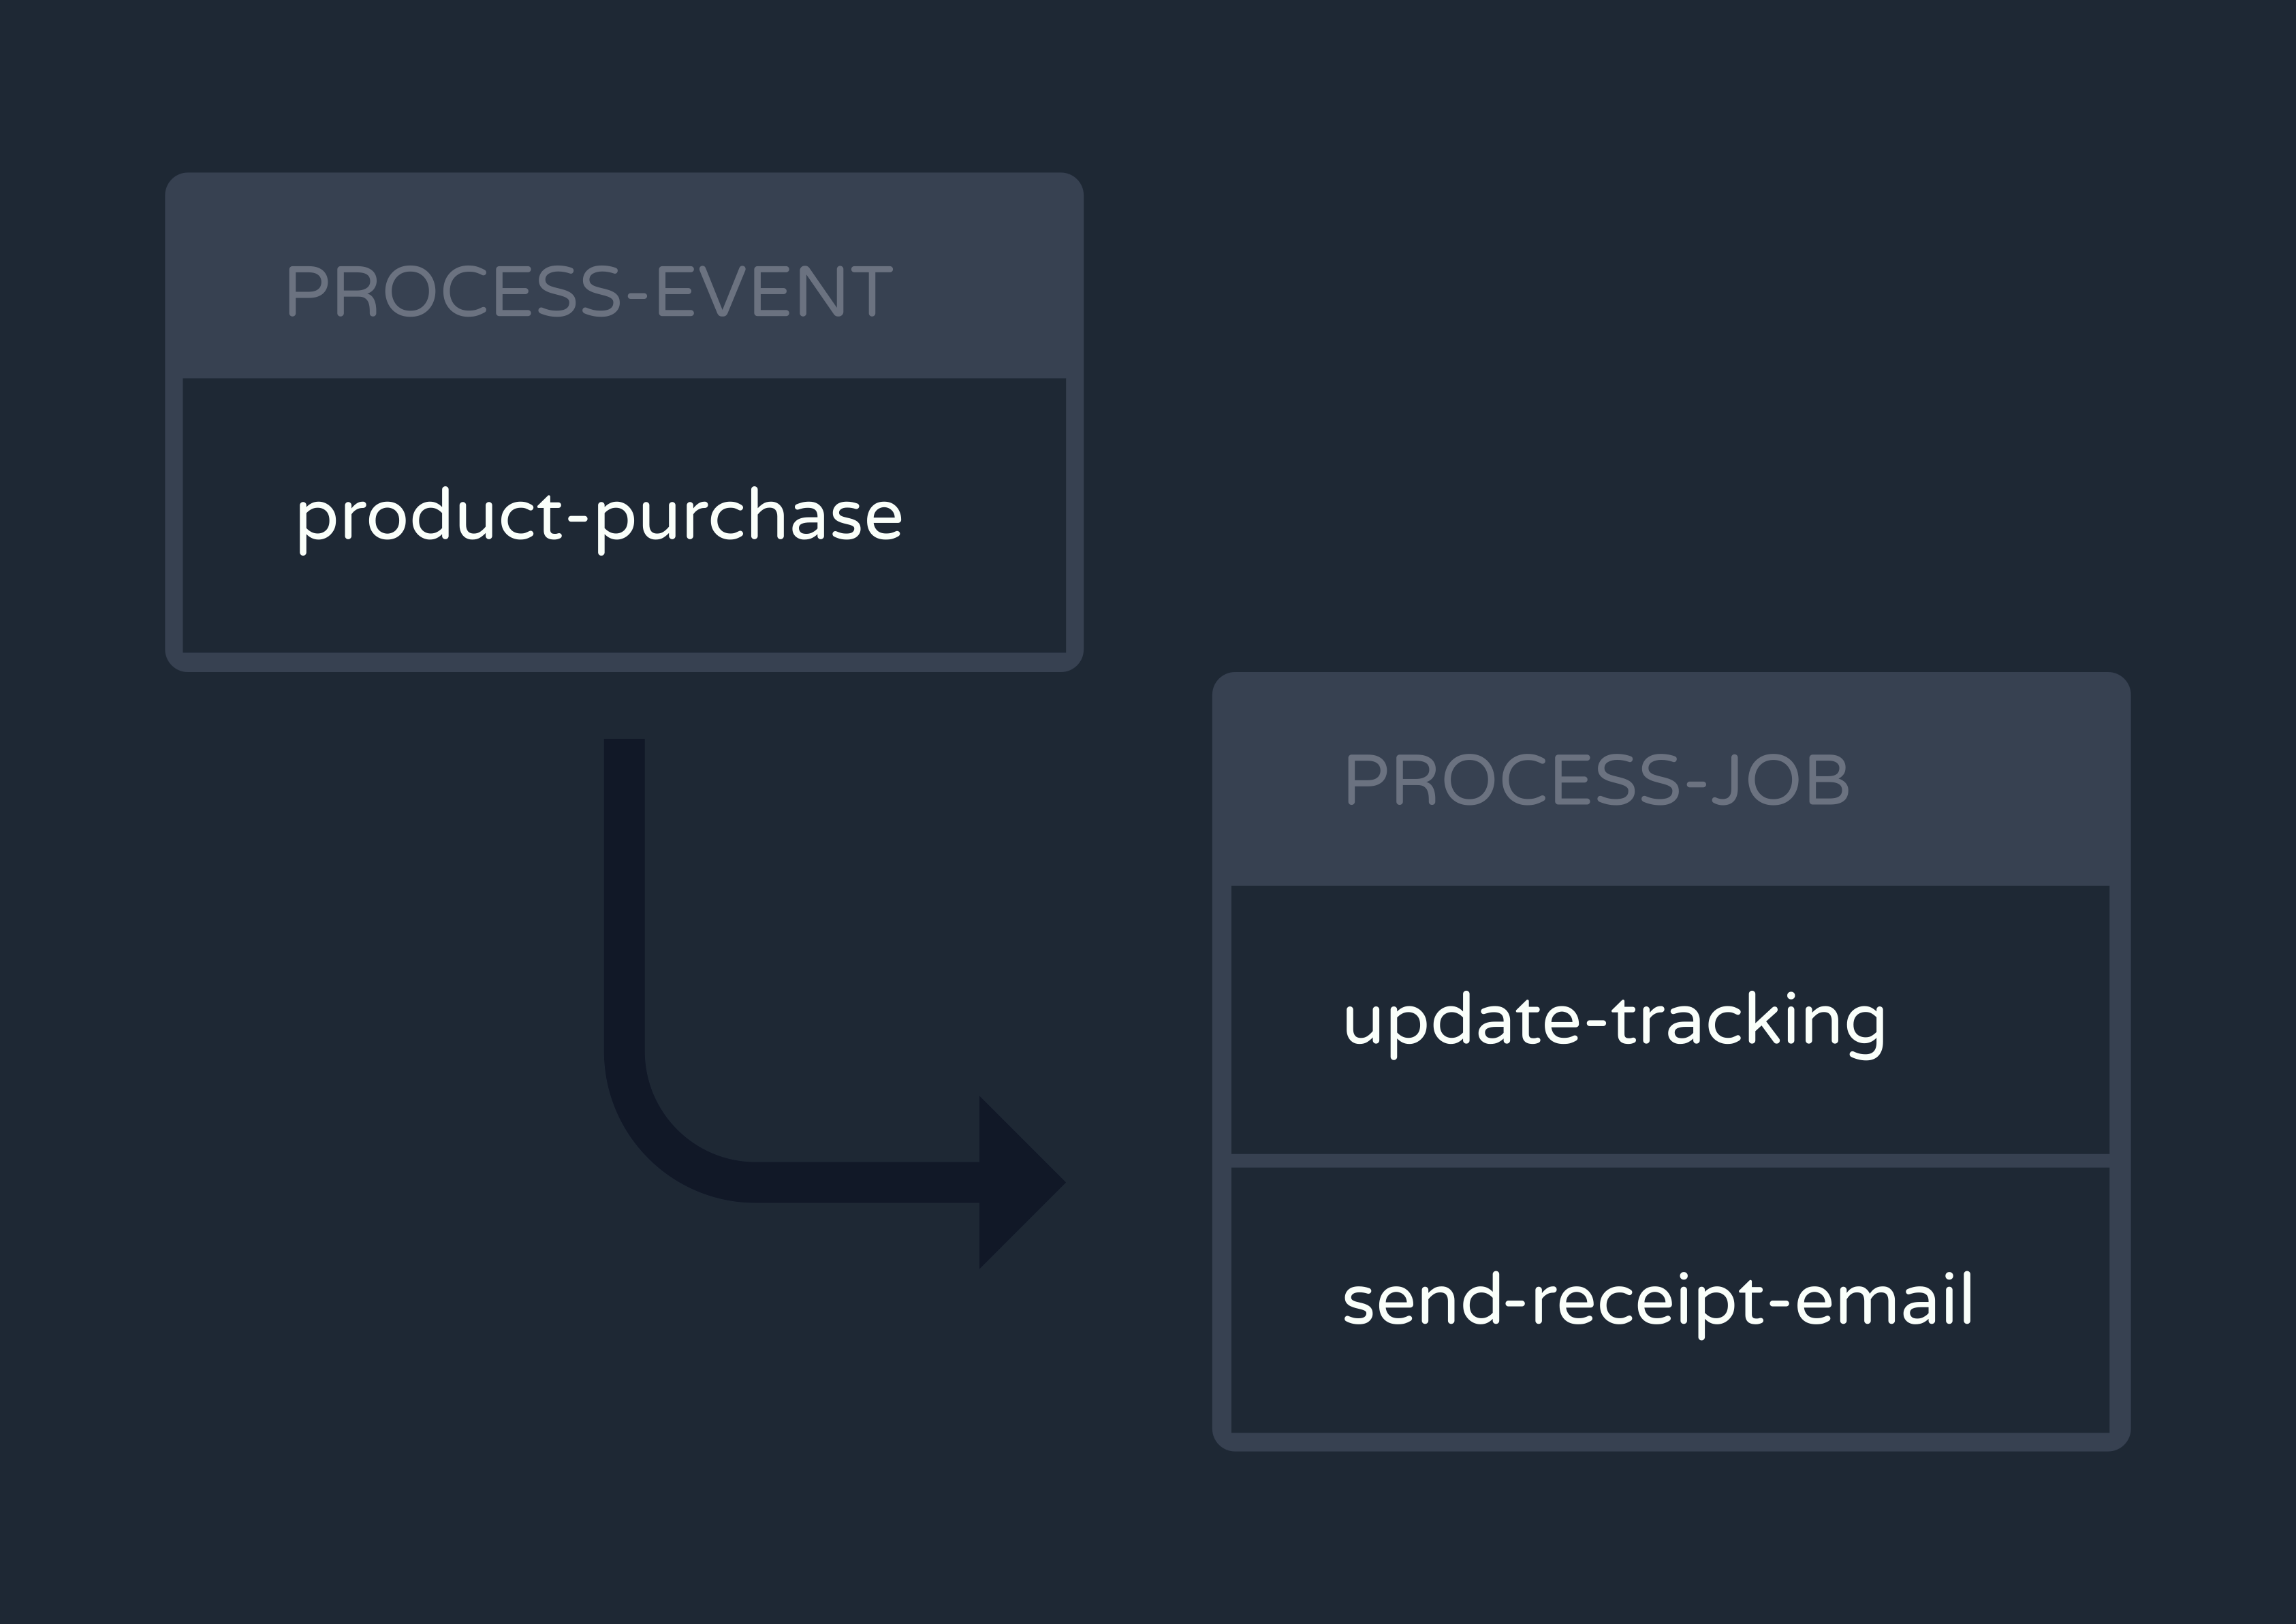
Next, the “process-event” workers enqueue a new job for each workflow invocation onto a second task queue called “process-job.” This is how one event fans out to multiple Reverb workflows. Workers on the “process-job” queue send RPCs to the functions node, where the workflows are finally executed.
In addition to the initial invocation, “process-job” workers are responsible for handling subsequent steps of a workflow. For more about how this step functionality was implemented, see the Implementation Challenges section.
5.3.3 Mapping to AWS
Because Reverb is a self-hosted service, all maintenance and scaling of our queue would take place on our users’ AWS accounts. Therefore, it was crucial that we made these processes as durable and automated as possible.
For the Postgres database, our main options were to run our own instance on AWS Elastic Cloud Compute (EC2) or use the managed AWS Relational Database Service (RDS). We chose RDS for its automated scaling and data backup features, which significantly reduce the manual configuration burden while ensuring durability for the jobs in the queue.
As for the workers server, we considered AWS Elastic Container Service (ECS) with either EC2 or Fargate. We opted for the more managed solution with Fargate because it removes the need to select server types or decide when to scale. This approach allows developers self-hosting Reverb to focus solely on defining their workflows without worrying about whether their queue will be able to handle processing them.
5.3.4 Lambdas vs. Database Connection Pooling
While Lambda and Postgres were each great solutions for their respective nodes, having the Lambdas directly enqueue events in Postgres posed a problem.
Opening database connections is expensive. Each new connection introduces overhead and latency through network handshakes, client authentication, and session management. If we’d stuck with an always-on ingress server, we could have maintained a long-running connection pool to store and reuse open connections. In other words, we wouldn’t have had to perform expensive operations every time we wanted to enqueue an event.
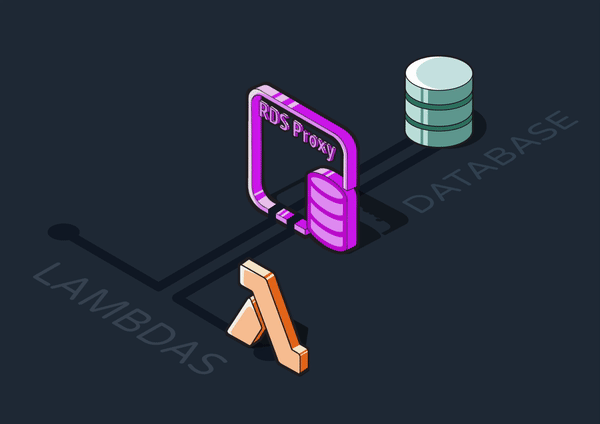
However, we instead opted for Lambdas and their short lifespans, which cannot maintain database connections between invocations. Thankfully AWS offers a solution to this problem called a database proxy.
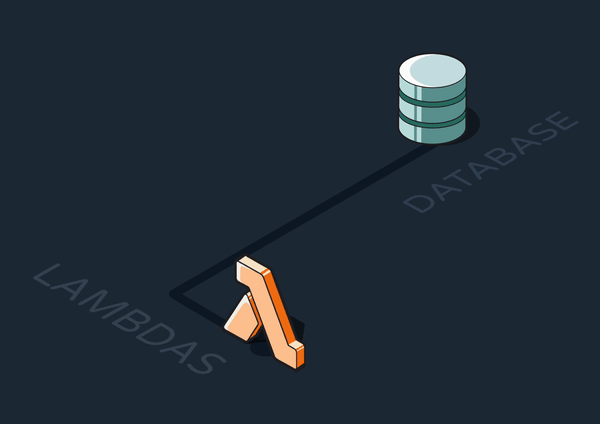
5.3.5 Adding a Database Proxy
A database proxy is an intermediary layer that manages traffic between clients (such as our ingress Lambdas) and a database server. It can provide various functionalities like query caching and security, but most importantly for Reverb, it can maintain a connection pool.
We introduced an AWS RDS Proxy between the Lambdas and the Postgres queue. Rather than constantly creating new connections to the RDS, the Lambdas communicate with the proxy through a pool of connections it maintains. Ultimately, we decided the efficiency benefits of using Lambdas were worth the tradeoff of adding another piece of infrastructure.
5.4 Defining & Executing Workflows
5.4.1 Defining Workflows as Step Functions
We now know how Reverb ingests events, maps them to workflows, and sends RPC calls to invoke those workflows. But how were the workflows defined in the first place?
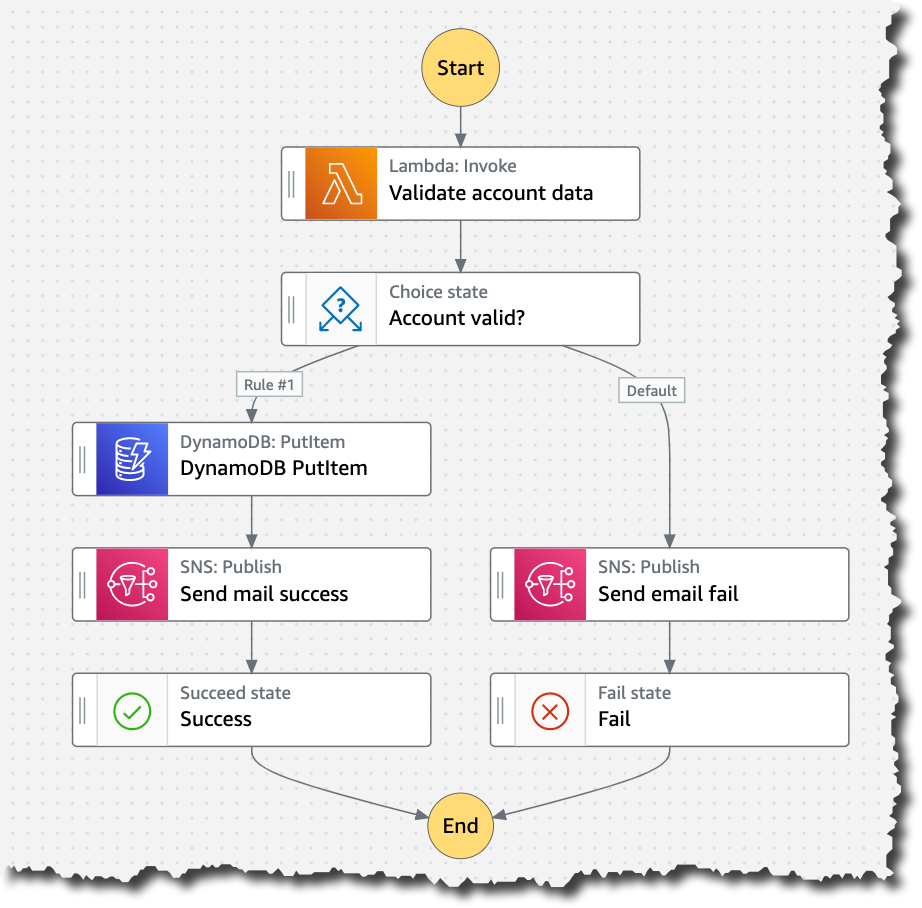
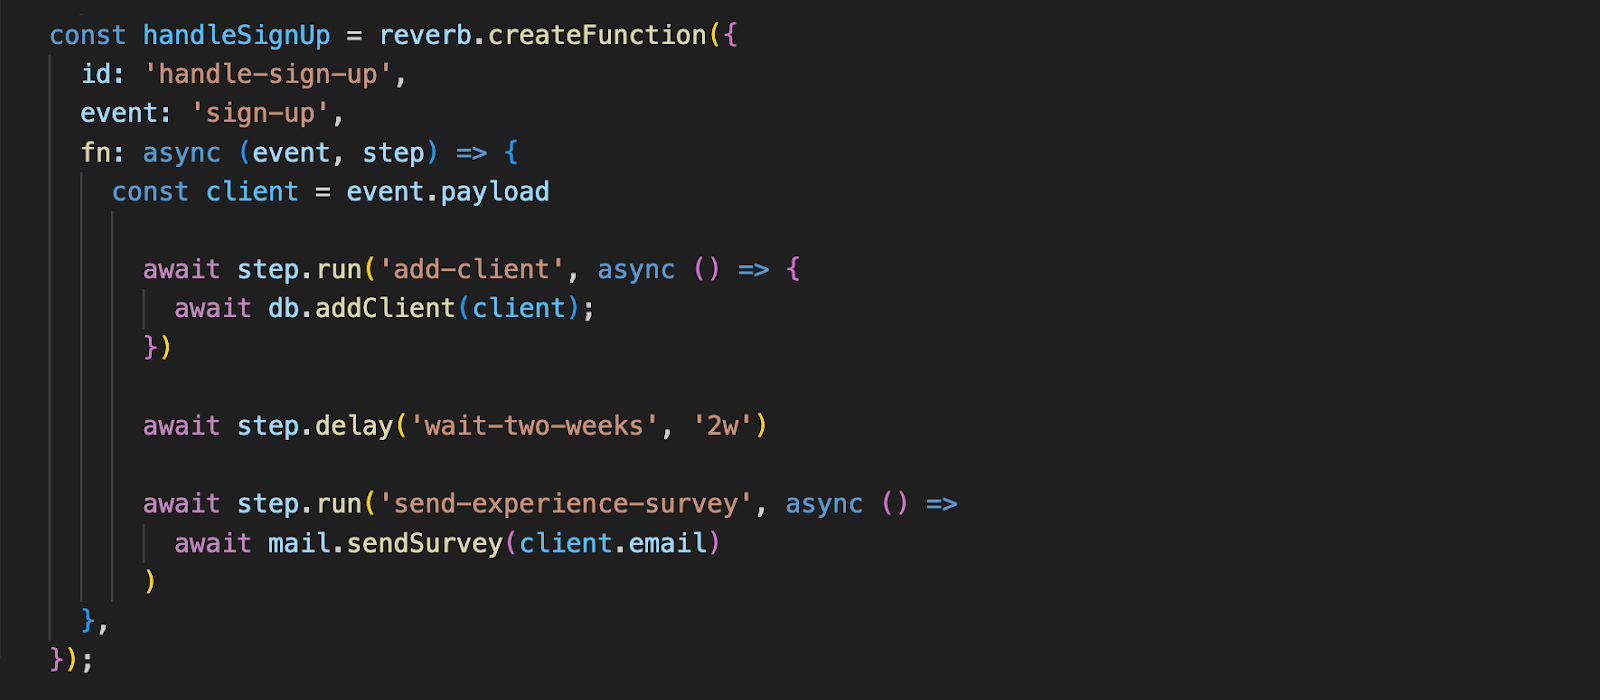
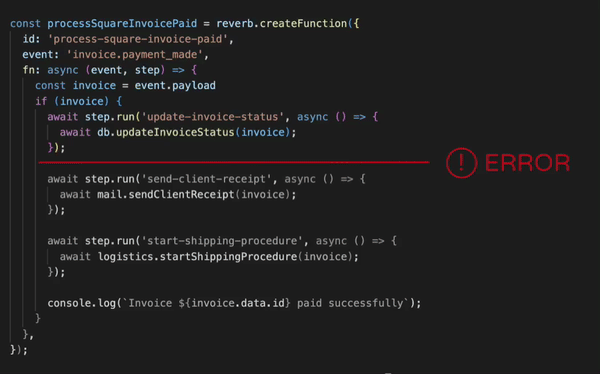
Before an event is ever sent during production, our users would have defined workflows as step functions during development. They do this in their own repository by installing our NPM package, “@reverb-app/functions,” and using the “createFunction” method exposed by the package. Here, we see an example step function “handle-sign-up” which is triggered by a “sign-up” event.
5.4.2 Function Steps
Reverb supports four types of steps within its workflows, allowing it to accommodate many different use cases.
- step.run(): runs a callback function passed to it as an argument
- step.delay(): delays execution of the subsequent workflow step for a specified time
- step.invoke(): triggers execution of another workflow
- step.emitEvent(): enqueues a new event that can trigger multiple workflows
Reverb also supports branching steps, which means any of the above steps can be set to execute only when conditions specified by the developer are satisfied.
5.4.3 Registering & Serving Functions
A workflow engine also needs to provide a way for the user to expose their function definitions to the engine. You can think of this as registering functions with Reverb so it knows how to trigger and execute them. So, in addition to “createFunction,” the Reverb NPM package exposes a “serve” method that performs two essential actions.
First, it registers metadata representing functions and events on the same Postgres RDS instance that hosts our queue. The “process-event” workers will use this data to map events to the functions they trigger.
Second, the “serve” method spins up a server endpoint where workers can send RPCs to invoke the step functions.
5.4.4 Where Does the Functions Node Live?
Some engines execute workflows on the user’s existing infrastructure, sending RPC requests directly to the user’s codebase. Others provide a way to deploy function definitions to the service itself so they can execute there instead. For Reverb, we opted to host functions on our service for a few reasons.
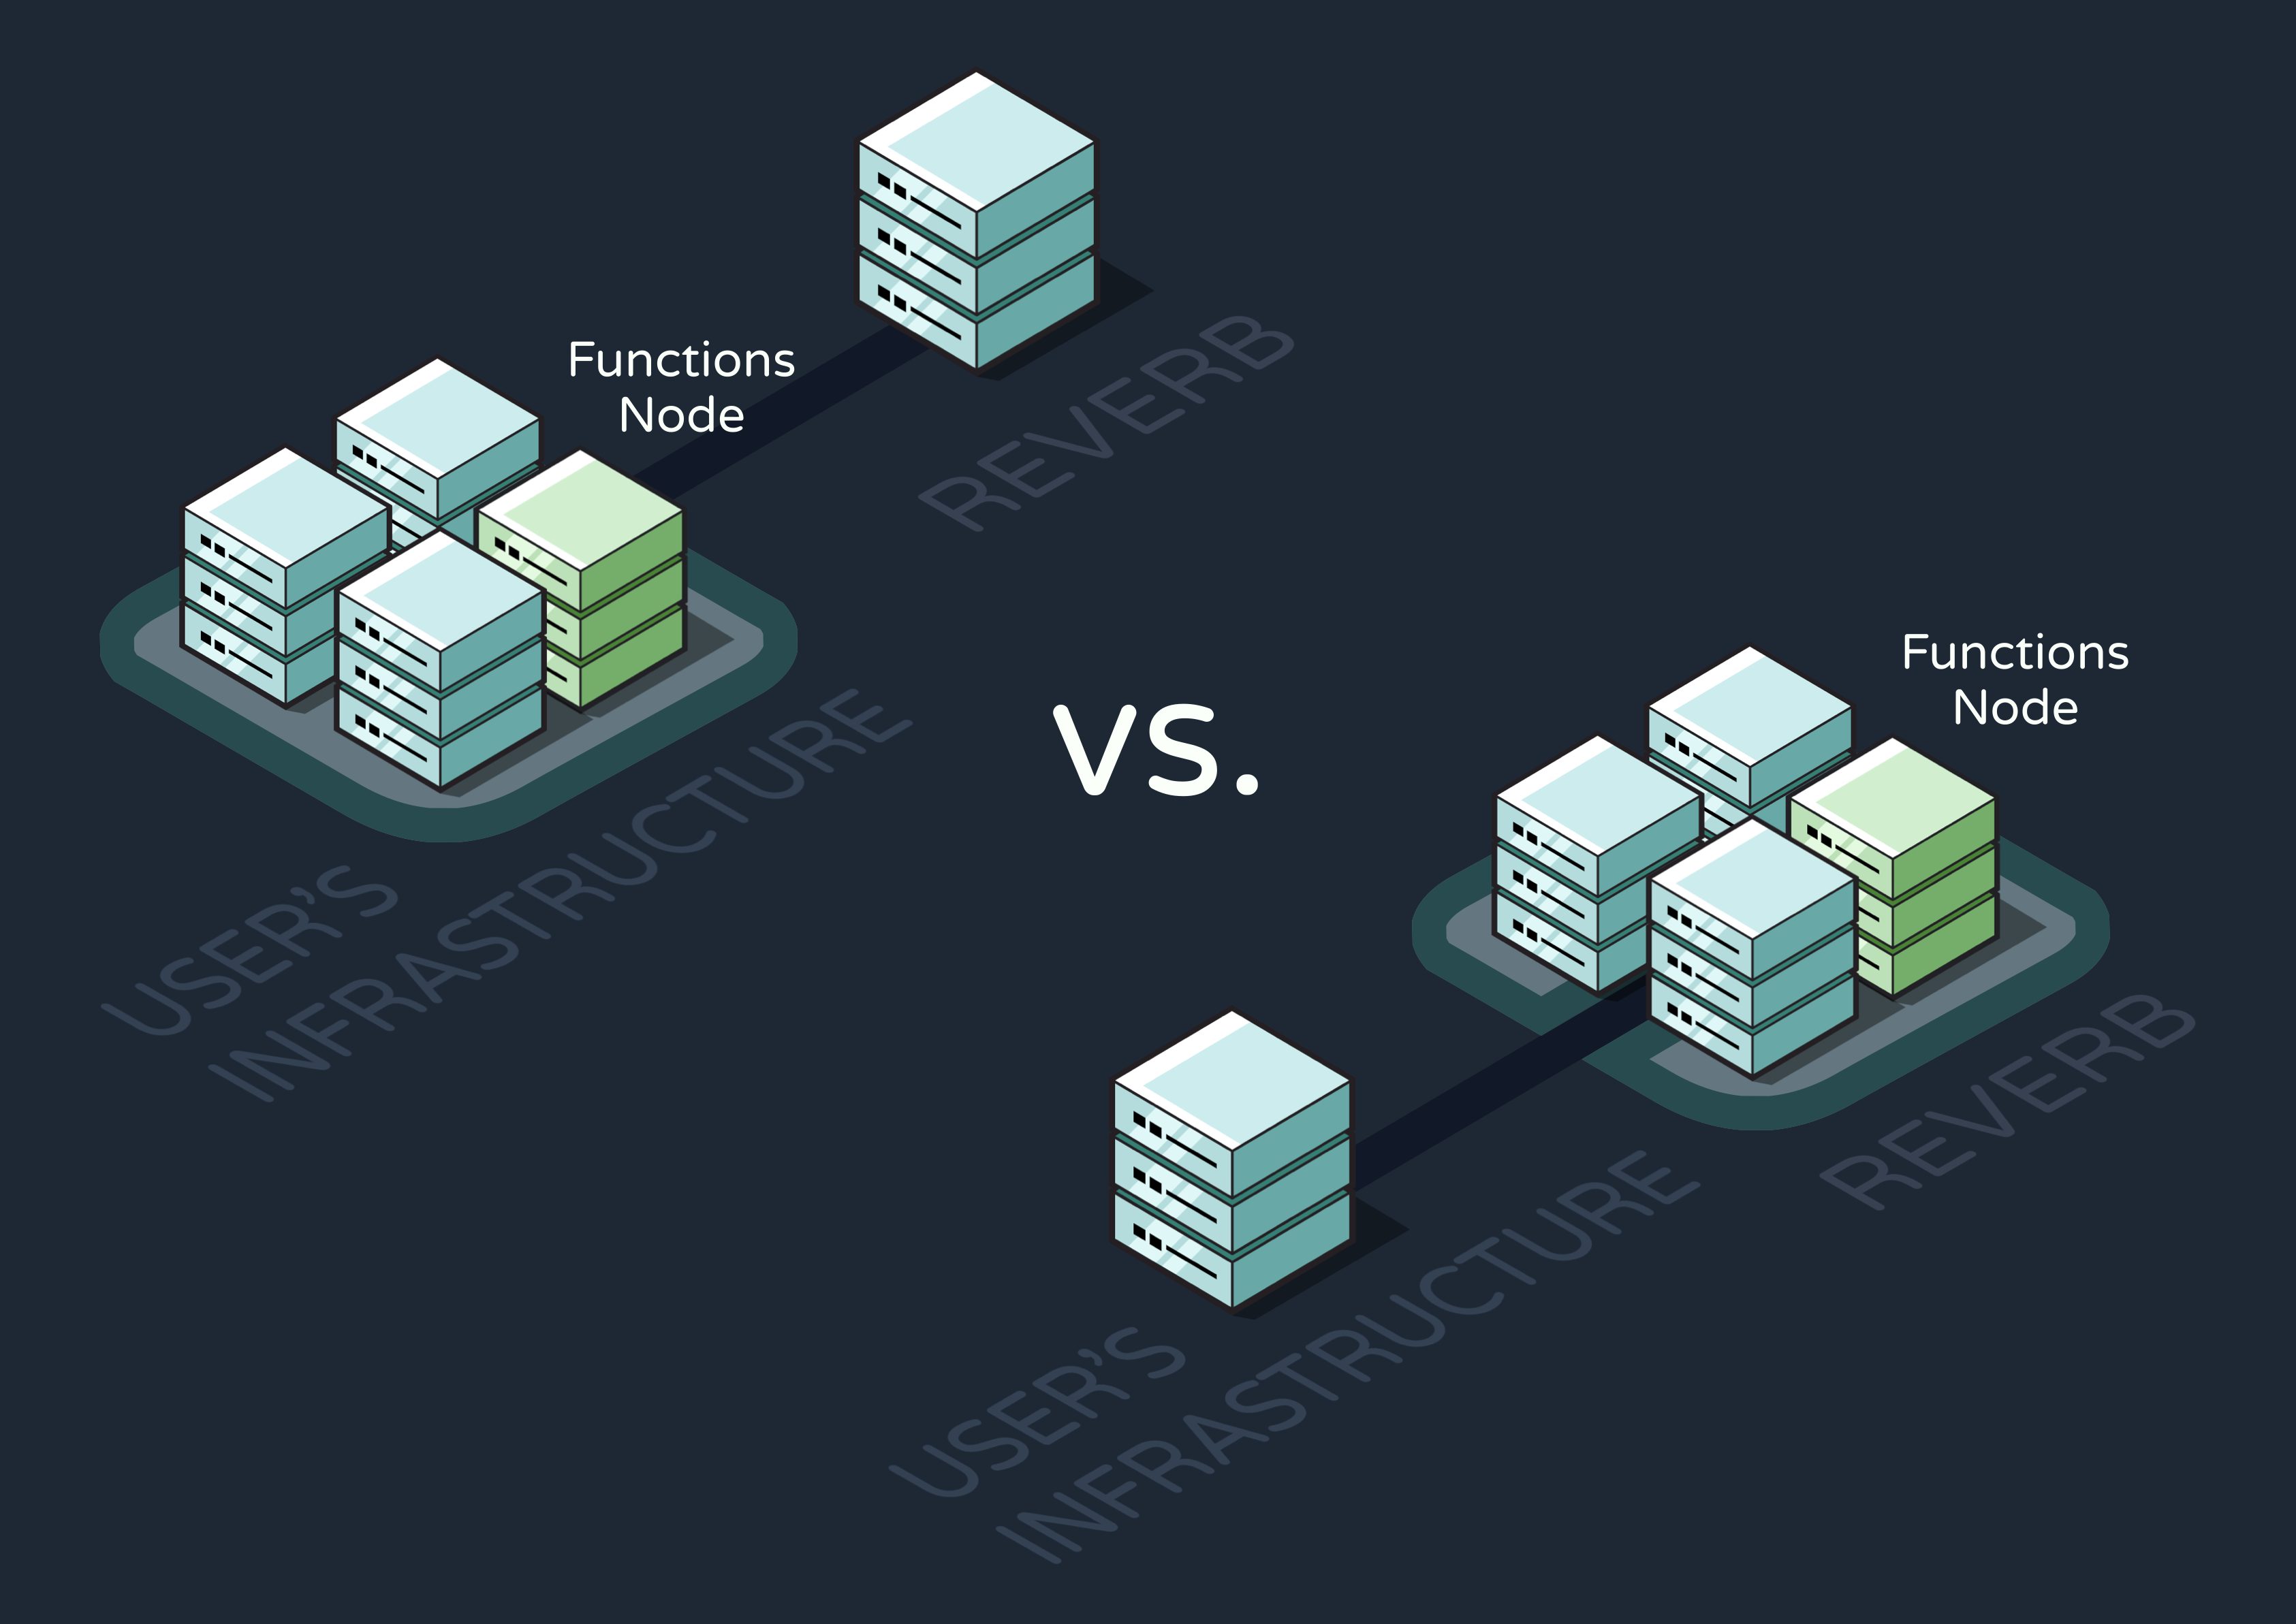
First of all, while executing on user infrastructure typically gives developers more control over the execution environment, we rendered this benefit irrelevant by making Reverb self-hosted. To better understand this, let’s compare our solution with that of a non-self-hosted service like Inngest. Their “functions node” lives on user infrastructure because executing functions on Inngest’s cloud service would give users no way to configure the environment. This isn’t true for Reverb, where the entire service exists on the user’s AWS account anyway.
Additionally, we believe hosting on Reverb’s infrastructure improves both security and developer experience:
- Security: Keeping the functions together with the rest of Reverb’s core architecture inside a private Virtual Private Cloud (VPC) limits access to external actors.
- Dev Experience: Executing on Reverb abstracts execution infrastructure and scaling away from the user, improving ease of use.
We chose this direction despite one notable tradeoff: the functions node has to be redeployed to Reverb’s service every time function definitions are changed or added. Later on in development, we automated this CI/CD process to make this drawback all but invisible to the user. We’ll cover this more deeply in the Improving Reverb section.
5.4.5 Choosing Fargate Again
Our functions node is managed by AWS Fargate alongside the workers node. Combining Fargate with our ingress Lambdas allows Reverb to auto-scale each node independently without adding more work for developers.
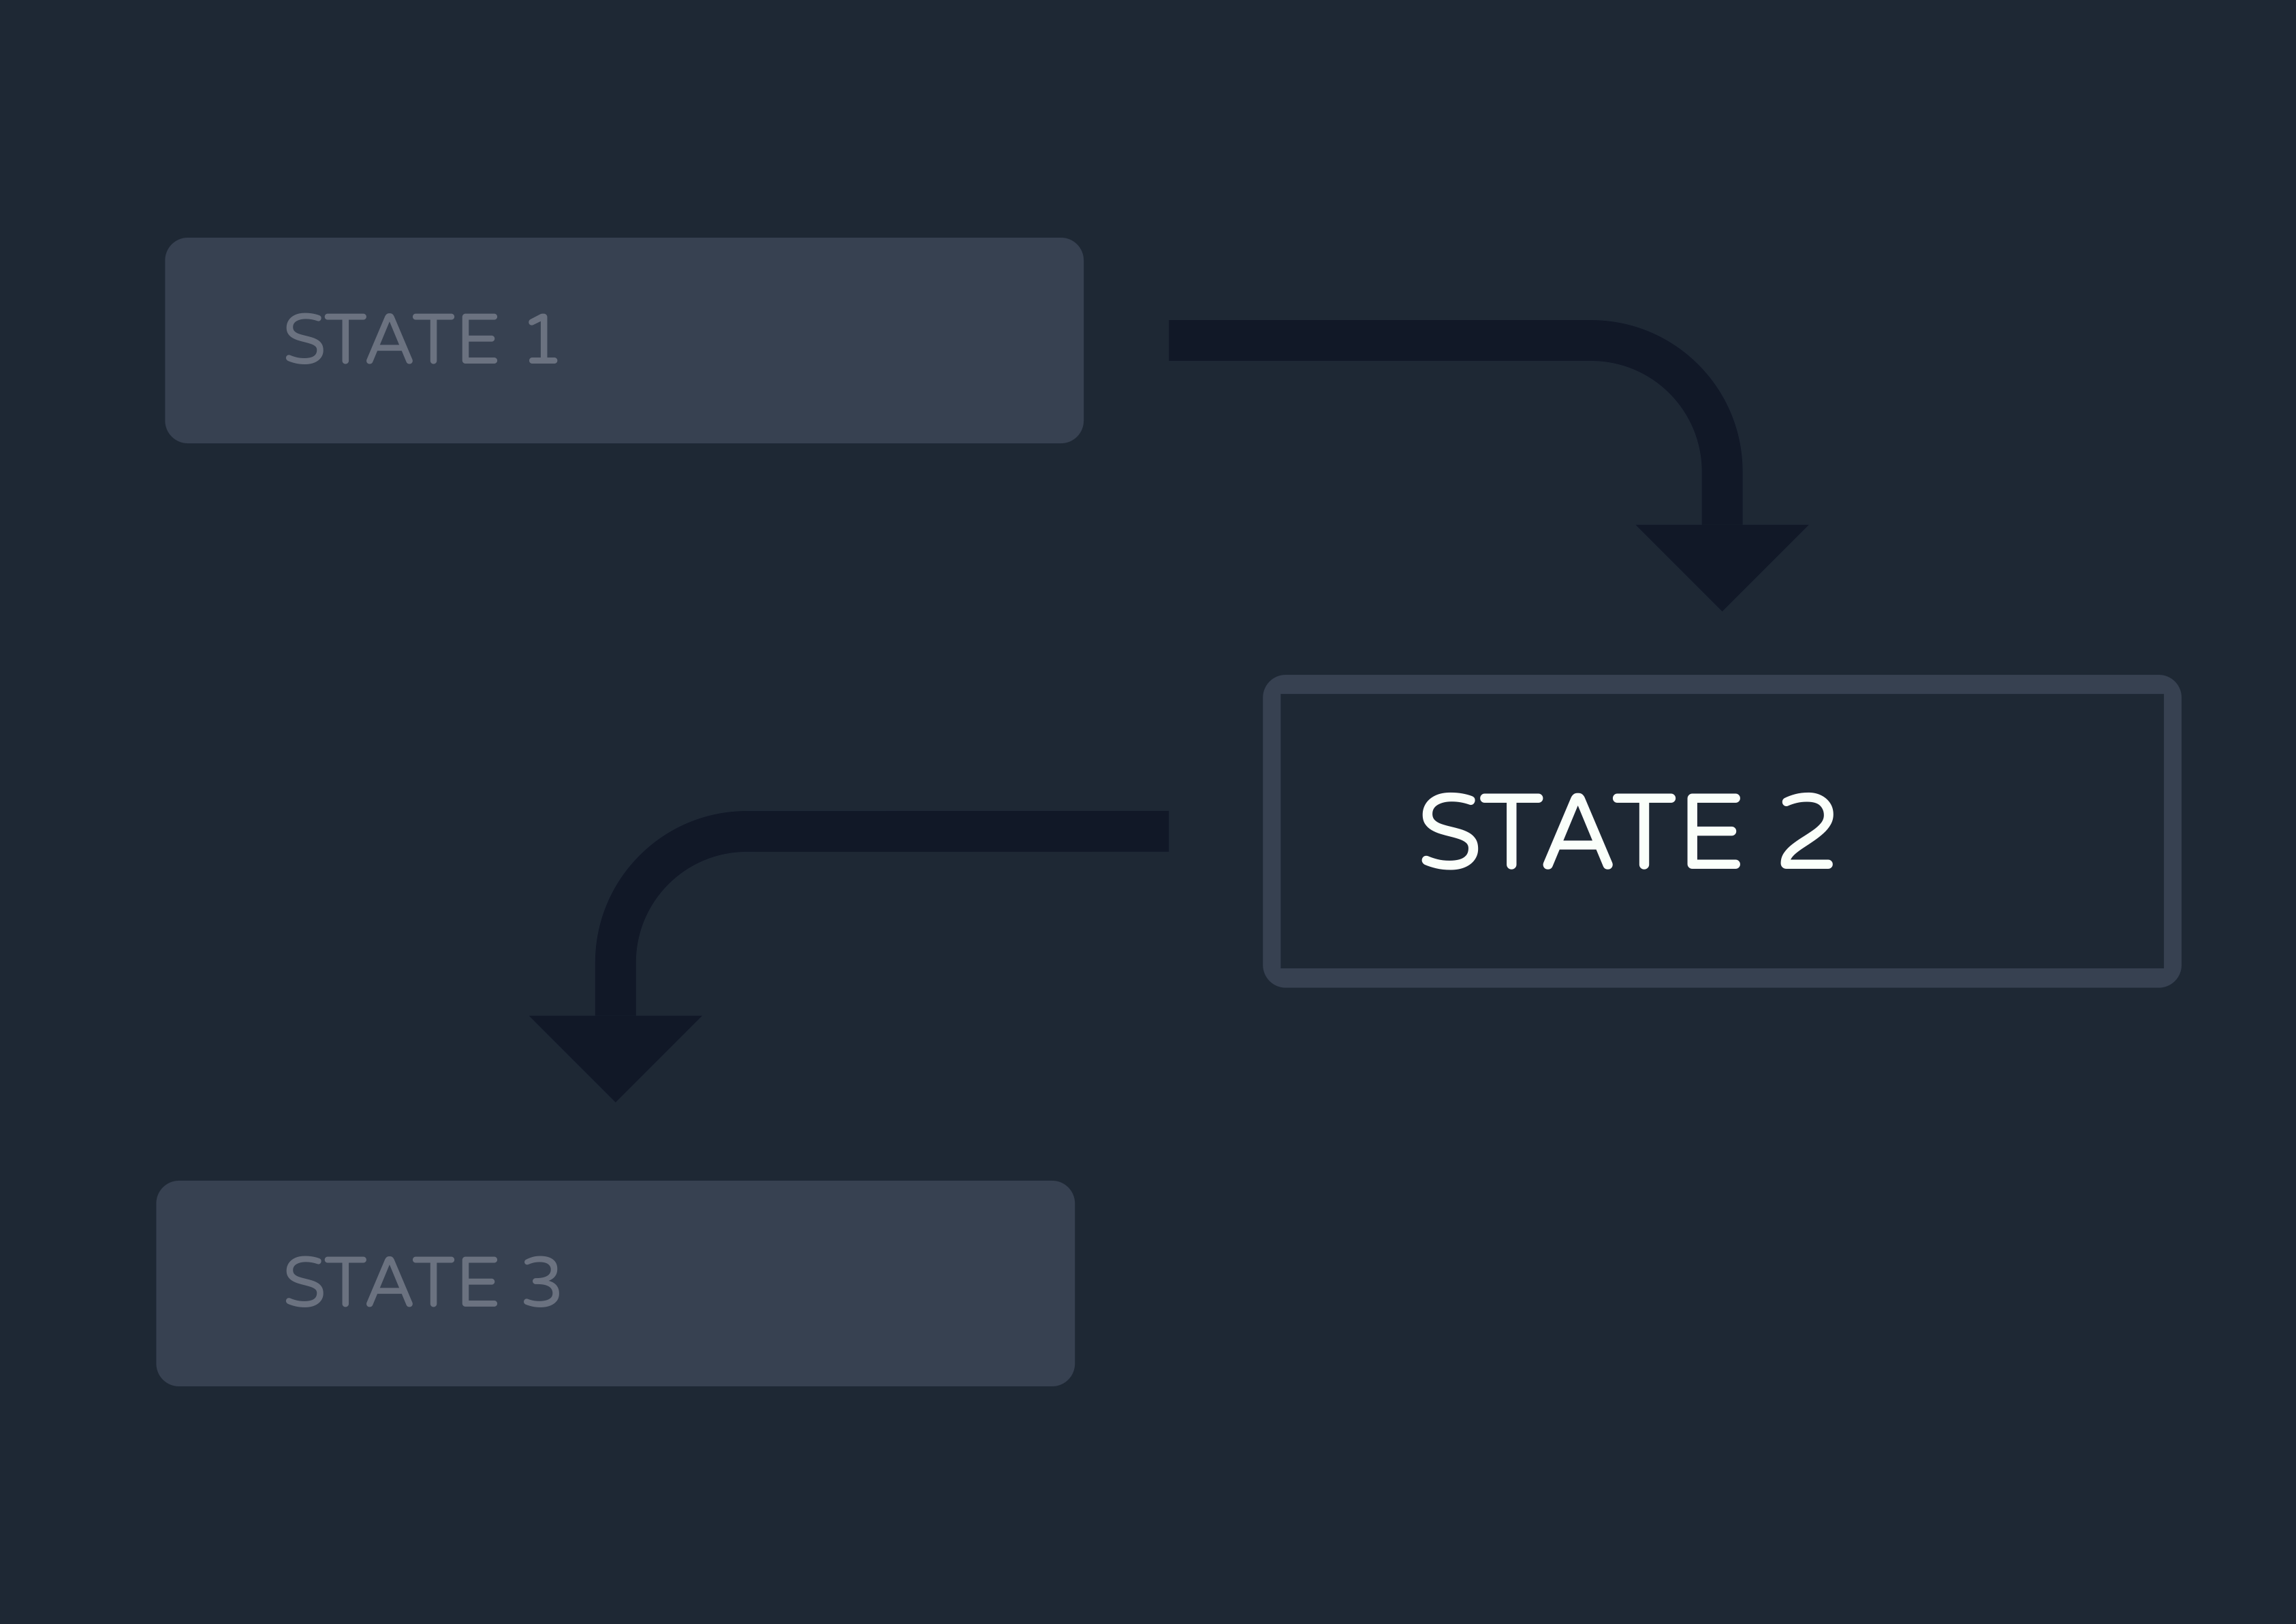
5.5 The Life Cycle of a Multi-Step Workflow
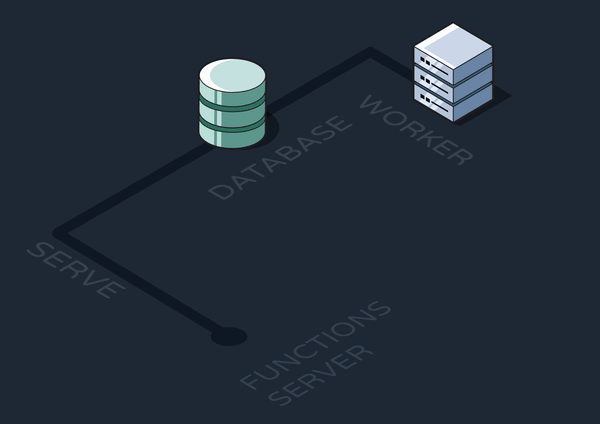
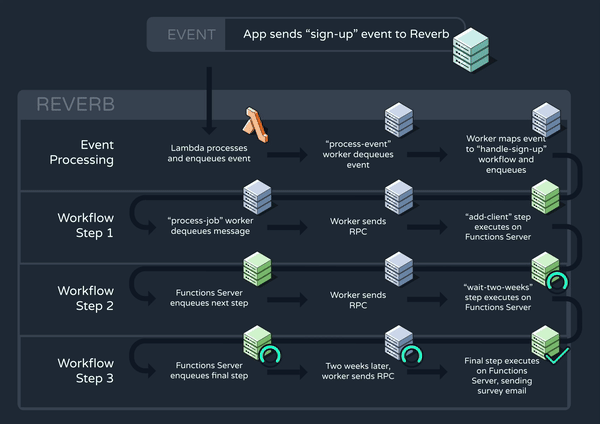
Now that all of our core functionality is in place, let’s walk through a high-level example of how Reverb might trigger and execute a workflow. Consider again the “handle-sign-up” workflow which is triggered by a “sign-up” event:
The function definition consists of three steps, the middle of which is a two-week delay. Below, we can see how this workflow progresses through Reverb’s system:
6. Improving Reverb
Once Reverb's core functionality was implemented, it was time to make it a more robust, fully-featured service.
6.1 Logging, Event Tracing, and Monitoring
Between an event’s initial ingestion and the eventual completion of all the workflows it triggers, there are many places where things could go wrong. An event could fail to reach Reverb, fail to be queued, fail to trigger a workflow, or provide a workflow with a payload it wasn’t expecting. Workflows could also error out or provide unexpected return values at any of their individual steps. To maintain an application’s health, all of the above issues need to be registered in real-time and made visible to developers for debugging.
6.1.1 Collecting Logs
Our first step toward improving Reverb’s observability was logging notable success points and errors along an event’s journey. But where in our infrastructure did it make the most sense to log from?
Graphile workers are at the center of the Reverb system. Every event, invocation, and workflow step passes through the workers at some point. So, they were a logical place from which to do our logging.
Next, we had to decide where to store our logs. There were a few problems to consider when making this choice:
- Our Postgres database already had its hands full with all the queueing throughput
- Because workflows would be executed constantly but only rarely observed and debugged, this storage would need to support vast amounts of writes versus relatively few reads.
- We didn’t care much about adhering to a specific schema, as different logs from different success or failure points would need to be stored alongside different metadata.
All of these factors pointed us toward utilizing a document database for Reverb’s logs. We went with MongoDB.
6.1.2 Logs API
6.1.2.1 Building the API
At this point, our logs database was hidden within a private VPC with the rest of Reverb’s core architecture. In order for the logs to become useful, we needed to provide a way for developers to access them easily and securely. We also knew these logs would only occasionally be read, so we didn’t want to introduce an inefficient, long-running server for directing queries to the database.
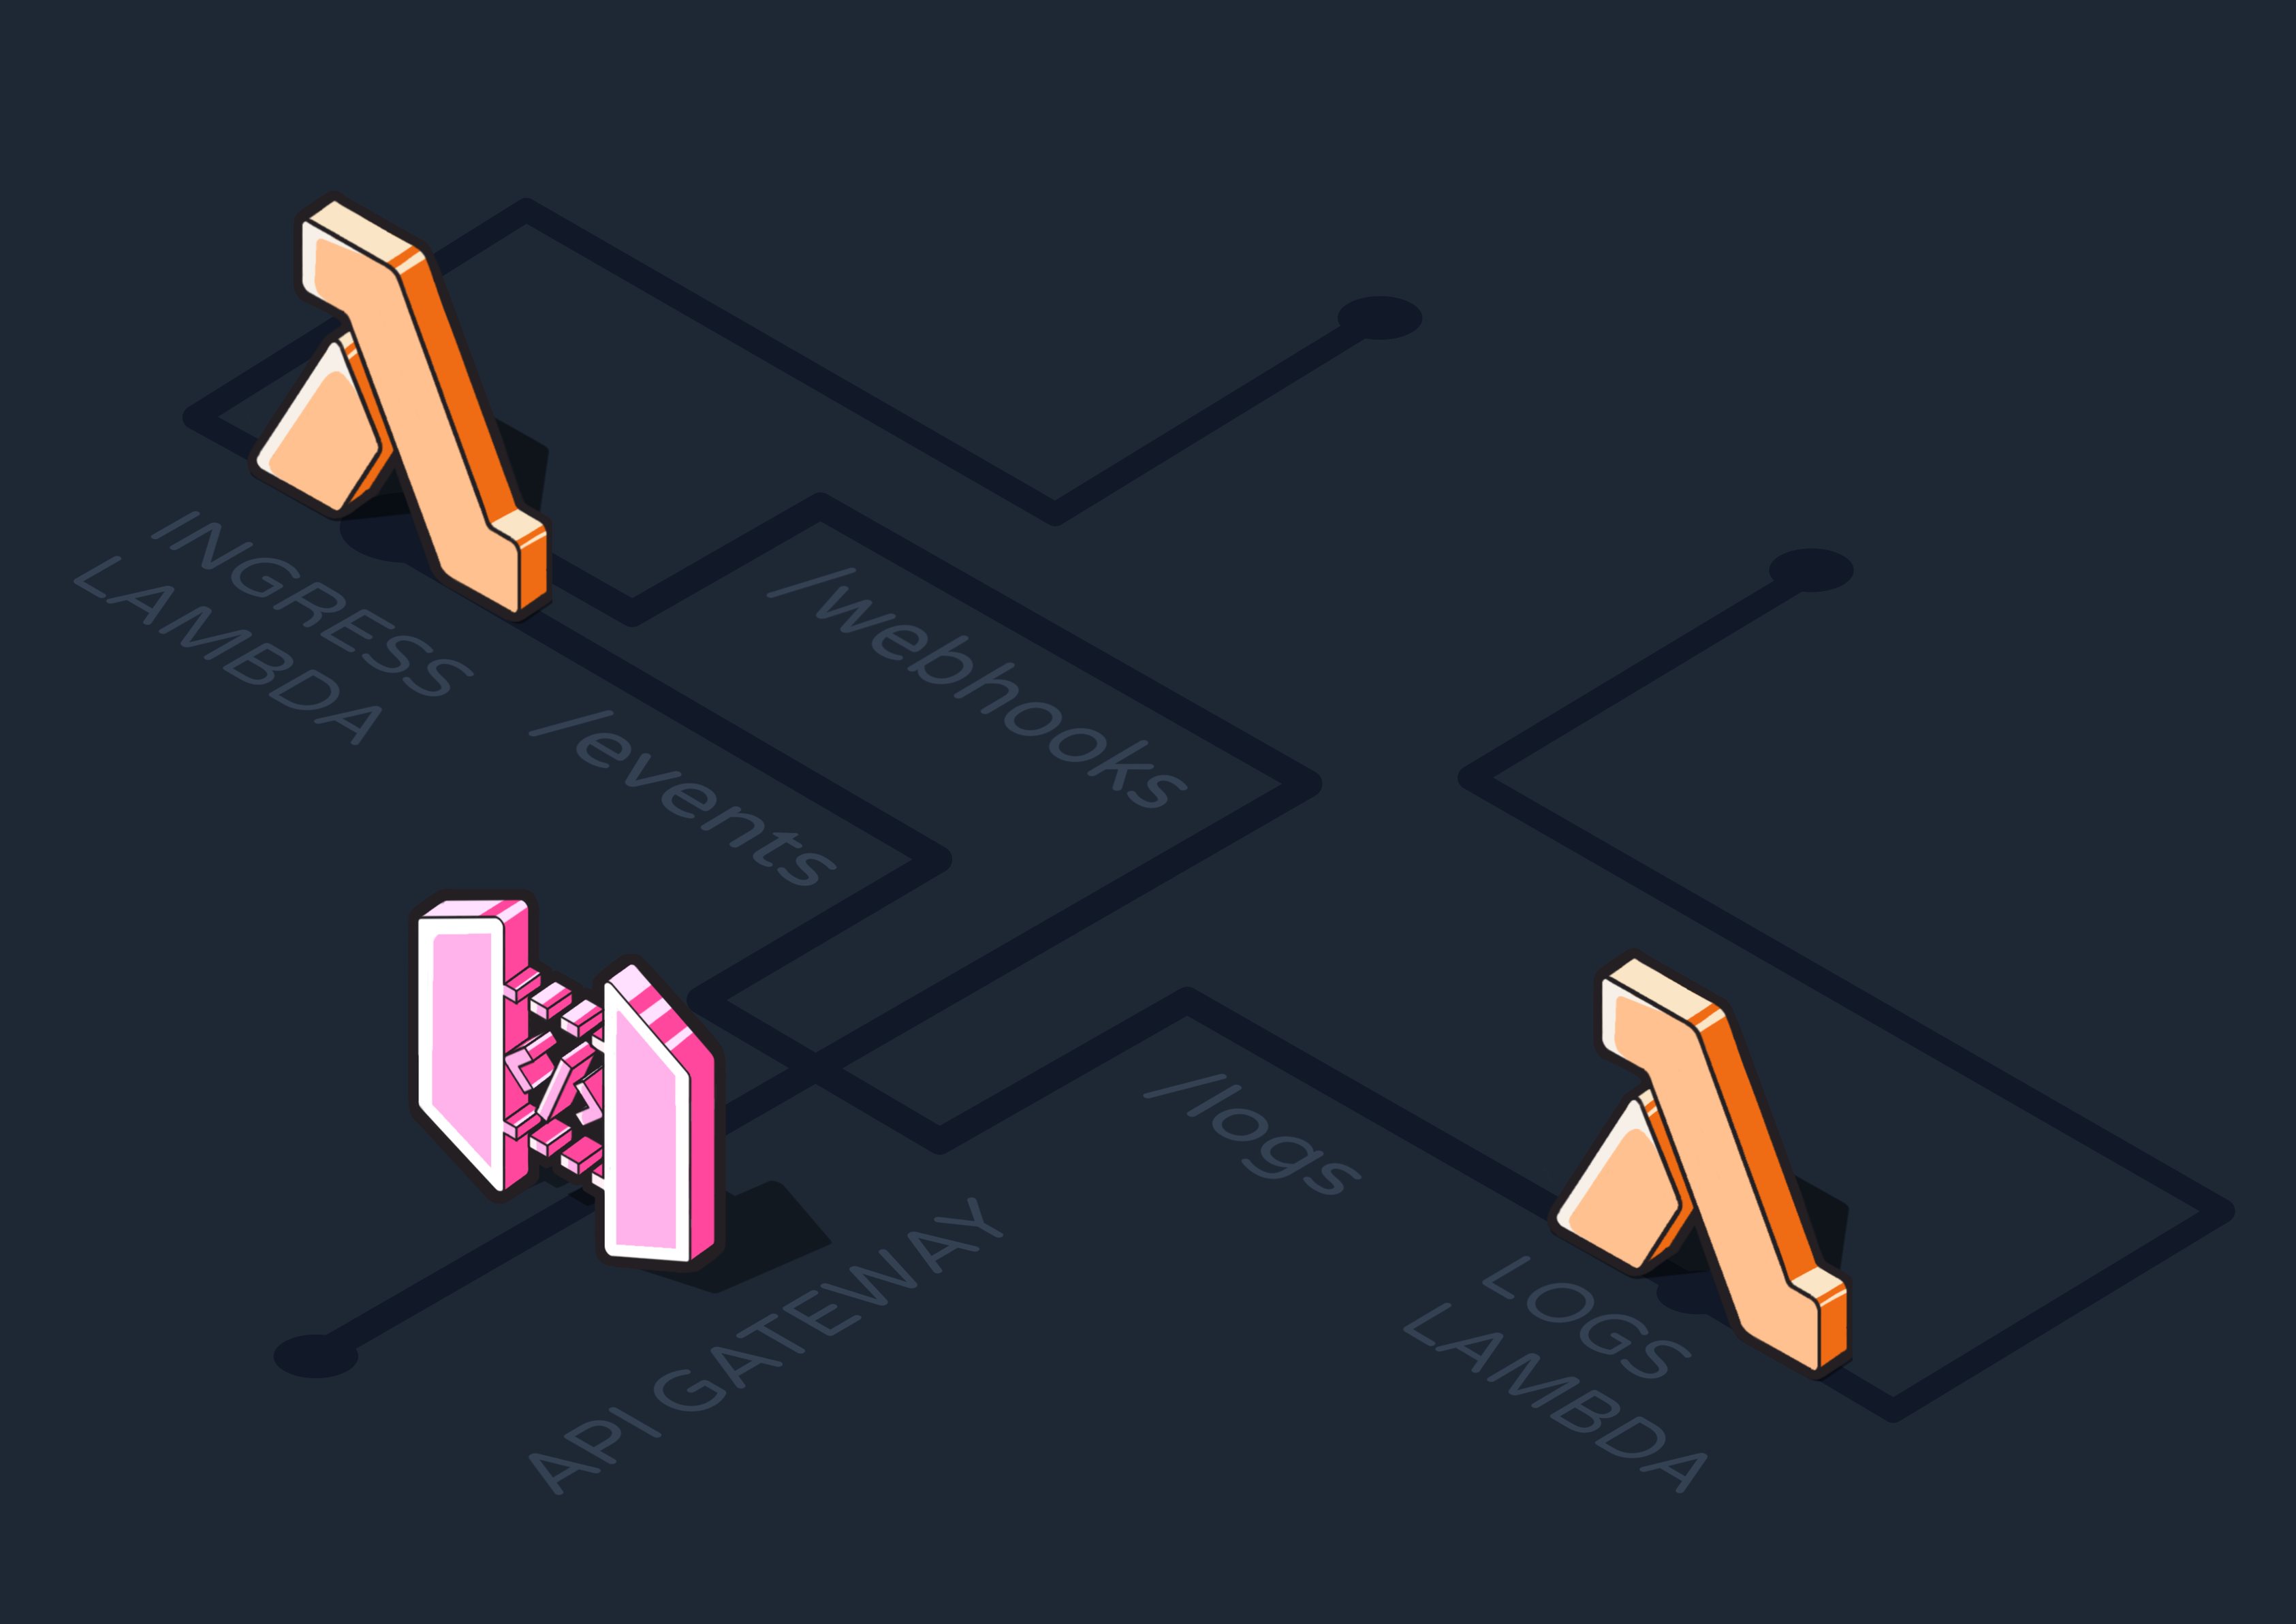
That’s why we again opted for Lambdas to implement a logs API. The new logs Lambdas joined our ingress Lambdas behind an AWS API Gateway, which allows Reverb to secure access by enforcing the use of an API key. Upon deployment, this key is auto-generated for the user and ensures they’re the only ones who can send events or access logs.
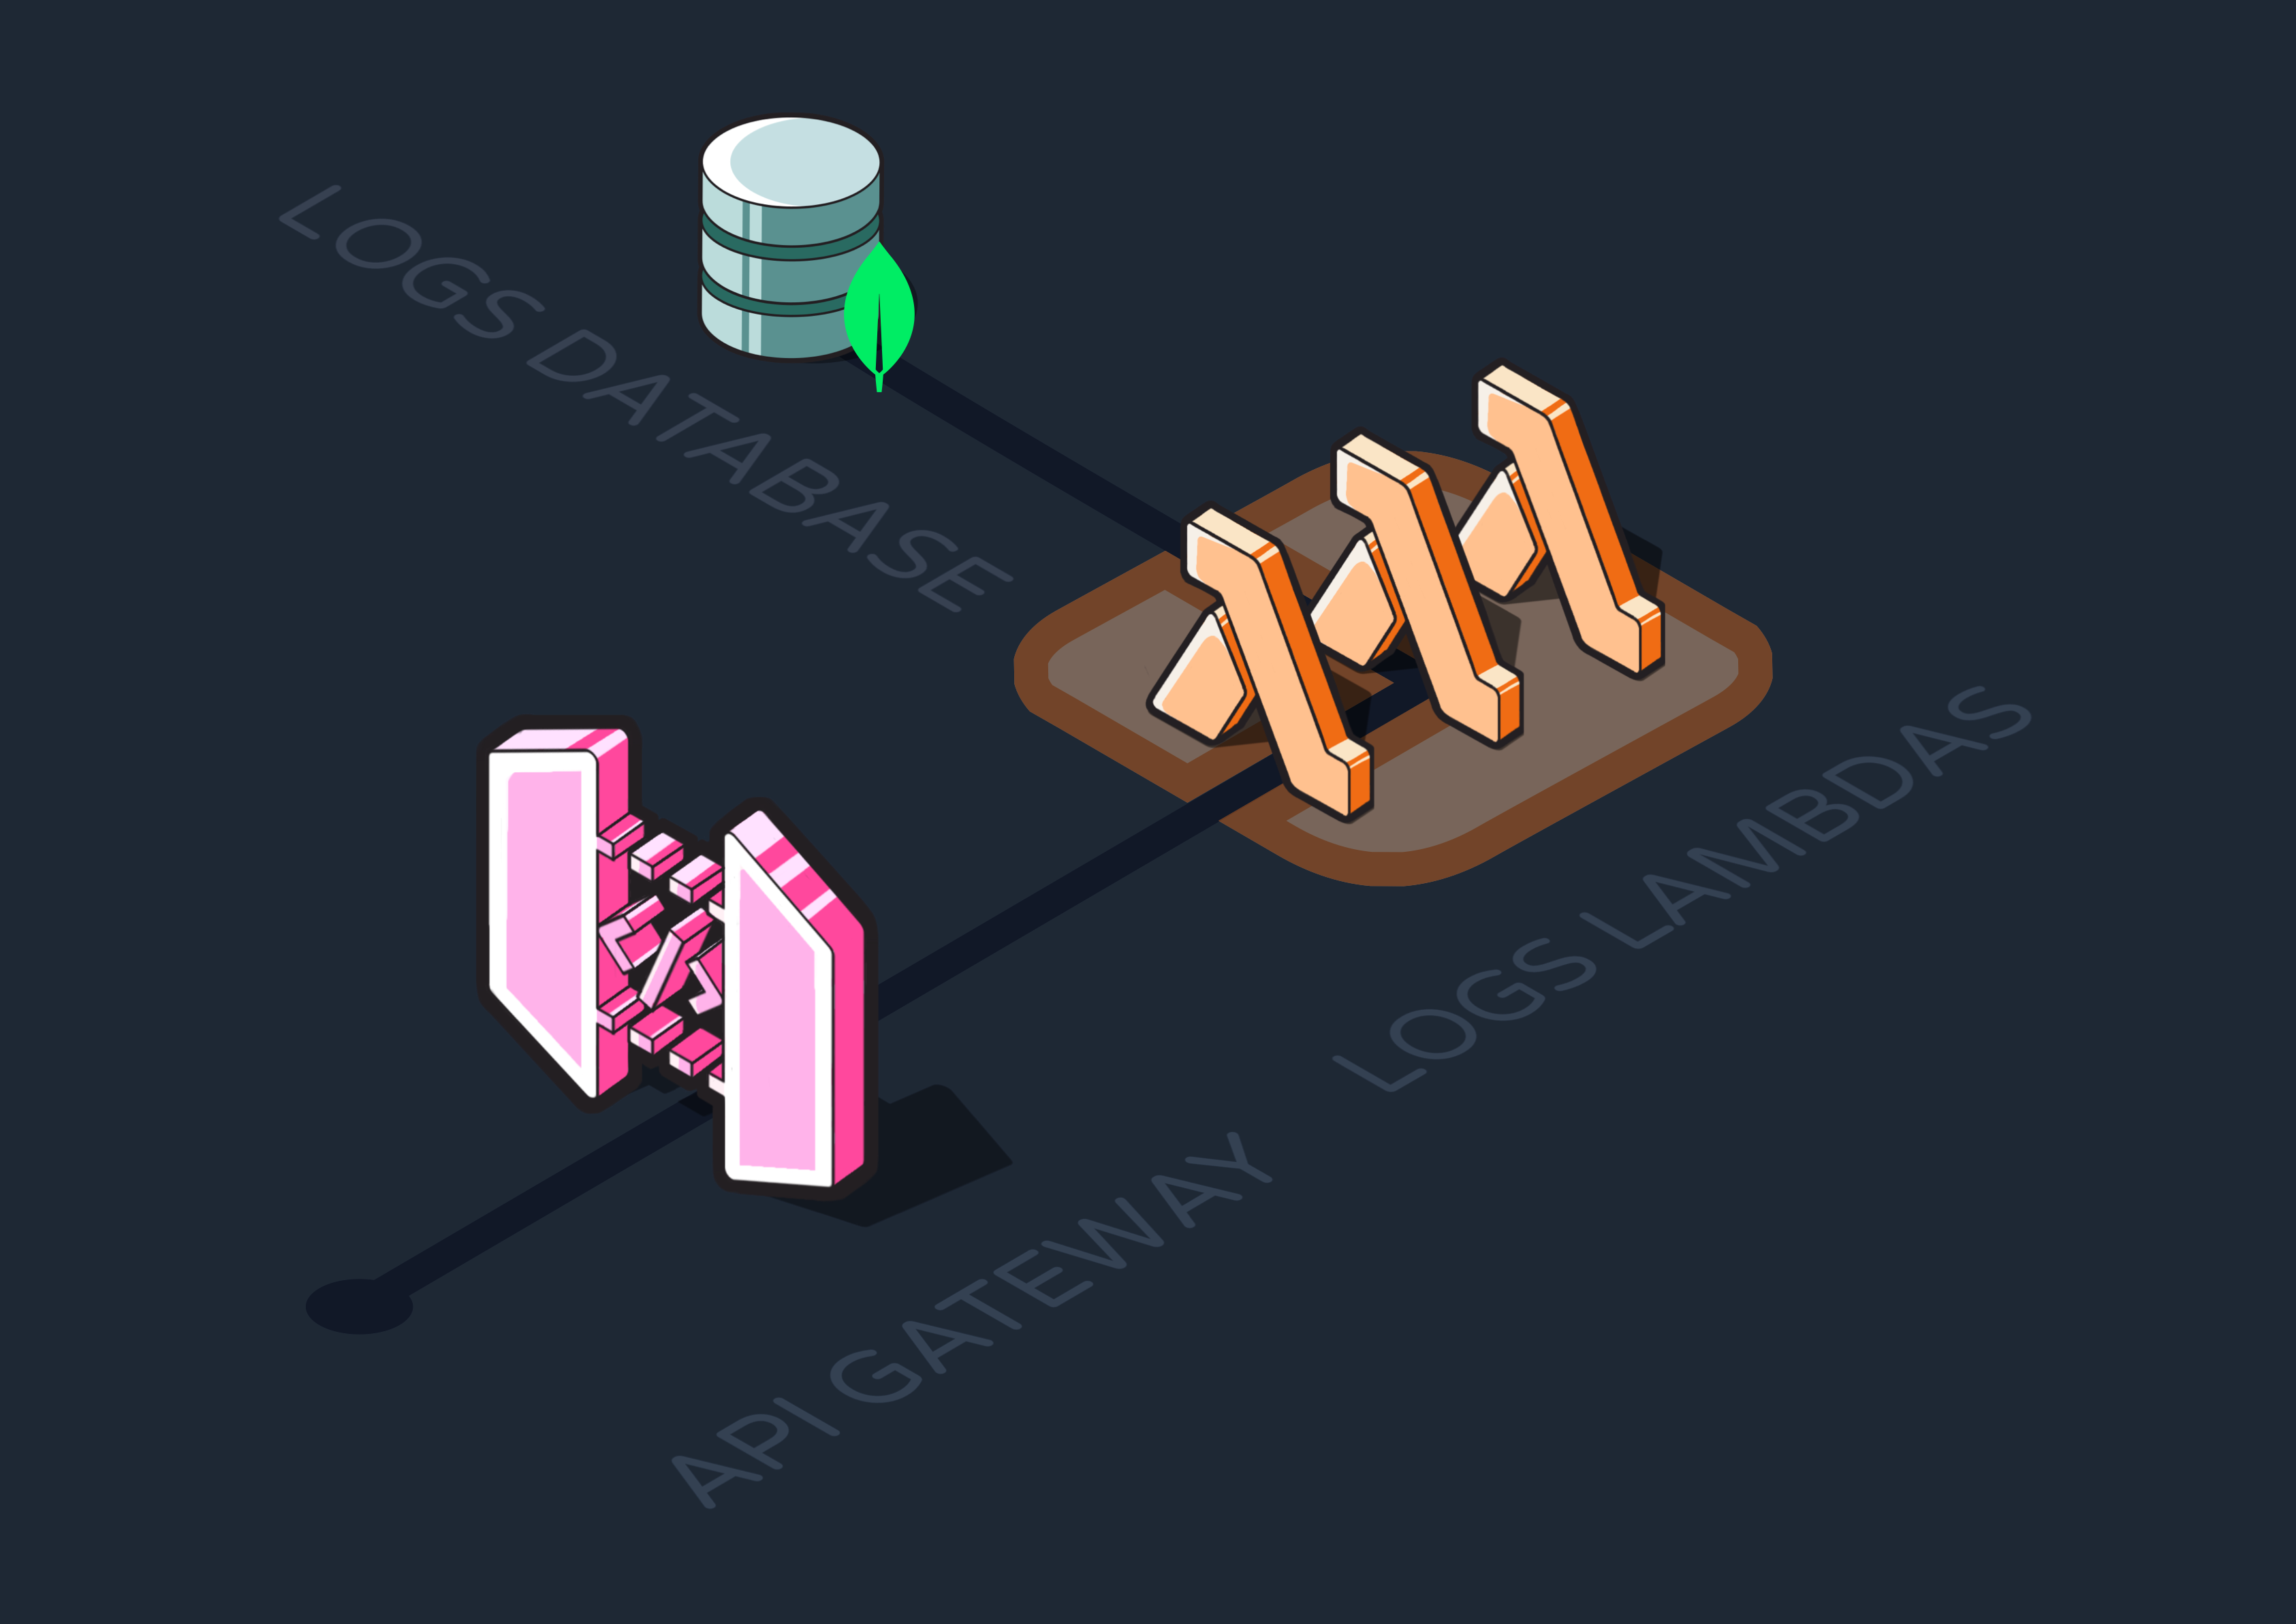
An API Gateway also lets you define different routes for directing traffic. We separated our ingress Lambdas out to a POST “/events” route, and exposed our logs API at “/logs”.
The different “/logs” endpoints are:
- GET /: retrieves all logs
- GET /events: retrieves ingested events
- GET /functions: retrieves function runs
- GET /events/:eventId: retrieves tracing data associated with an event by its ID
- GET /functions/:functionId: retrieves a function’s execution data by its ID
- GET /error: retrieves errors of every kind
- GET /dead-letter: retrieves jobs that surpassed the max allowed retries
Where relevant, we allow devs to filter the results by timestamp or ID through the use of query parameters.
6.1.2.2 Implementing Pagination
Without further configuration, many of the above routes would return massive amounts of data with every request. This is a problem, as sending that much data over HTTP could noticeably affect performance. It would also be extremely difficult for developers to parse and interpret that much data, which defeats the entire purpose of creating the API.
A typical solution to this problem is pagination, a technique that divides large datasets into smaller, more manageable pages. We knew we wanted to implement pagination so devs could fetch logs without sandbagging the system, but we first had to figure out the best pagination strategy for our use case.
There were two types of pagination we were choosing between for each route: offset-based and cursor-based. Offset-based pagination involves specifying a limit––here, the number of logs per page––and an offset, which skips a specified number of records from the start of the data. For instance, you might retrieve the first 100 logs with an offset of 0, then offset by 100 to retrieve the next 100 logs, then offset by 200 to retrieve the next set. As you can already predict from this example, offset-based pagination can be inefficient with large datasets, as it requires skipping more and more records with each subsequent page.
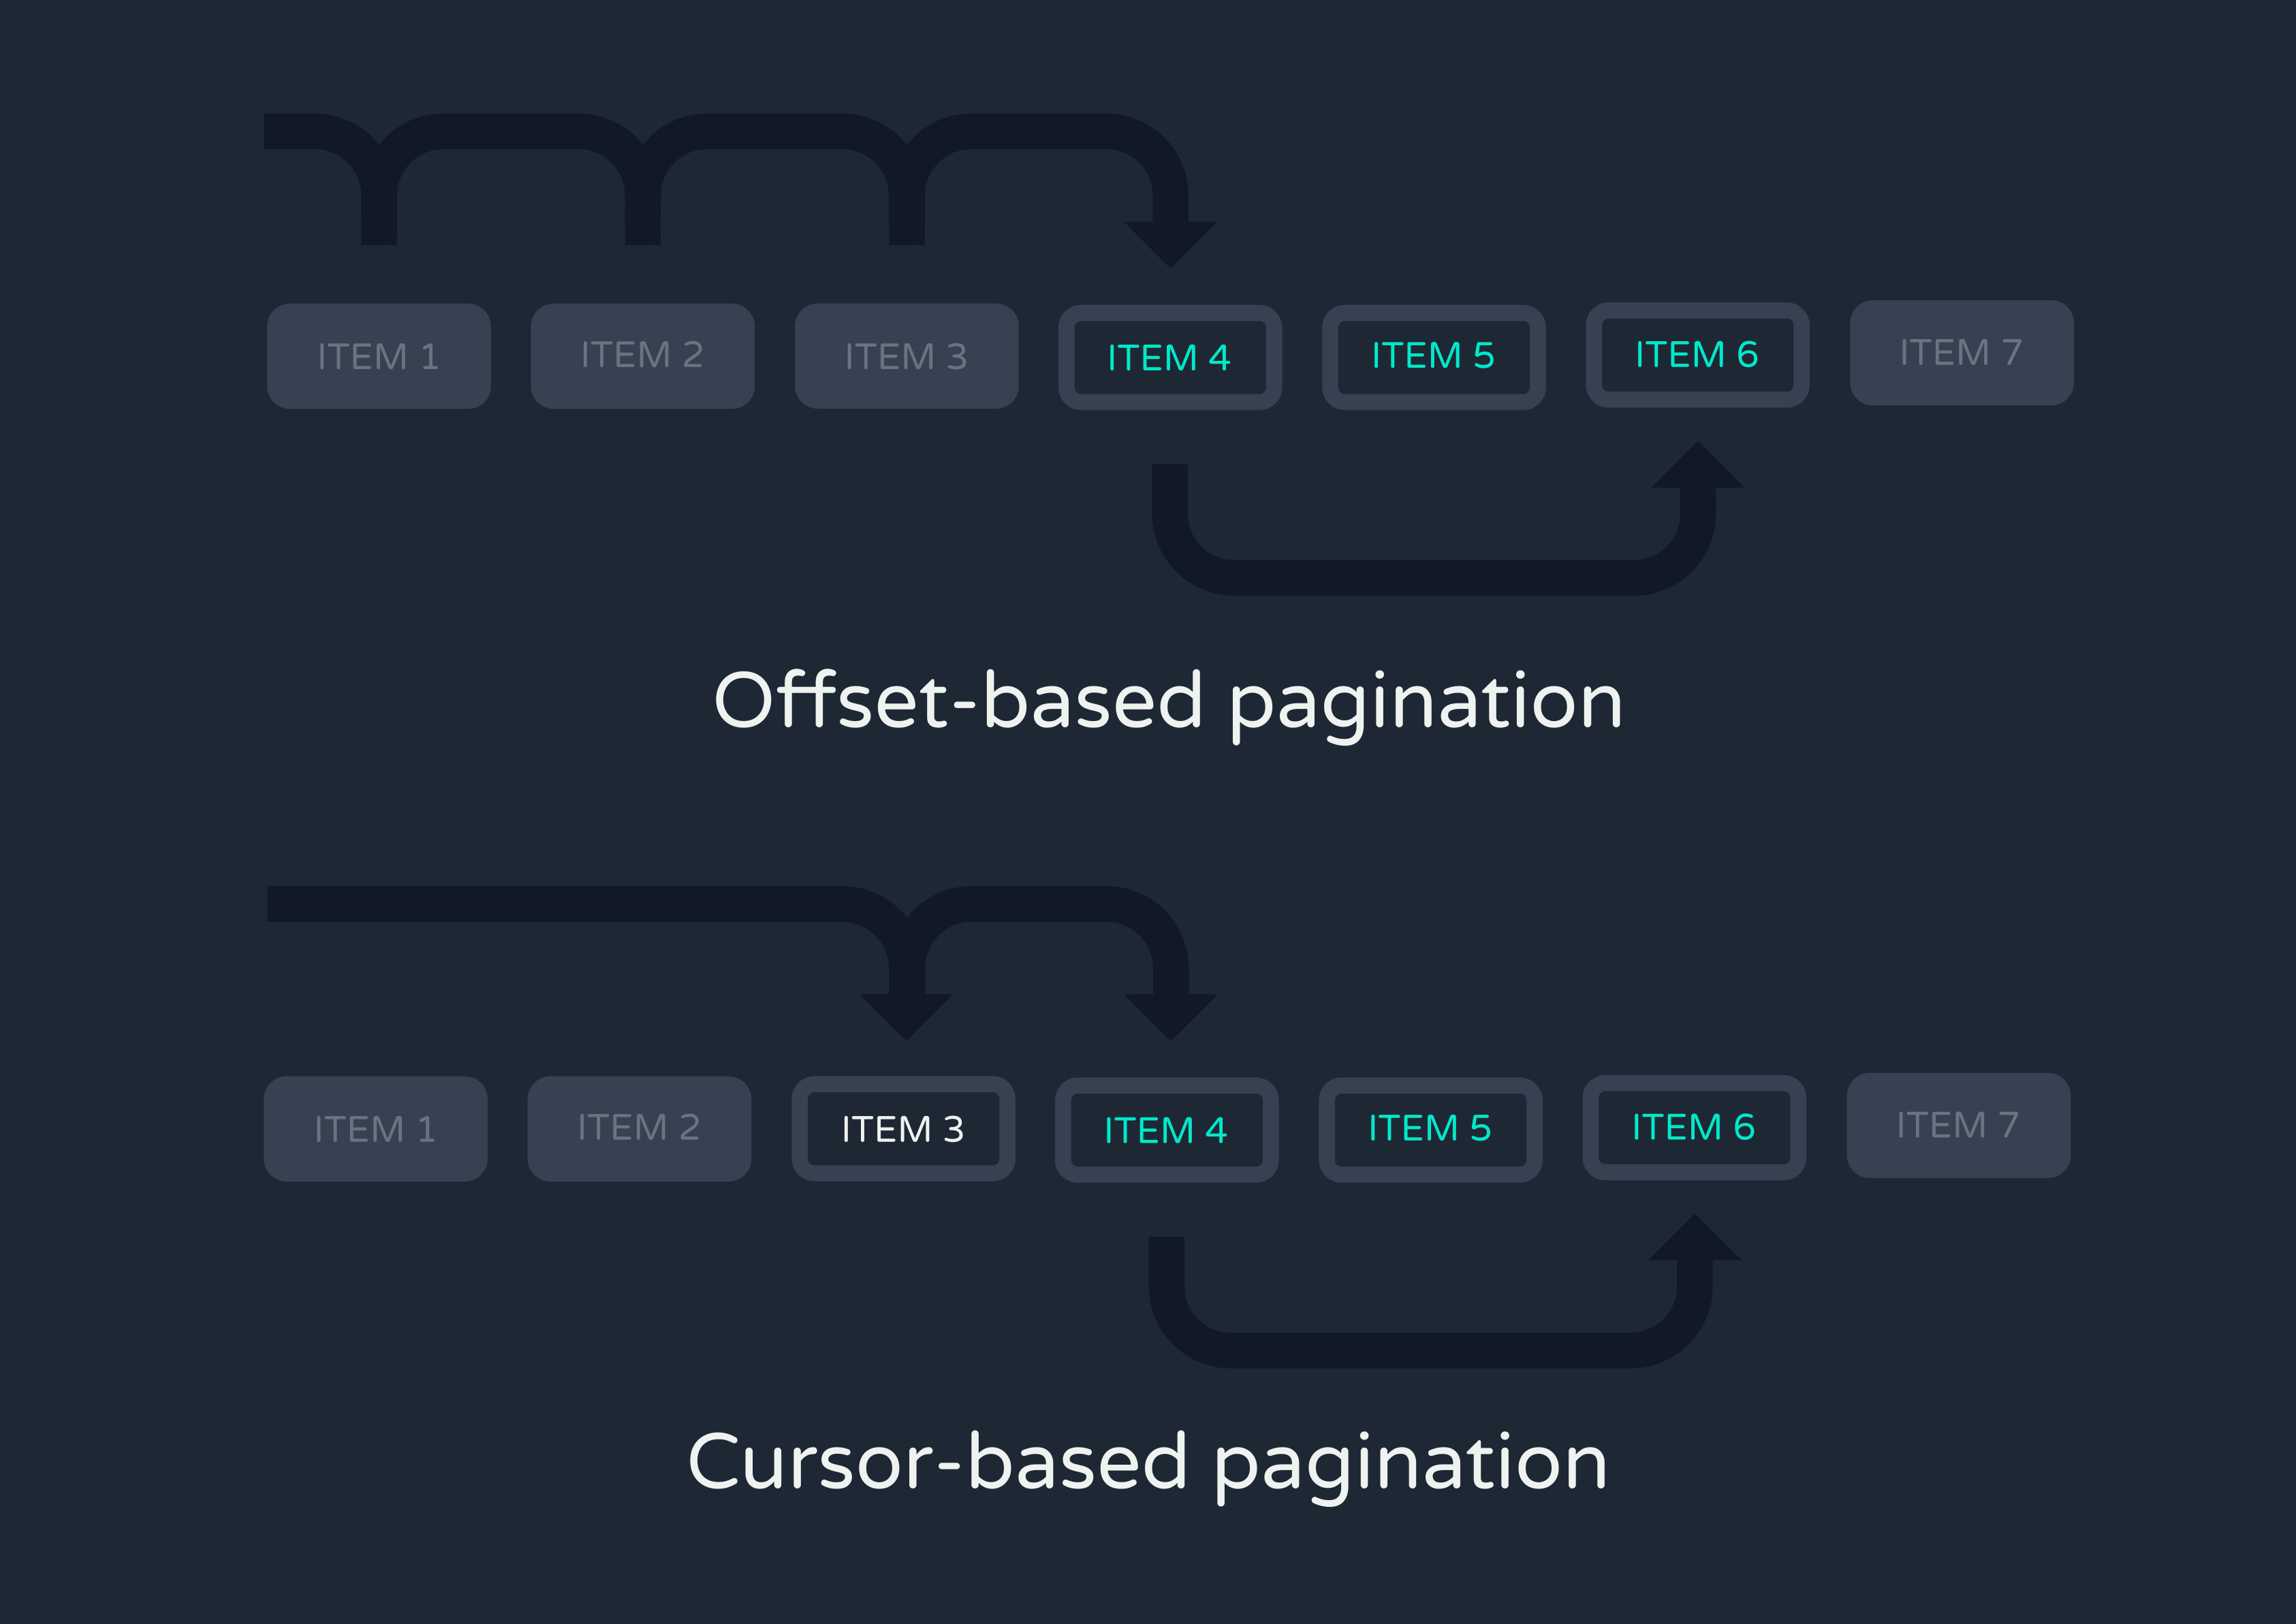
Cursor-based pagination, on the other hand, uses a unique identifier from the last record of the previous page to fetch the next set of records immediately after that one. This method is more efficient for large datasets since it avoids the need to skip past all previous records with every query. We implemented this form of pagination on the / route, which is all but guaranteed to return a high quantity of entries.
The main drawback of cursor-based pagination is its inability to jump directly to a specific page—you always have to increment from the previous one. For this reason, we opted for offset-based pagination for the rest of the routes, as being able to jump to a specific page of logs is crucial for efficiently locating bugs and fixing them.
In the future, we also plan to counteract the inefficiency of offset-based pagination by offloading old logs to long-term storage and keeping datasets small. You can read more about this in the Future Work section.
6.1.3 UI & CLI tool
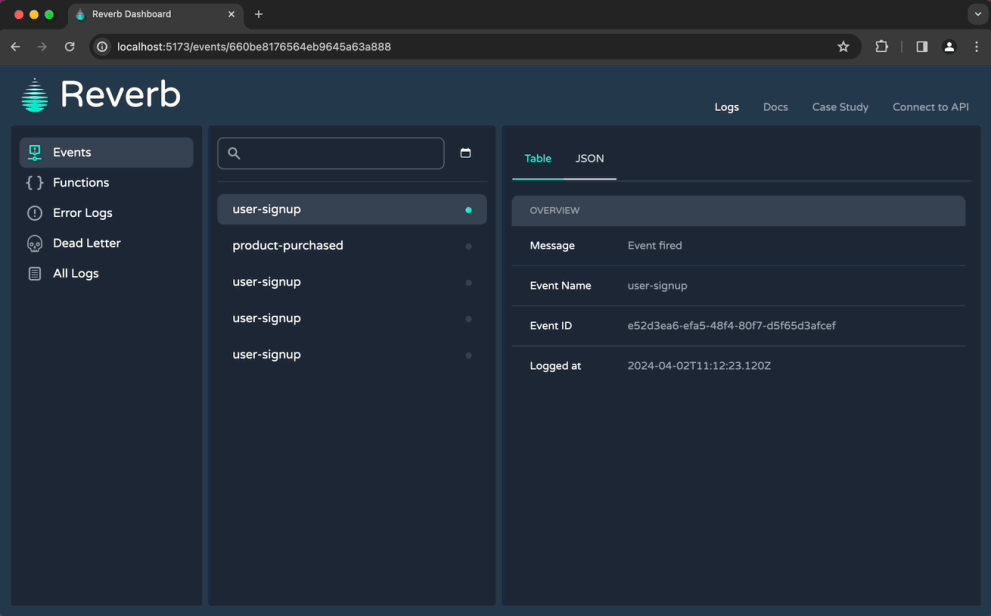
While devs could technically now access their Reverb logs directly at the API endpoints, manually sending requests and parsing responses is not a good developer experience. So, we designed both a CLI tool and a dashboard for interacting with data.
The CLI tool lets developers quickly retrieve and filter logs from any of the API endpoints. It also offers helpful features unrelated to logs, like commands for deploying the AWS infrastructure and manually firing off events.
However, not every developer loves using the command line, so we also created a dashboard to visualize logs and monitor workflow state. Compared with the CLI tool, the dashboard makes it easier to quickly see a function's status and offers more robust filtering tools.
6.2 Webhooks
From Stripe payments to Supabase insertions to automated X posts, third-party integrations are critical to modern background workflows. However, third parties can’t be fully integrated without the engine providing a way to digest their webhooks. At this point, all the events Reverb was configured to receive shared an expected schema, while webhook requests from different sources could look completely different from one another.
To solve this, we added a second endpoint for reaching our ingress Lambdas: “/webhooks”. Any time an authenticated request reaches this endpoint, a specific “reverb-received-webhook” event is queued. The body of the webhook request is made accessible via a “webhook” property in the enqueued payload.
Essentially, this endpoint acts as a passthrough which allows devs to parse and utilize webhooks in their Reverb workflows. For instance, a developer working at a clothing brand could have X send Reverb a webhook after an automated brand post goes live. They could then define a workflow that is triggered by the “reverb-received-webhook” event, and have the first step of the workflow confirm that the specific webhook received was about a successful X posting. Finally, the remaining workflow steps could prompt ChatGPT to come up with the content for the next post and schedule it for the following week.
6.3 CI/CD & GitHub Actions
At this point, we had virtually all the infrastructure we needed to implement Reverb, but we didn’t have an easy way for developers to deploy and redeploy it. This was a significant problem because we had decided to execute workflows on Reverb––as opposed to on the user’s infrastructure––meaning the functions code would need to be redeployed every time it was updated. To solve this, we built automated solutions for both the initial infrastructure deployment and to support redeploying functions later on.
We first composed the overall infrastructure in code with AWS’s CDK (Cloud Development Kit). Then, we integrated the CDK with our CLI to allow users to deploy Reverb to their AWS account with one command.
6.3.1 GitHub Actions
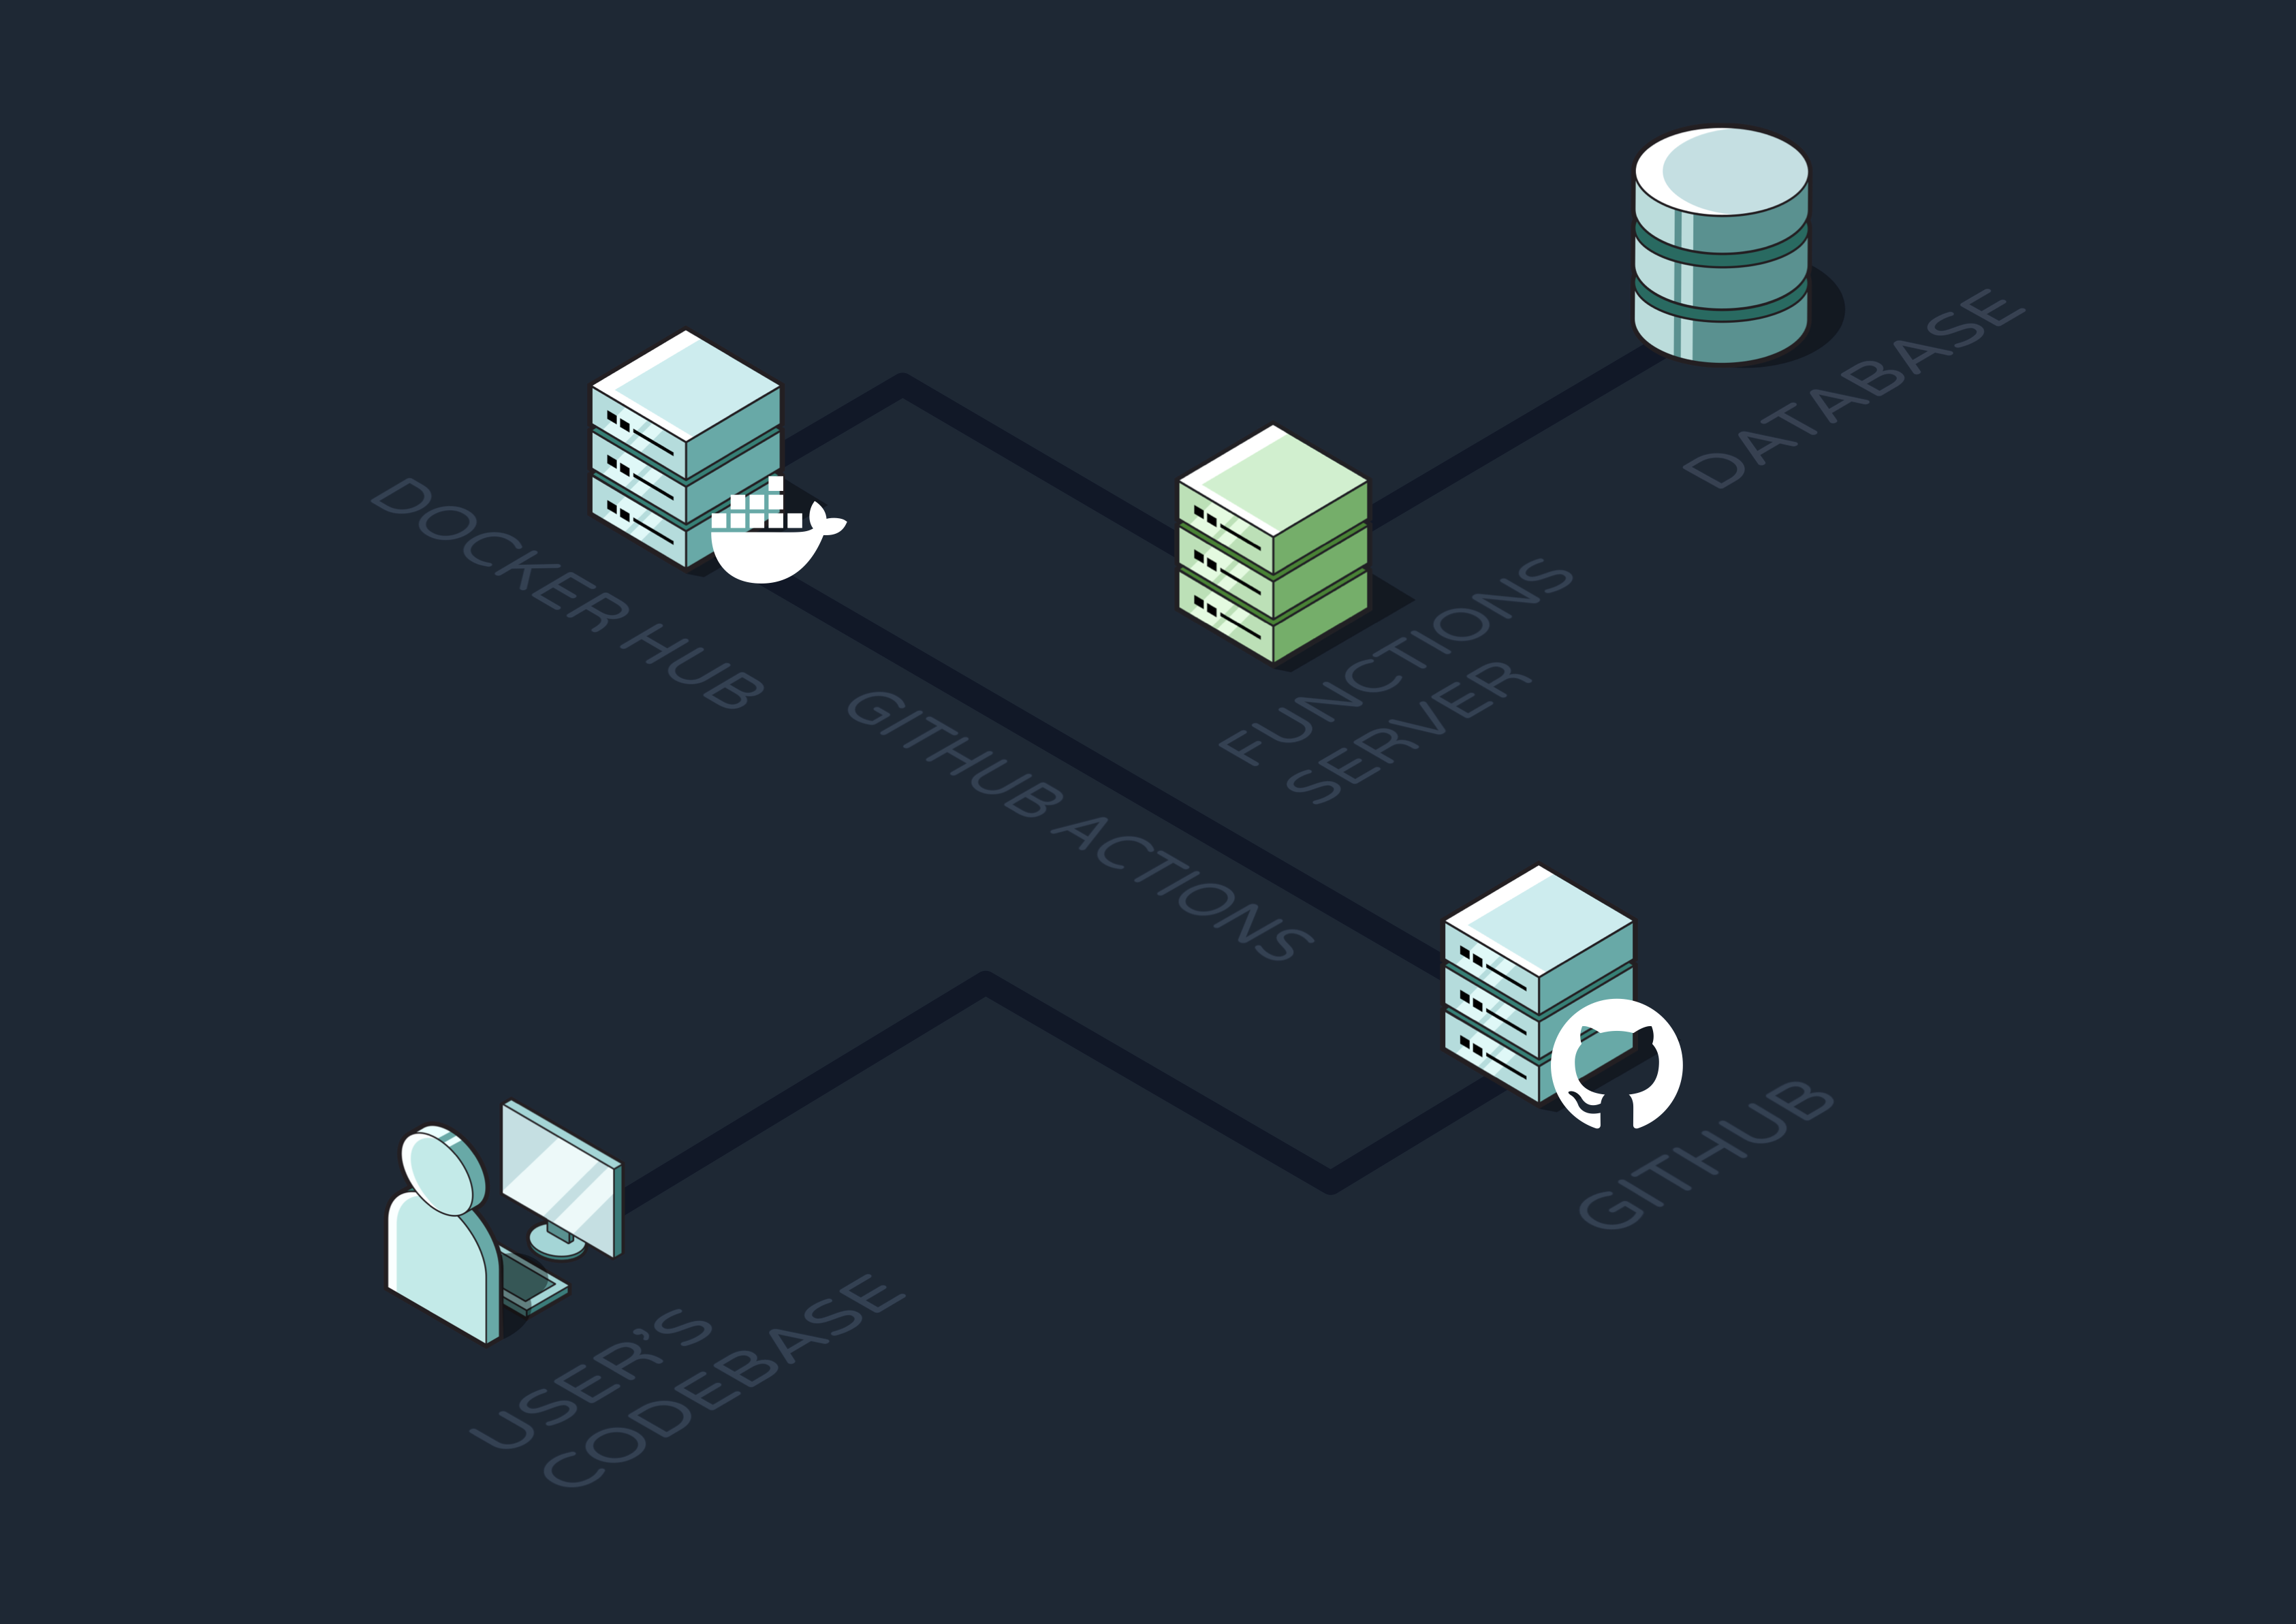
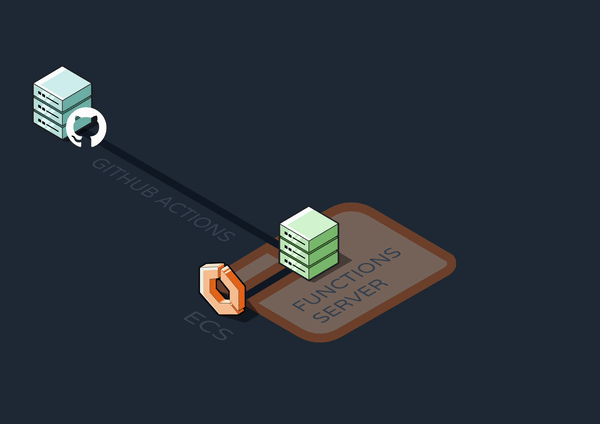
While the CDK was helpful for the initial infrastructure deployment, we still needed a way for users to deploy and redeploy their workflow definitions to Reverb whenever they changed. Without automation for this process, a developer would have to build a new Docker image of their functions server, push it to a Docker image repository, and redeploy the functions to ECS. Not only is this a lot of work, but it’s a very manual process that could become a large source of user errors.
So, we decided to use Github Actions to automate the deployment and redeployment of function definitions. GitHub Actions is a Continuous Integration/Continuous Delivery(CI/CD) tool that triggers automated workflows when specified events occur in a GitHub repo. For Reverb, we wanted a redeployment sequence to run every time the user pushed new code to a designated repository.
Once triggered, our GitHub Action executes three main steps. First, it integrates with Docker and builds an image of the developer’s repository. Next, it uploads that image to Docker Hub so that it can be pulled by AWS ECS. Finally, it triggers a Lambda to redeploy the functions container using that new image.
6.3.2 Create Reverb Template
With our Github Action designed for deployment, we now needed a way for developers to start a repository with the Action included. This involved building a template project for users to clone from GitHub with the necessary files already included.
We decided to take it one step further and use Node Package Manager to
run a create script. This way, a developer just needs to run the
command npm create reverb and a copy of the Reverb GitHub
template will be created in their directory automatically. This was an
important step to make Reverb as developer friendly as possible.
7. Reverb’s Architecture
With every component covered above, this is what Reverb’s current AWS infrastructure looks like.

8. Implementation Challenges
8.1 Step Functionality and State Management
We encountered significant engineering challenges when figuring out how to implement the step functions at the core of Reverb:
- By default, Javascript functions execute from the start of their definition every time. So how can we stop a function at a step, ensure it runs successfully, and then resume execution at the next step?
- How does a step access the return values of previous steps?
- What happens if a step throws an error? How do we retry the function starting at that step?
8.1.1 State Machine Pattern
At the center of any multi-step workflow engine is a state management pattern known as a state machine.
A state machine is a model of computation that represents complex processes as a series of distinct states. The machine can only exist in one state at any given time, meaning the machine has to transition from one state to another in order to perform sequential actions.
Clearly, this pattern maps well to the concept of a Reverb workflow:
- Each workflow consists of a series of distinct steps
- It must only be executing or waiting to execute one step at any given time
- It has to transition to the next step in order to perform a sequential action
We needed to implement a state machine design so that our application would always know which step each workflow was up to. That way, any invocation of the workflow after the initial one would start not from the beginning of the function, but from the first step that hadn’t yet been executed.
8.1.2 Trying a Counter System
We first experimented with a naive solution that boiled down to keeping two counts:
- A target count, which is the highest known step count for the function from previous runs (starts at 0)
- A run count, which is the number of steps encountered in the current run
We’d run the function until the run count exceeded the target count, and then ignore each step after that point. If the run count was greater than the target count at the end of the execution, we’d know that the function had not completed and we could re-enqueue it with an incremented target count for the next step. This solution gave us an easy way to cache return values of steps, as we could cache the values in an array with the index being the step count.
However, this led to problems of its own. There was a rigidity in how functions were executed and you could not fundamentally change a function mid-execution. Specifically, adding/removing steps or changing the order would break any already-running functions.
8.1.3 Passing a Cache Object
Instead of using a counter, Reverb implements the “state” part of our state machine by passing in a new instance of a “step” class with each workflow invocation. In addition to methods like step.run() and step.delay(), this class has a hidden step.#cache property that keeps track of previously-run steps and what they returned. Rather than identifying steps by an index, which could change if steps were added or removed, steps are given an id string (like “save-to-database”) by the user.
If a step has already been run, it simply returns the prior return value rather than executing again. This tactic is commonly referred to as memoization.
This solution ensured our workflows always knew which step to execute next. But we still had to figure out how to stop functions mid-run after each step to queue up the next one.
8.1.4 Intentionally Throwing Custom Errors
The only two ways to exit a Javascript function early are returning or throwing an error. Returning early was a non-starter—it would force developers to manage caching logic themselves to tell the function when to return. This would easily lead to system-breaking user errors and inundate workflow definitions with conditional logic checking what’s in the cache. That’s far from an ideal developer experience.
So that left us with the only other choice: throwing errors. Unlike returning, we could throw an error from within a step method and have it bubble up to the top level of our functions server. This would stop the workflow dead in its tracks after executing the step. The server would then catch the intentional error and send a response to the Graphile workers telling them what kind of step had run and what it returned.
Finally, the worker would re-enqueue a call to the same workflow, but with an updated cache for the next round.
8.2 Handling Codebase Updates
8.2.1 Updates to the Functions Codebase
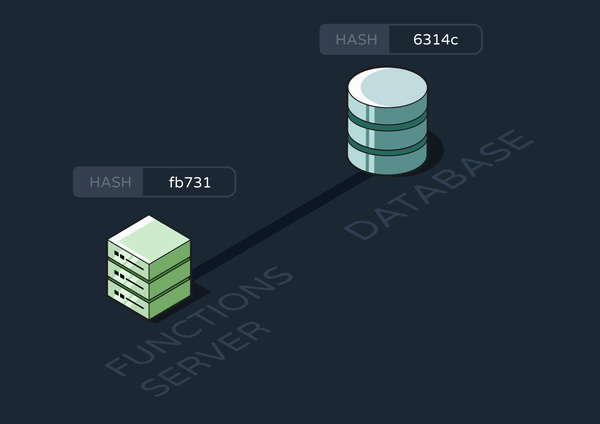
Using AWS ECS to auto-scale our functions server containers was helpful for accommodating varying levels of throughput. However, this horizontal scaling introduced additional challenges in maintaining efficiency and consistency.
When our functions server was hosted on just one ECS container, we could safely assume any redeployment of the container meant the devs had made changes to their functions codebase. There simply was no other reason they would have redeployed their code. Accordingly, the new functions server would update our database with the new event and function mappings.
However, when the containers became horizontally scaled, a new deployment no longer meant new code. It could just be scaling up an additional instance of the same code. Updating the database in this case would be pointless and inefficient. Even worse, it would block our Graphile workers from querying the database every time the functions server scaled up.
8.2.1.1 Detecting changes to the functions
To avoid slowing our system unnecessarily, we needed each new server to know whether it contained brand new functions data in its memory. This way, it would only update the database if it needed to.
First, we considered having the server scan the entire database and cross check every record with its own data. But it quickly became clear this would add inefficiencies on top of inefficiencies.
8.2.1.2 Using a hash
A hash function is an algorithm that always returns the same output, or “hash”, for a given input. Such functions are designed to be fast and efficient, and are used in many different situations, from encrypting passwords to grouping data in a hash map.
Importantly, hashing can also be used for checking whether data has been altered by comparing the current data's hash value with a previously calculated hash. If the hashes don’t match, that necessarily means the inputs were different.
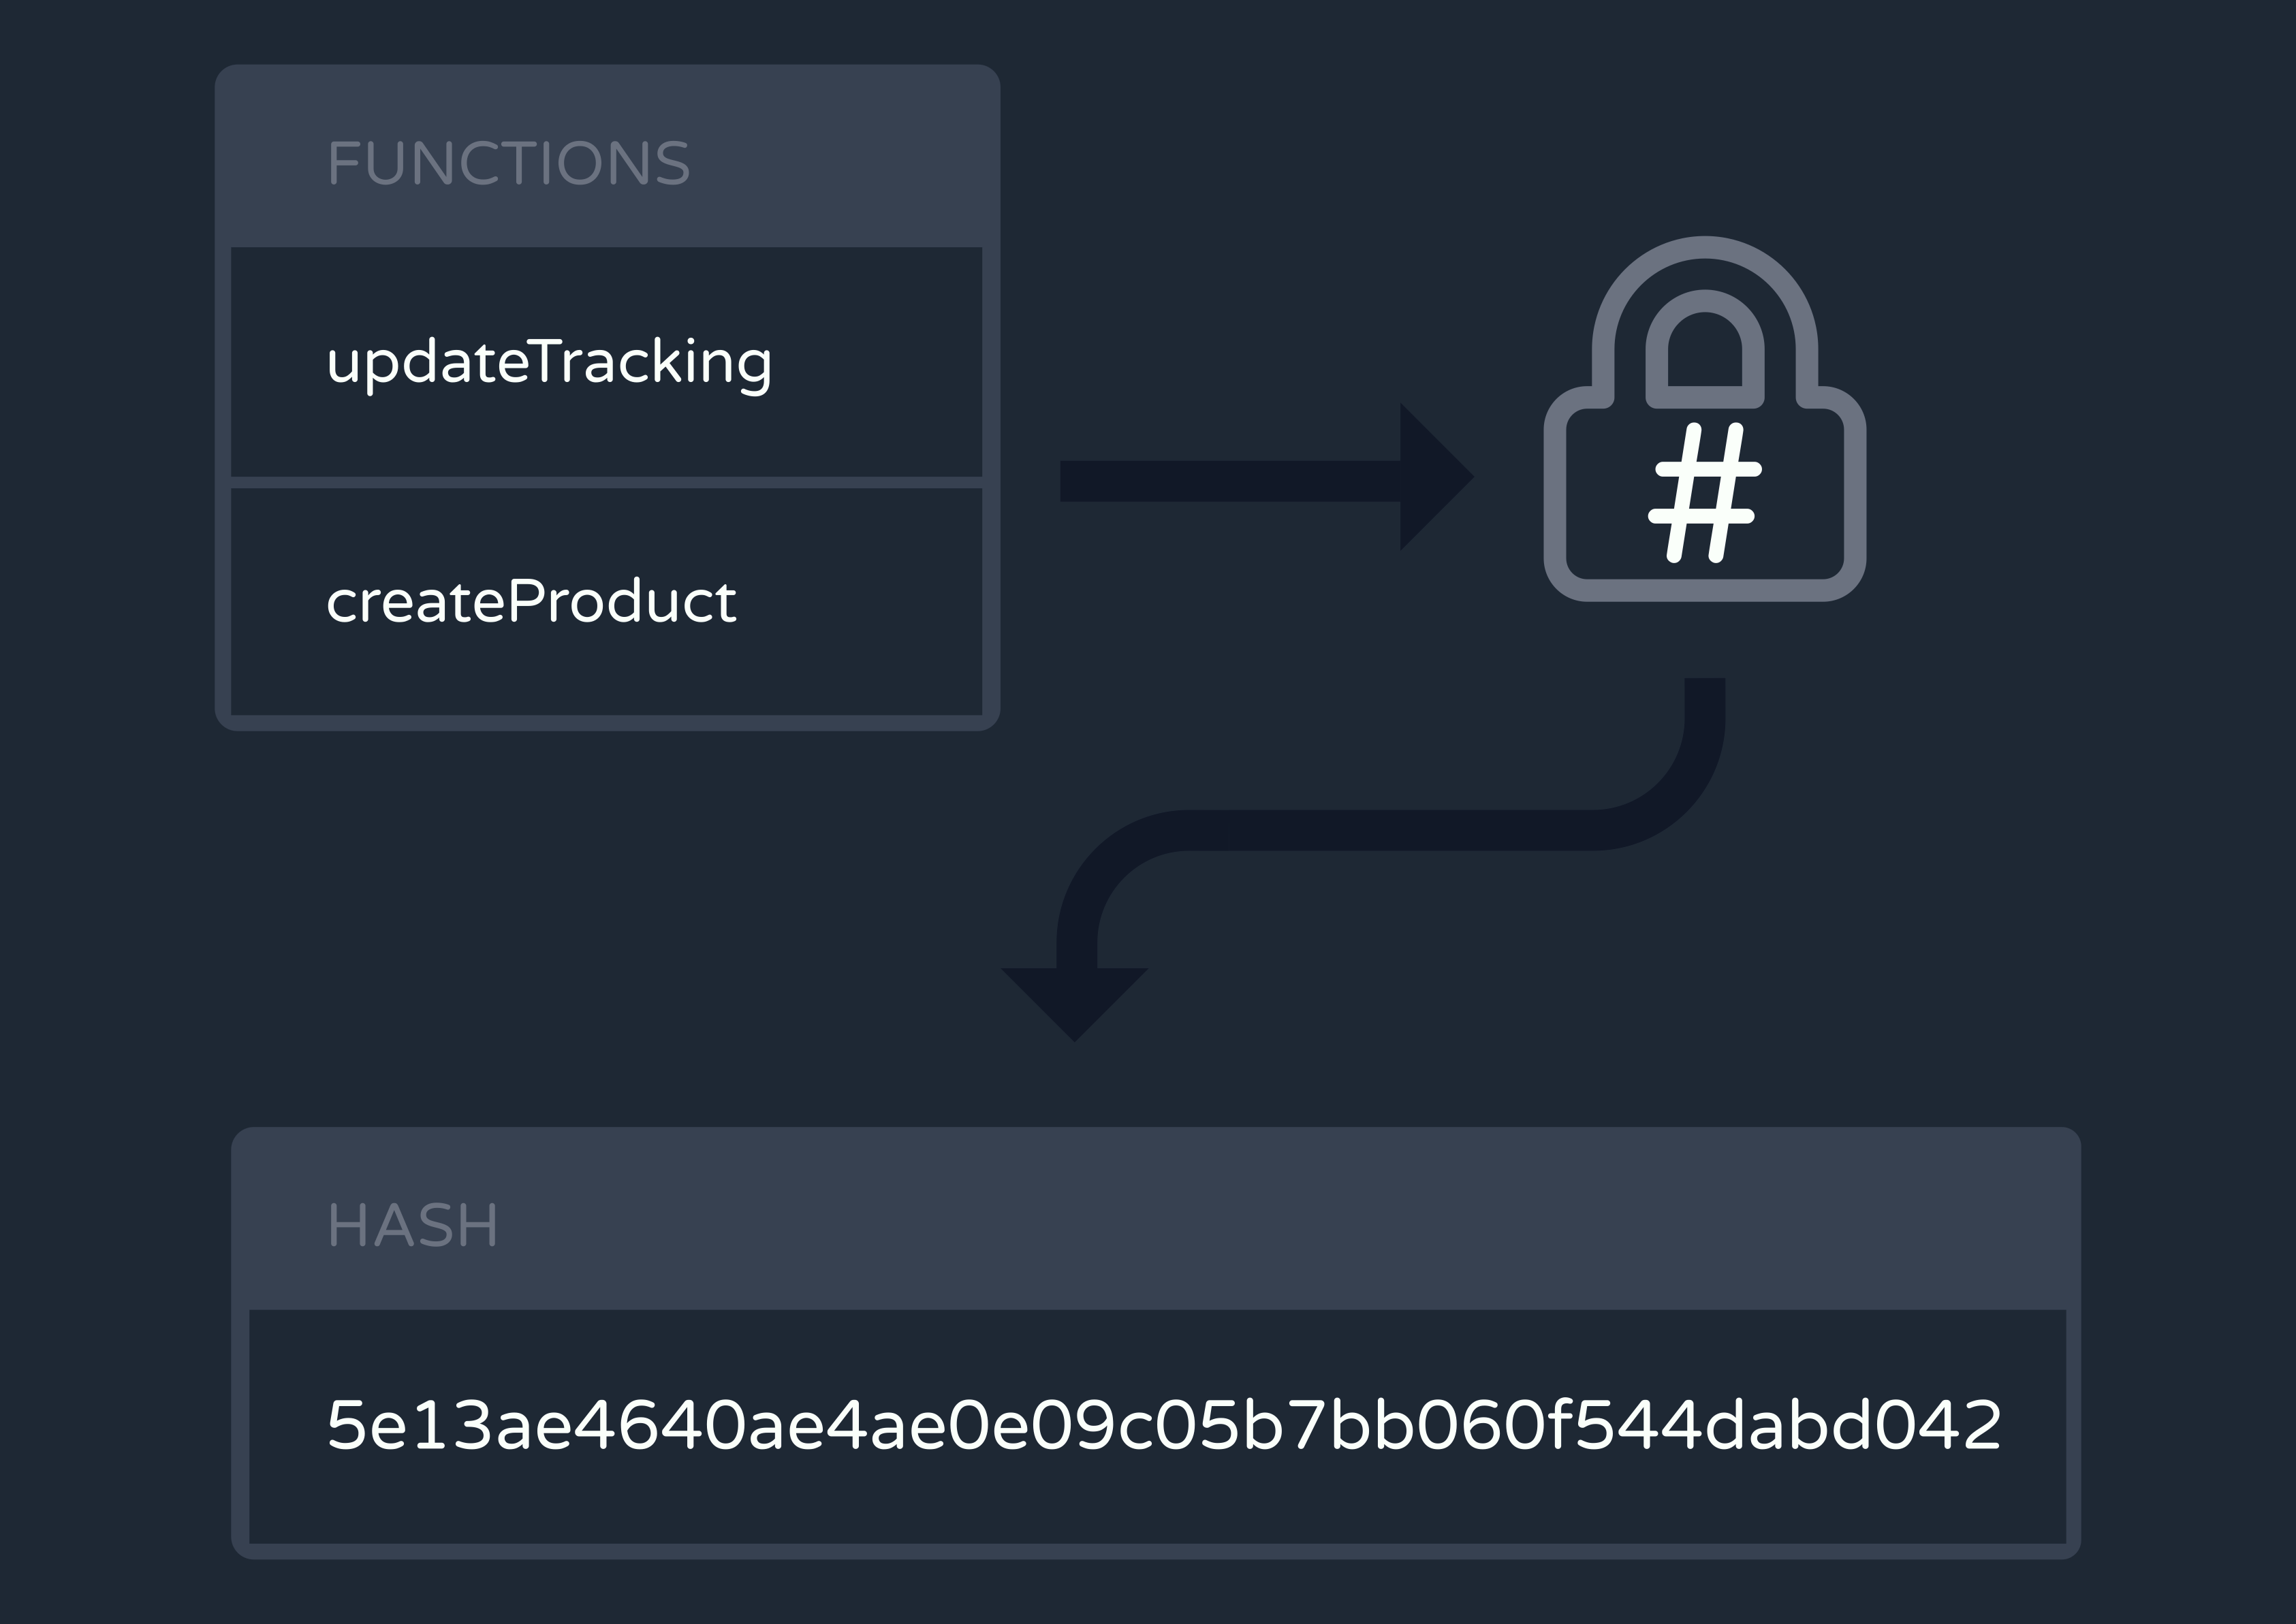
We realized we could use a hashing library to efficiently compare the functions data in our database with that on the new functions server. To do so, we created a new, single-row table in the database that stored a hash string. Every time a new server spun up, it would stringify its data, hash it, and compare the hash with what was already in the database. If and only if the hashes didn’t match, it would update the events, functions, and hash tables.
8.2.1.3 Updating Long-Running Functions
One of the problems with updating Reverb’s functions on the fly is that long-running workflows that have already started executing may break mid-run. Consider, for example, a workflow that has a two-month delay in the middle of it. If a developer changes and redeploys that workflow’s function definition at any point during those two months, the previous steps’ memoization could be broken before the next step runs. When designing around this, we came up with two possible solutions:
- Make the developer version their functions so that when a function is called, it is tied to a specific version.
- Make the developer add intermediate steps to fix changes between one version of the function and the next.
In solution 1, developers would have to keep copies of each iteration of each function in their codebase in order to ensure compatibility. If we had gone down this route, we would have needed functionality to tell how many instances of each function version are running at a time, so that when a version of a function had no more active runs, the developer could safely remove that version from the codebase. This would require more space in the database to accommodate all versions.
We preferred a simpler and more efficient solution, which is why we decided to have developers add intermediary steps. With the way Reverb’s step functionality is implemented, if a new step is added while a function is mid-run, that step will successfully execute in the spot where it’s defined. This allows developers to insert intermediary “glue” steps. These glue steps can alter the data memoized by the steps before them, so the brand new steps later in the flow receive the data they expect. This tactic does not require any additional database space or version-checking logic.
8.2.2 Updates to Cron Functions
8.2.2.1 Managing cron with Graphile Worker
One reason we chose Graphile Worker as our queue was because it had built-in cron job functionality. Every “runner”—which is what Graphile calls a batch of workers subscribed to a common task—determines the cron jobs it’s supposed to run by reading from a crontab. A crontab is essentially a schedule of tasks to be executed at specified times.
The catch is that Graphile runners can only configure their crontab when they first start up. This simple fact introduced a number of issues into Reverb’s system.
8.2.2.2 Timing the startup of the runners
At first, we figured it would be easy enough to store data about cron-triggered workflows in our database and have the runners configure their crontab based on that data. However, if the runners happened to start up before the functions server populated the database, the runners wouldn’t see any data and would configure an empty crontab. And because Graphile doesn’t let you update this later on, Reverb would never execute any cron workflows.
Our initial solution was to have Graphile Worker poll, or repeatedly query, the database to check for the presence of data. Only after data appeared, Graphile Worker would spin up its runners and configure the correct crontab.
This worked for the initial deployment of the data. But what about when the user updates and redeploys their functions? Our runners’ crontabs would already be configured, and Graphile wouldn’t let us update them.
8.2.2.3 Solution: The update-cron Runner
At this point, we only had runners for processing events and jobs. To solve the above conundrum, we added a new runner with workers subscribed to “update-cron” queue messages.
The first time this runner spins up, it configures its crontab based on data in the database. It also stores the database hash used in the Updates to the Functions Codebase section.
On subsequent changes to the functions data, the functions server enqueues an update-cron message containing the newest hash. An update-cron worker checks whether this new hash matches the old one. If not, it shuts down its own runner and starts an entirely new one. This works because, by default, Graphile has its workers complete their entire task before shutting down.
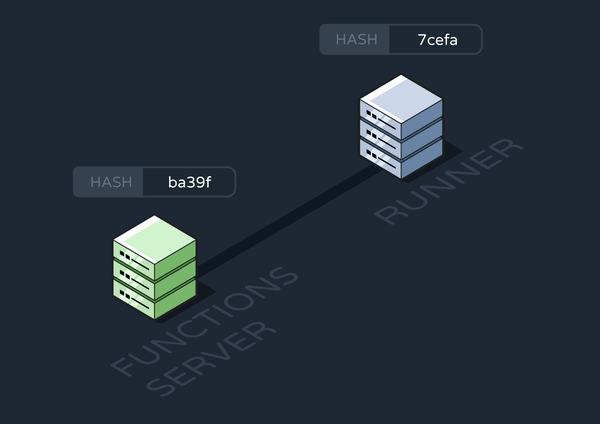
Finally, the new runner configures its crontab with fresh data from the database.
8.2.2.4 Achieving Eventual Consistency
As with the functions containers, having AWS Fargate automatically horizontally scale our workers containers caused complications.
For one thing, our functions server would have no way of knowing how many instances of the update-cron runner there were. So we couldn’t have it enqueue one update-cron message per runner to ensure they all update their crontab.
We could overestimate the number of runners and enqueue more than enough jobs, but even that inefficient solution isn’t a real one. With Graphile Worker, it’s essentially random which runner’s worker’s dequeue a given job. It’s possible and even likely some runners would dequeue multiple update-cron messages, while others wouldn’t dequeue any.
Therefore, we decided that the best solution was to achieve eventual consistency across our runners. In an eventually consistent system, updates to a piece of data are propagated to all instances asynchronously. This means that we’d make sure at least one runner was always running the most up-to-date crons, while the other runners could update their own crontabs over time.
To achieve this, the functions server only sends one update-cron message to one runner. However, this one runner has its own built-in cron job that enqueues additional update-cron messages on a recurring schedule (Yes, this is a cron job that enqueues cron jobs, in a tactic known by the Reverb team as “cronception”). These subsequent update-cron’s can be picked up by any runner, so eventually all runners will have updated their crontabs.

9. Future Work
9.1 More Observability Metrics
Right now, all of Reverb’s observability is based on digesting logs from our Graphile workers. Developers can also view performance metrics via the AWS console, but we have yet to integrate these metrics with our UI or CLI. In addition, we are currently missing out on useful workflow state information that could be gathered directly from the Postgres queue, such as how many total functions are enqueued and how long they’ve been in the queue. Collecting all of this valuable engine data into a single place would improve the developer experience.
9.2 Long-Term Logs Storage
Reverb’s MongoDB server currently holds all logs from the entire app’s history. This is not ideal, as long-running Reverb instances will eventually fill up the server. Additionally, storing that many logs could lead to inefficiencies in our API’s offset-based pagination system. In the future, we would like to automate removing older logs from the server and storing them in an AWS S3 bucket.
9.3 waitForEvent Steps
Some event-based workflow engines, like Inngest, include a
waitForEvent step in their API. This step would hold
until a specific event occurs or a timeout has been reached. This is a
more flexible approach for developers than our current API allows.
In our current iteration, the developer would have to wait the full
timeout, then manually check if an event occurred or not. With
waitForEvent, the function would only continue executing
after the event fired and would only deplete the full timeout period
if the event never came. Both solutions have their use cases, but it
would be best to give developers the choice.
9.4 Multiple Language Support
Reverb currently only supports Typescript/Javascript due to their level of adoption within the industry.
However, not all developers are comfortable with the same languages. This is why Inngest, Temporal, and other paid solutions offer SDKs for a number of choices. Reverb already has a set interface for interacting with the Graphile Worker instances, which would make porting its functions server API to a multitude of other languages quite feasible.